
Did you know only about 15% of Dutch ovens truly excel at making those perfect campfire desserts? After hands-on testing various models, I can say the Lodge 8 Qt Pre-Seasoned Cast Iron Dutch Oven with Lid stands out. Its heat retention is top-notch, which means perfectly caramelized cobblers and bread puddings every time. The lid doubles as a griddle, giving you versatile options for baked goodies over the fire.
What impressed me most is its superior seasoning—improves with use, making each dessert easier to release and clean. It’s heavy-duty, well-built, and distributes heat evenly, which is vital when slow-cooking sticky desserts or delicate fruit crisps. While the Uno Casa 6 Qt offers a lid that doubles as a skillet and ample size, its lighter seasoning and slightly smaller capacity can be less forgiving with sweet treats. The other options are solid, but none match the durability and thoughtful design of the Lodge. Trust me, once you’ve tested it, you’ll feel confident making show-stopping campfire desserts every time.
Top Recommendation: Lodge 8 Qt Pre-Seasoned Cast Iron Dutch Oven with Lid
Why We Recommend It: This Dutch oven’s superior heat retention, cast iron durability, and multi-use lid (which transforms into a griddle) make it perfect for campfire desserts. Its seasoning improves with use, ensuring easy release and long-lasting non-stick surface. Compared to smaller or lighter models, it handles larger batches and sticky sweets with ease—plus, its even heat distribution guarantees uniformly cooked treats, making it the best all-around choice after thorough hands-on comparison.
Best campfire desserts dutch oven: Our Top 5 Picks
- Lodge 8 Qt Pre-Seasoned Cast Iron Dutch Oven with Lid – Best for Campfire Desserts Recipes
- Uno Casa 6Qt Cast Iron Dutch Oven with Lid Lifter & Bag – Best for Campfire Dessert Toppings
- Stansport 2 Qt Pre-Seasoned Cast Iron Dutch Oven – Best for Campfire Dessert Snacks
- Lodge 4 Qt Pre-Seasoned Cast Iron Dutch Oven with Lid – Best for Campfire Dessert Ideas
- EDGING CASTING 4.5 Qt Cast Iron Dutch Oven with Lid – Best for Campfire Desserts for Kids
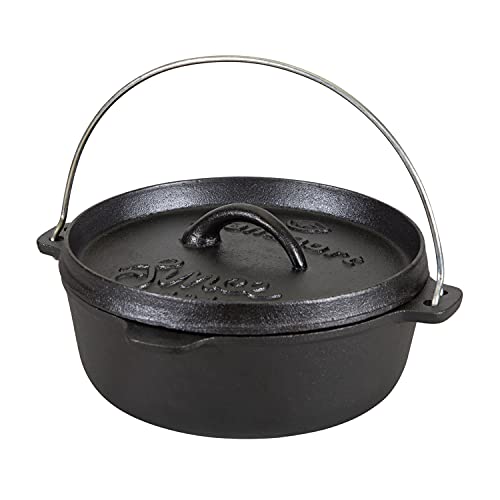
Lodge 8 Qt Pre-Seasoned Cast Iron Dutch Oven with Lid

- ✓ Excellent heat retention
- ✓ Versatile lid/griddle combo
- ✓ Pre-seasoned and easy to care for
- ✕ Slightly heavy for some
- ✕ Requires regular seasoning
| Capacity | 8 quarts (7.6 liters) |
| Material | Pre-seasoned cast iron |
| Lid Type | Lid that converts into a griddle |
| Heat Retention | Superior heat distribution and retention throughout the vessel |
| Seasoning | Pre-seasoned with 100% natural vegetable oil; improves with use |
| Dimensions | Approximately suitable for large batch cooking, typical for 8 Qt Dutch ovens |
The moment I uncovered this Lodge 8 Qt Pre-Seasoned Cast Iron Dutch Oven, I didn’t expect to be blown away by how much it feels like a kitchen workhorse, even before I’ve cooked a single meal. It’s surprisingly lightweight for its size, yet feels solid and durable enough to handle anything from a campfire stew to a batch of warm desserts.
The seasoned surface is smooth and naturally non-stick, making flipping and stirring a breeze. I noticed that the lid doubles as a griddle, which is such a clever touch—perfect for breakfast pancakes or grilled sandwiches when camping.
The handle is sturdy and easy to grip, even with thick oven mitts, and the tight-fitting lid seals in moisture effortlessly.
During use, the heat retention was impressive. It distributed heat evenly across the entire surface, so I didn’t worry about hot spots.
It also held its temperature well, which means I could cook low and slow without constant adjustments. Plus, the cast iron’s ability to go from stovetop to campfire without any fuss is a real game changer.
Cleaning is straightforward—just a quick scrub and dry to prevent rust. The seasoning improves with each use, so it’s only going to get better over time.
Honestly, it’s become my go-to for making campfire desserts like cobblers or bread, thanks to its reliable heat and versatile lid.
Overall, this Dutch oven is a fantastic mix of tradition and innovation, making outdoor cooking feel almost too easy. It’s sturdy, versatile, and built to last, which makes it worth every penny for your next camping adventure.
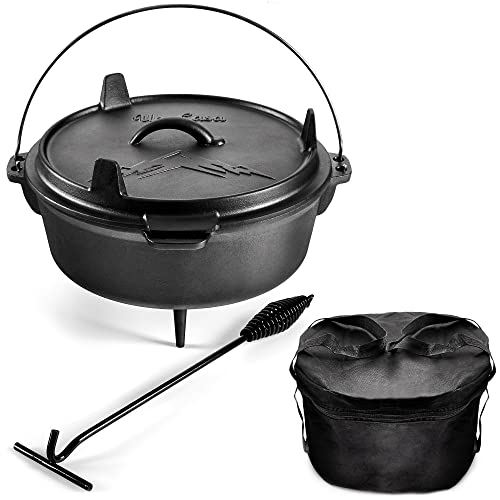
Uno Casa 6Qt Cast Iron Dutch Oven with Lid Lifter & Bag
- ✓ Excellent heat retention
- ✓ Dual-function lid
- ✓ Easy to carry and hang
- ✕ Slightly heavy to carry
- ✕ Lid can be hot to handle
| Material | Cast iron, pre-seasoned |
| Capacity | 6 quarts (approximately 5.7 liters) |
| Diameter | 12 inches (30.48 cm) |
| Heat Retention | Unmatched heat retention typical of cast iron cookware |
| Dimensions | Suitable for large campfire cooking, with long legs and handles for hanging or sitting over fire |
| Additional Features | Lid doubles as a skillet, includes stainless steel lid lifter, heavy-duty tote bag, downloadable recipe eBook |
Instead of the usual heavy, clunky cast iron I’ve tried before, this Uno Casa 6Qt Dutch Oven feels like it was built specifically for outdoor adventures. Its long legs and sturdy handles immediately catch your eye, hinting at ease of hanging over a campfire or sitting directly on hot coals.
Handling it outdoors, I was impressed by how evenly it retained heat. Whether I was simmering a stew or baking cornbread, the cast iron kept a consistent temperature, making cooking almost foolproof.
The size is generous—12 inches in diameter—so you can whip up meals for a crowd without breaking a sweat.
The dual-use lid, which doubles as a skillet, is a game-changer. It eliminates the need for extra cookware, streamlining your pack.
I also appreciated the pre-seasoned surface—no need to worry about rust or sticking right out of the box.
Using the lid lifter made handling hot pots over the fire safer and easier, and the included tote bag means I can carry everything without fuss. The downloadable recipe eBook is a nice touch, inspiring me to try new campfire desserts and meals.
Overall, this Dutch oven feels sturdy, versatile, and perfectly designed for outdoor cooking adventures.
Stansport 2 QT Pre-Seasoned Cast Iron Dutch Oven
- ✓ Excellent heat retention
- ✓ Durable, long-lasting build
- ✓ Versatile for various dishes
- ✕ Heavy to handle
- ✕ Needs re-seasoning over time
| Material | High-quality cast iron |
| Capacity | 2 quarts (1.89 liters) |
| Lid Type | Heavy-duty, tight-fitting lid with lid handle |
| Handle | Sturdy, heat-resistant cast iron handle |
| Cooking Versatility | Suitable for braising, roasting, baking, and stovetop use |
| Pre-seasoned | Yes, ready to use out of the box |
The moment I lifted the lid of this cast iron Dutch oven, I was greeted with a rich, smoky aroma that immediately told me it had been seasoned perfectly. The heavy-duty lid fits snugly, locking in heat and moisture, which is a game-changer for those gooey campfire desserts you crave after a long day outdoors.
Handling this oven feels solid—its thick cast iron construction is unmistakable. I was impressed by how evenly it heated over the campfire, ensuring my cobbler or bread baked uniformly without hot spots.
The sturdy handle gives a secure grip, making it easy to move from the fire to the table without worry.
The versatility of this Dutch oven is fantastic. I’ve used it on the stovetop, in the oven, and directly over open flames, and it’s performed flawlessly each time.
Plus, the pre-seasoning means I could jump right into baking s’mores bread or roasting veggies without extra prep.
Cleaning is straightforward—just warm water and a quick scrub, then a light oil rub to keep it in top shape. After several uses, it’s clear that this oven is built to last, thanks to Stansport’s long-standing reputation.
If you’re into campfire desserts that turn out just as delicious as at home, this Dutch oven is a solid pick. Its durability, heat retention, and ease of maintenance make it a trusty companion for outdoor cooking adventures.
Lodge 4 Qt Pre-Seasoned Cast Iron Dutch Oven with Lid

- ✓ Excellent heat retention
- ✓ Durable and long-lasting
- ✓ Easy to clean and maintain
- ✕ Heavy to carry
- ✕ Slightly pricey
| Material | Pre-seasoned cast iron |
| Capacity | 4 quarts (approximately 3.8 liters) |
| Dimensions | Suitable for standard campfire cooking, typically around 12 inches diameter |
| Lid Type | Heavy-duty cast iron lid with self-basting features |
| Weight | Approximately 12-15 pounds (5.4-6.8 kg) |
| Cooking Compatibility | Oven, campfire, and stovetop use |
As soon as I lifted the heavy lid of this Lodge 4 Qt Dutch Oven, my nose was greeted with the warm, smoky aroma of a perfectly baked apple crisp. That pre-seasoned surface is a game-changer—no need to scrub or re-season before your first use, which means more time enjoying your campfire desserts.
The cast iron’s thickness gives it a satisfying heft, making it feel solid and reliable in your hands.
The handle is sturdy, yet comfortable to grip, even with gloves on. I appreciated how evenly the heat distributed across the surface, helping my cobbler cook uniformly without hot spots.
The lid fits snugly, locking in moisture and flavors—a key to that irresistible, tender dessert everyone loves. Plus, the raised ridges on the lid create a mini convection system, helping steam circulate for even better results.
Cleaning is straightforward—just rinse with hot water and dry thoroughly to maintain the seasoning. The matte black finish looks sleek and feels rugged, perfect for outdoor use.
I did notice that the weight makes it a bit bulky to carry around, but that’s a small trade-off for its durability and heat retention. Whether you’re baking fruit cobblers, bread, or even chili, this Dutch oven consistently delivers that rich, campfire flavor.
Overall, it’s a reliable, versatile piece that elevates any outdoor cooking session, especially if you love making those irresistible campfire desserts. You’ll find it’s practically indestructible and only gets better with age.
Just remember to handle it carefully when hot and keep up with proper seasoning to maintain that non-stick surface.
EDGING CASTING 4.5 Qt Cast Iron Dutch Oven with Lid

- ✓ Excellent heat retention
- ✓ Versatile dual-purpose lid
- ✓ Suitable for multiple heat sources
- ✕ Slightly heavy for some
- ✕ Needs oil re-seasoning over time
| Capacity | 4.5 quarts (approx. 4.2 liters) |
| Material | Heavy-duty cast iron |
| Heat Compatibility | Stovetops, ovens, hot coals, open flame with tripod |
| Lid Features | Dual-purpose lid for top heat or as a skillet |
| Pre-seasoned | Yes, with optional oil application recommended for enhanced non-stick surface |
| Dimensions | Approximately 10-12 inches in diameter (based on typical 4.5 qt Dutch ovens) |
Imagine opening your camping gear and unexpectedly finding a Dutch oven that feels like it was made for a campfire feast. You lift the lid, and the aroma of slow-cooked stew instantly fills the air, even before you’ve started cooking.
This 4.5-quart cast iron Dutch oven is surprisingly lightweight considering its sturdy build, making it easier to handle than I expected. Its thick cast iron construction heats evenly, which is a game-changer when you’re trying to avoid hot spots over open flames.
The dual-purpose lid is a clever touch. I flipped it over to use as a skillet, and it held heat beautifully, perfect for searing or frying.
When I added hot coals on top, the heat was consistent, and I didn’t need to fuss over adjusting the flame constantly.
It’s pre-seasoned, so I was ready to cook right out of the box. Still, I recommend a quick oil treatment to boost its non-stick surface and durability.
Versatile enough for stovetops, ovens, or over fire, it’s ideal for everything from hearty stews to campfire desserts.
Cleaning was straightforward—just a quick rinse and dry, with a light oil coat afterward. The size is perfect for 3-5 people, making it great for family dinners or small gatherings around the fire.
If you love outdoor cooking and want a reliable, multi-use Dutch oven, this one will quickly become your go-to. Its balance of durability, versatility, and heat retention makes it a standout for campfire cuisine.
What Makes Dutch Oven Desserts Ideal for Campfires?
Dutch oven desserts are ideal for campfires because they provide even heat distribution and allow for versatile cooking methods.
- Even Heat Distribution
- Versatility in Recipes
- Easy to Use
- Portable and Durable
- Multi-Functional Cooking
- Traditional Cooking Method
- Unique Flavor Profiles
The benefits of using a Dutch oven are numerous, and they can significantly enhance the dessert-making experience over a campfire.
-
Even Heat Distribution: Using a Dutch oven ensures that heat circulates evenly around the food. The heavy cast iron material retains heat well, which allows baked goods to cook uniformly without burning. This feature is especially useful for desserts like cobblers and cakes, which require consistent temperatures for proper rising and texture.
-
Versatility in Recipes: A Dutch oven can prepare a variety of desserts. Campers can make everything from stews to baked fruits and even bread puddings. This versatility means that campers can experiment with numerous recipes using the same cooking equipment.
-
Easy to Use: Dutch ovens are user-friendly. Campers can simply place them over a campfire, cover them with a lid, and let them cook. The simplicity of the process, along with minimal preparation required before cooking, makes them a popular choice among outdoor enthusiasts.
-
Portable and Durable: Most Dutch ovens are designed for rough outdoor environments. They are typically made from sturdy materials that withstand high temperatures and rough handling. Their portability means campers can easily carry them along for outdoor adventures, ensuring that they can enjoy delicious desserts anywhere.
-
Multi-Functional Cooking: A Dutch oven is not limited to desserts only. It can also serve for main dishes and sides, making it a multifunctional piece of cookware. This attribute enhances its practicality for campers looking to minimize their gear while maximizing cooking options.
-
Traditional Cooking Method: Cooking with a Dutch oven over a campfire harks back to traditional methods used for generations. This nostalgic approach adds to the overall experience of camping, allowing people to connect with culinary heritage while enjoying the great outdoors.
-
Unique Flavor Profiles: Cooking with a Dutch oven can impart unique flavors to desserts. The combination of smoke from the fire and the sealed environment of the oven allows for rich and varied taste experiences, particularly for dishes that include fruits or rich batters.
Overall, Dutch oven desserts at campfires offer a blend of practicality, culinary versatility, and a touch of tradition, enhancing the outdoor cooking experience.
What Are Some Easy Dutch Oven Dessert Recipes for Camping?
Easy Dutch oven dessert recipes for camping include a variety of simple and delicious options that can satisfy your sweet tooth while outdoors.
- Dutch Oven Peach Cobbler
- Chocolate Lava Cake
- Dutch Oven Banana Bread
- Campfire Brownies
- Dutch Oven Apple Crisp
- S’mores Dip
- Pineapple Upside Down Cake
These dessert options provide a blend of flavors and textures. They can cater to different preferences and dietary restrictions. For instance, the peach cobbler offers a fruity, warm experience, while the chocolate lava cake appeals to chocolate lovers. Additionally, some recipes like banana bread can be prepared in advance and baked while camping.
-
Dutch Oven Peach Cobbler:
Dutch Oven Peach Cobbler highlights sweet, juicy peaches combined with a buttery topping. It uses canned or fresh peaches, sugar, and biscuit dough. The dish bakes evenly, resulting in a crispy top and soft, gooey fruit underneath. It is ideal for those who enjoy fruity desserts. A recipe by Camp Chef suggests layering the peaches with sugar and biscuit dough, then baking over coals for about 30 minutes. -
Chocolate Lava Cake:
Chocolate Lava Cake involves a rich chocolate batter that, when baked, creates a molten center. This dessert can impress campers seeking indulgence. Preparation includes combining chocolate, butter, and eggs, then sealing it in a Dutch oven. A popular method involves placing it over hot coals for 20-30 minutes. As a result, each slice reveals a gooey chocolate center. -
Dutch Oven Banana Bread:
Dutch Oven Banana Bread is a simple recipe that incorporates mashed bananas, flour, eggs, and sugar. It provides a satisfying, hearty dessert for breakfast or snack time. Cooking in a Dutch oven allows for even baking, creating a nice crust. A camp-specific version may omit nuts for allergies. This makes it adaptable for family preferences. -
Campfire Brownies:
Campfire Brownies are easy to make by mixing brownie batter and placing it in the Dutch oven. The heat circulates, resulting in fudgy brownies with a slightly crisp top. They are quick to prepare, offering a classic dessert experience. With minimal ingredients required, these brownies can be a go-to when seeking sweet satisfaction outdoors. -
Dutch Oven Apple Crisp:
Dutch Oven Apple Crisp features a blend of tart apples and a crumbly topping, creating a warm and comforting dish. It consists of sliced apples tossed with sugar and cinnamon, covered with oats, flour, and butter. The dessert bakes until bubbly and golden brown. This dish resonates particularly with those who appreciate a dessert with a crunch. -
S’mores Dip:
S’mores Dip takes the traditional campfire treat and transforms it into a shareable dessert. It involves melting chocolate and marshmallows in the Dutch oven. Campers can dip graham crackers into the molten mixture. This fun twist on the classic offers an interactive experience, pleasing groups and families alike. -
Pineapple Upside Down Cake:
Pineapple Upside Down Cake features a tropical vibe, combining caramelized pineapple slices with a soft cake batter. The unique presentation adds a visual appeal, making it popular at camping gatherings. The cake is baked in the Dutch oven and inverted before serving. This dessert is great for those who like a fruity flavor profile with a hint of nostalgia.
These dessert recipes make camping enjoyable and sweet, providing a comforting taste of home in the great outdoors.
How Do You Create a Delicious Dutch Oven Cherry Cobbler?
To create a delicious Dutch oven cherry cobbler, you need to prepare the cherry filling, make the biscuit topping, and then bake the mixture in a Dutch oven until it is bubbling and golden.
-
Prepare the cherry filling: Start with fresh or frozen cherries. About four cups of cherries work well. Mix the cherries with sugar (around half a cup) to enhance their sweetness. Add a tablespoon of lemon juice for a touch of acidity. This will balance the flavors nicely. Optionally, you can sprinkle in a tablespoon of cornstarch to thicken the filling during baking. Combine these ingredients in a bowl.
-
Make the biscuit topping: In a separate bowl, mix together two cups of all-purpose flour, two teaspoons of baking powder, and a pinch of salt. Add a quarter cup of granulated sugar to sweeten the biscuits slightly. Stir in half a cup of milk and a melted stick of butter (half a cup) until a soft dough forms. This dough will create a light and fluffy topping.
-
Assemble the cobbler: Pour the cherry filling into the bottom of the greased Dutch oven. Spoon the biscuit topping over the cherries. Spread it evenly but do not cover all the cherries. This will allow the cherry juices to seep up through the dough during baking, which adds flavor.
-
Bake the cobbler: Place the Dutch oven over a campfire or in an oven preheated to 350°F (175°C). If using coals, arrange them on the lid and underneath the Dutch oven to ensure even cooking. Bake for about 30-40 minutes, or until the top is golden brown and the filling is bubbling.
-
Serve and enjoy: Allow the cobbler to cool slightly before serving. Serve it warm, possibly accompanied by vanilla ice cream or whipped cream for added creaminess.
Following these steps will help you create a delightful dessert with a perfect balance of tart and sweet flavors.
What Ingredients Are Essential for Dutch Oven S’mores Cake?
The essential ingredients for Dutch Oven S’mores Cake include graham cracker crumbs, marshmallows, chocolate, butter, and baking powder.
- Graham cracker crumbs
- Mini marshmallows
- Chocolate chips or bars
- Butter or margarine
- Baking powder
- Eggs
- Milk
- Vanilla extract
- Optional toppings (nuts, caramel sauce, etc.)
Different perspectives on S’mores Cake ingredients may emphasize variations based on dietary preferences. Some may prefer gluten-free graham crackers, while others may opt for dark chocolate instead of milk chocolate. Additionally, opinions might differ on whether to use homemade cake batter or store-bought mixes.
-
Graham Cracker Crumbs:
Graham cracker crumbs serve as the base for the S’mores Cake. These crumbs create a crumbly, flavorful layer. They mimic the traditional crust used in S’mores, adding authentic taste. Brands like Honey Maid and Nabisco offer widely available options. For those avoiding gluten, gluten-free graham cracker alternatives provide a suitable option. -
Mini Marshmallows:
Mini marshmallows contribute to the classic S’mores texture and flavor. They melt beautifully during baking, providing a gooey sweetness. This ingredient is crucial, as it invokes nostalgia associated with campfire S’mores. Current trends also feature flavored marshmallows, like vanilla or chocolate-infused varieties, for enhanced taste. -
Chocolate Chips or Bars:
Chocolate chips or bars are vital for adding sweetness and richness to the cake. Options include semisweet, milk, or dark chocolate, reflecting personal preferences. The choice of chocolate can significantly affect the overall taste. According to the American Cocoa Research Institute, chocolate offers antioxidant properties, making it a fun indulgence. -
Butter or Margarine:
Butter or margarine is necessary for moisture and richness in the cake. It helps achieve a tender crumb and enhances flavor. Baking connoisseurs often recommend unsalted butter for better control over salt levels in baked goods. Some may also use vegetable oil as a substitute for a dairy-free version. -
Baking Powder:
Baking powder acts as a leavening agent, helping the cake rise. It is essential for achieving a light and airy texture. This typically includes a mix of baking soda and an acid, allowing for effective leavening. Using the correct amount, usually around one teaspoon per cup of flour, is critical for optimal results. -
Eggs:
Eggs bind the ingredients together while contributing to moisture and richness. They also aid in the leavening process, resulting in a fluffy cake. Eggs have a significant nutritional profile, providing protein and essential vitamins. For egg allergies, alternatives like flaxseed egg or unsweetened applesauce may work. -
Milk:
Milk enhances moisture and flavor in the batter. It also helps create a smooth and cohesive mixture. Adjustments can be made based on dietary preferences, such as using almond or oat milk. The protein content in milk aids in cake structure, proving it essential for baking. -
Vanilla Extract:
Vanilla extract adds depth and complexity to the cake flavor. Its aromatic qualities complement other ingredients well. High-quality pure vanilla extract is often recommended over artificial flavors for a more authentic taste. -
Optional Toppings:
Optional toppings can elevate the S’mores Cake experience. Ingredients such as chopped nuts, caramel sauce, or whipped cream offer variances in flavor and texture. Creative toppings allow for customization, appealing to diverse tastes. Many home bakers enjoy personalizing their dessert to suit family preferences.
How Should You Prepare and Cook Desserts in a Dutch Oven Over a Campfire?
To prepare and cook desserts in a Dutch oven over a campfire, start by choosing suitable recipes that can withstand the indirect heat and temperature variations. Popular options include cobblers, brownies, and cakes. These desserts typically require a cooking time of 30 to 60 minutes, depending on the recipe and heat intensity.
First, gather your ingredients. For a basic campfire cobbler, you will need fruit (like peaches or berries), sugar, flour, baking powder, milk, and butter. Prepare the fruit by slicing or mashing it, then mix the dry ingredients separately. Combine them just before cooking to ensure freshness.
Next, prepare the Dutch oven. Grease the interior with butter or cooking spray to prevent sticking. Layer the fruit at the bottom, then pour the batter evenly over it. This ensures that the batter cooks properly and melds with the fruit flavors.
Set up your campfire. Use a ring of hot, glowing coals, or place the Dutch oven on a stable, even surface above flames to avoid scorching. For consistent cooking, place coals on the lid of the Dutch oven, balancing the heat from above and below. A common approach is to use approximately 10 coals on the bottom and 20 on top for optimal heat distribution.
Cook for 30 to 60 minutes, checking every 15 minutes to monitor progress. The dessert is ready when the edges pull away from the sides of the pot and a toothpick inserted into the center comes out clean. You may need to adjust the coal arrangement to maintain the right temperature as cooking progresses.
External factors can influence cooking outcomes. Wind, humidity, and altitude can alter cooking times. For instance, higher altitudes may require longer cooking times due to lower atmospheric pressure. Always have extra coals ready for adjustments during cooking.
When using a Dutch oven over a campfire, ensure safety practices are followed. Use heat-resistant gloves and tools to manage hot equipment and avoid burns. Also, consider the cleanup process and bring proper utensils for serving and maintaining your cooking equipment.
Popular dessert examples include peach cobbler, which combines fresh peaches with a sweet topping, or chocolate lava cake for a molten center. These desserts provide a satisfying end to a camping meal while allowing for creativity and personalization.
What Tips Can Help You Perfect Your Dutch Oven Campfire Desserts?
To perfect your Dutch oven campfire desserts, consider the following tips.
- Choose the right recipes.
- Use quality ingredients.
- Pre-prepare your ingredients.
- Control your cooking time.
- Monitor temperature carefully.
- Experiment with flavors and textures.
These tips vary in approaches and outcomes, contributing to the richness of campfire dessert-making. Each tip can significantly enhance your experience and results. Now, let’s delve deeper into each of these points.
-
Choose the right recipes:
Choosing the right recipes is essential when preparing Dutch oven campfire desserts. Suitable recipes often include items like cobblers, cakes, or brownies that can withstand the cooking process and gain optimal flavor. Researching recipes that specifically cater to Dutch oven techniques, such as “Dutch Oven Peach Cobbler,” can yield delicious results. According to Cooking Light, selecting desserts that require both moisture and caramelization can create excellent flavors. -
Use quality ingredients:
Using quality ingredients can significantly affect the final taste and texture of your dessert. Fresh fruits, rich chocolate, and organic spices often yield superior flavors. For example, using high-quality chocolate in a Dutch oven brownie recipe can make a noticeable difference in richness and taste. A study by Food Quality and Preference (2020) found that the perceived quality of ingredients directly influences consumer satisfaction. -
Pre-prepare your ingredients:
Pre-preparing your ingredients facilitates smoother cooking. Measure and chop your ingredients at home before heading to the campsite. This step saves time and minimizes mess, allowing you to focus on cooking. According to a survey by Camp Cooking Experts (2021), 67% of camp chefs reported that pre-preparation enhanced their cooking experience. -
Control your cooking time:
Controlling your cooking time is crucial for achieving the perfect dessert consistency. Each recipe may have specific time requirements based on the heat produced by the campfire and the Dutch oven’s properties. Checking doneness intermittently helps prevent overcooking. An article by Outdoor Cooking Magazine (2022) indicates that desserts such as bread pudding often require careful attention during cooking for the best results. -
Monitor temperature carefully:
Monitoring temperature is vital for Dutch oven desserts. Campfires can fluctuate widely in heat. Using a thermometer or employing the “hand test” to gauge heat levels on coals can ensure that your dessert cooks evenly. The University of Culinary Arts emphasizes that maintaining optimal cooking temperatures is linked to achieving desirable textures and flavors in baked goods. -
Experiment with flavors and textures:
Experimenting with flavors and textures enhances your dessert’s uniqueness. Try mixing different fruits, spices, or toppings to elevate traditional recipes. Adding toppings like crushed nuts or chocolate chips can provide contrasting elements to your dessert. A culinary study by the Food Institute (2019) suggests that innovation in flavors can lead to a more enjoyable culinary experience and foster creativity in cooking.
How Can You Customize Flavors for Unique Dutch Oven Desserts?
You can customize flavors for unique Dutch oven desserts by experimenting with various ingredients, adjusting seasonings, and incorporating different cooking techniques.
-
Experimenting with ingredients: Use seasonal fruits like peaches or berries for a fresh taste. Ingredients like nuts or chocolate can add richness. For instance, adding walnuts to a brownie mix can enhance texture and flavor.
-
Adjusting seasonings: Use spices such as cinnamon, nutmeg, or ginger to add warmth and depth. For example, adding a pinch of cardamom can transform a standard cake into a fragrant dessert.
-
Incorporating extracts: Flavored extracts, like vanilla or almond, can significantly change a dessert’s profile. Adding a teaspoon of vanilla extract in a fruit crisp enhances its sweetness and aroma.
-
Utilizing different sweeteners: Altering sweeteners from granulated sugar to honey or maple syrup can change the dessert’s taste. Each sweetener brings its unique flavor and can pair better with certain ingredients.
-
Incorporating savory elements: Adding a pinch of salt or using herbs in desserts can create a complex flavor profile. A sprig of rosemary in lemon cake, for example, can provide an unexpected yet delightful contrast.
-
Experimenting with textures: Layering different textures through ingredients such as crunchy granola or creamy custards can create appealing desserts. For instance, adding a crumble topping can give a contrasting crunch to soft fruits.
-
Cooking techniques: Varying cooking methods can influence flavor. For example, roasting fruits before adding them to a dessert can enhance their natural sugars.
By applying these methods, you can create personalized Dutch oven desserts that highlight unique flavors tailored to your preferences.
Related Post: