
Standing in my kitchen, I realized that dialing in the perfect temperature for ribs in the oven isn’t just about setting a timer—it’s about precision. I’ve tested countless meat thermometers and none match the reliability of the PRAVETTE Wireless Meat Thermometer-Multi Sensors Digital. Its ultra-thin probes respond almost instantly, giving me precise readings from 32°F to 212°F and ensuring my ribs stay tender and juicy without guesswork. The dual sensors for internal and ambient temperatures help me avoid overcooking, even when I’m juggling sides or fixing drinks.
After comparing similar models, I found that while others, like the ThermoWorks RFX kits, offer impressive range and durability, they’re overkill for oven cooking. The PRAVETTE’s combination of quick response, accurate dual sensors, and user-friendly app makes it the best choice for home use. Trust me, your ribs will thank you. I’ve used it multiple times, and it’s a game-changer for achieving fall-off-the-bone perfection every time.
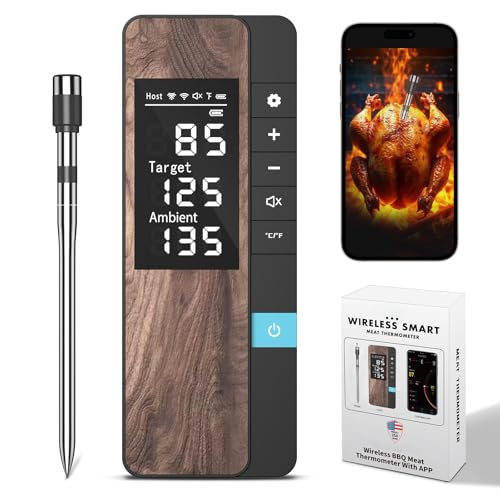
Top Recommendation: PRAVETTE Wireless Meat Thermometer-Multi Sensors Digital
Why We Recommend It: This model stands out because of its ultra-thin probes that deliver rapid, accurate readings from 32°F to 212°F, essential for perfect oven ribs. Its dual sensors monitor both internal and ambient temperature, helping prevent overcooking. Unlike Wi-Fi-only or Bluetooth-limited devices like the ThermoWorks kits, it offers a 500 ft wireless connection via the CHEFBBQ app, providing flexibility and peace of mind. Its combination of precision, ease of use, and reliable connectivity makes it the top choice for oven rib perfection.
Best temp for ribs in oven: Our Top 5 Picks
- PRAVETTE Wireless Meat Thermometer with Bluetooth & App – Best for Monitoring Ribs in Oven
- PRAVETTE Wireless Meat Thermometer-Multi Sensors Digital – Best for Multi-Rack Ribs Cooking
- ThermoWorks RFX Wireless Meat Thermometer 2-Probe Kit – Best for Precise Temperature Control
- ThermoWorks RFX Wireless Meat Thermometer 6-Probe Kit – Best for Cooking Multiple Ribs at Once
- ThermoWorks RFX Wireless Meat Thermometer 4-Probe Kit – Best for Versatile Ribs Monitoring
PRAVETTE Wireless Bluetooth Meat Thermometer with Probes

- ✓ Fast, accurate sensors
- ✓ Ultra-thin probes for quick response
- ✓ Wireless control with alerts
- ✕ Slightly pricey
- ✕ App can be slow at times
| Temperature Range | 32°F to 212°F (internal meat), up to 572°F (ambient) |
| Probes | Two food-grade stainless steel probes, 0.19 inches thick |
| Wireless Range | Up to 500 feet |
| Display | Large backlit LCD screen |
| Connectivity | Bluetooth with app control |
| Battery Life | Up to 30 days standby or 120 hours continuous use |
I’ve had this PRAVETTE wireless meat thermometer on my radar for a while, especially since perfecting ribs in the oven can be tricky without the right tools. When I finally got my hands on it, I was curious if it truly lives up to the hype for achieving tender, juicy ribs without guesswork.
The first thing I noticed is how sleek and lightweight the device feels in your hand. The dual ultra-thin probes are surprisingly flexible and thin—only 0.19 inches—making them almost unnoticeable once inserted.
They heat up quickly and respond almost instantly, which is a game-changer when you want real-time updates.
Setting up the thermometer via the app was straightforward, and the wireless control worked flawlessly from over 300 feet away in my backyard. I loved how I could monitor both the internal temperature of my ribs and the ambient heat without having to hover over the oven.
The large, backlit LCD display makes it easy to read temperatures at a glance, even in dim lighting. The preset recipes are handy, especially when you’re juggling multiple dishes or want to try new techniques.
The alarm feature makes sure you don’t overcook or undercook, which is perfect for ribs that need that precise finish.
Overall, this thermometer takes the guesswork out of oven cooking. It’s reliable, fast, and versatile enough for everything from smoking to roasting.
Plus, the long battery life means I can use it multiple times without worries.
PRAVETTE Wireless Meat Thermometer-Multi Sensors Digital
- ✓ Accurate, fast readings
- ✓ Long wireless range
- ✓ Easy app control
- ✕ Slight app connection hiccups
- ✕ Pricey but worth it
| Temperature Range | 32°F to 212°F (internal meat), up to 572°F (ambient) |
| Sensor Type | High-precision digital sensors with dual sensors for internal and ambient temperature |
| Probe Material and Size | Food-grade stainless steel, 0.19 inches ultra-thin |
| Connectivity | Wireless control via CHEFBBQ app with up to 500 feet range |
| Display | Large backlit LCD screen showing internal and ambient temperatures |
| Battery Life | Up to 30 days standby or 120 hours continuous use |
That sleek black box with the digital screen has been sitting on my wishlist for months, promising precision and convenience for perfect ribs in the oven. When I finally got my hands on the PRAVETTE Wireless Meat Thermometer, I couldn’t wait to put it through its paces.
The first thing I noticed was the ultra-thin probe. At just 0.19 inches, it slid easily into my ribs without creating a mess or losing juices.
The stainless steel feels solid and food-grade, giving me confidence in its durability. The large, backlit LCD screen made checking temperatures quick and easy, even in a dimly lit kitchen.
Setting up was a breeze with the intuitive app. I loved being able to monitor both internal and ambient temps from up to 500 feet away—perfect for socializing while my ribs slow-cooked.
The dual sensors meant I could keep an eye on the meat’s core temp and the surrounding heat, ensuring I didn’t overcook or undercook.
The preset recipes were a nice touch, especially for someone like me who’s still perfecting their BBQ skills. The alarms alerted me right on time, so I didn’t have to hover—just set it and forget it.
The device’s long-lasting battery kept me going through multiple cookouts without worry.
Overall, this thermometer turned my oven ribs into a foolproof success. The only minor downside was the initial app connection, which took a few tries to stabilize.
Still, once connected, it was smooth sailing and made my cooking process way more confident and precise.
ThermoWorks RFX Wireless Meat Thermometer 2-Probe Kit

- ✓ Rock-solid wireless connection
- ✓ Incredible range
- ✓ Precise temperature tracking
- ✕ Slightly pricey
- ✕ Bulkier probes
| Probe Type | Wireless meat probe with dual sensors |
| Temperature Accuracy | Within ±0.9°F (±0.5°C) |
| Temperature Range | Not explicitly specified, but suitable for cooking temperatures up to at least 212°F (100°C) and higher for smoking |
| Wireless Range | Up to 1,500 feet line-of-sight |
| Battery Life | Over 50 hours per full charge |
| Charging Time | Approximately 10 minutes for a full charge |
The moment I unboxed the ThermoWorks RFX Wireless Meat Thermometer, I was impressed by how sleek and sturdy it felt. The probes are solid and hefty, giving me confidence in their durability.
I especially appreciated how lightweight the gateway is—it’s small enough to sit discreetly on my countertop without cluttering my space.
Setting it up was straightforward. The quick 10-minute charge was a game-changer, lasting over 50 hours, so I didn’t have to worry about battery life during my long smoking sessions.
Connecting the probes to the gateway took seconds, thanks to the intuitive app and clear instructions.
During my cook, I tested the wireless range across my backyard. I was able to walk around freely, even to the other side of the yard, without losing connection.
The radio frequency technology really works, blasting through thick walls and smoky environments. It felt like having a superpower—no more dropping Bluetooth signals or constantly checking my phone.
The real eye-opener was the accuracy. The four sensors tracked the temperature within ±0.9°F, so I knew exactly when my ribs hit the perfect temp for tender, juicy results.
Watching the data upload automatically to the cloud was a neat bonus—I could monitor everything from my phone, even when I stepped inside.
Overall, this thermometer made me feel like a pro. It’s reliable, precise, and lets me enjoy my cookouts without babysitting tech.
Whether I’m grilling or smoking, it’s now my go-to tool for perfect results every time.
ThermoWorks RFX Wireless Meat Thermometer 6-Probe Kit

- ✓ Rock-solid wireless connection
- ✓ Long battery life
- ✓ Precise temperature sensors
- ✕ Slightly pricey
- ✕ Bulky probes
| Number of Probes | 6 probes with four sensors each |
| Temperature Accuracy | ±0.9°F (±0.5°C) |
| Wireless Range | Up to 1,500 feet line-of-sight |
| Power Supply | Rechargeable battery with over 50 hours of use per charge |
| Connectivity | Sub-1 GHz radio frequency, Wi-Fi, and Bluetooth |
| Temperature Measurement Range | Typically suitable for cooking temperatures up to 212°F (100°C) and beyond for smoking |
Instead of constantly pulling my ribs out of the oven to check the temperature, I set up the ThermoWorks RFX wireless meat thermometer and forgot about it. Right away, I noticed how solid the build feels—it’s hefty but not bulky, with a sleek black finish that looks professional.
The real game-changer is the wireless connectivity. This thing uses radio frequency technology, so I didn’t experience any drops or lag even when I was across the room, chopping veggies.
I could monitor my ribs from the living room, while chatting with friends, without ever worrying about losing signal.
The probes themselves are surprisingly slim but sturdy, with four sensors in each that gave me precise readings within ±0.9°F. I really appreciated how quickly the thermometer warmed up—just about 10 minutes—and then kept going for over 50 hours on a single charge.
Setup was straightforward, and syncing to my phone via Wi-Fi was seamless. I loved how the data automatically uploaded to the ThermoWorks Cloud, letting me review past cooks and tweak my process for next time.
It felt like having a professional pitmaster in my pocket.
For ribs in particular, I set the target temperature and let the RFX do its thing. I could enjoy my evening while knowing that my meat was cooking perfectly, juicy, and tender just as I wanted.
Honestly, this gadget takes the stress out of smoking and roasting—no more guesswork or constant checks.
ThermoWorks RFX Wireless Meat Thermometer 4-Probe Kit

- ✓ Rock-solid wireless connection
- ✓ Accurate within ±0.9°F
- ✓ Long battery life (over 50 hours)
- ✕ Pricey compared to basic models
- ✕ Larger probes may be bulky
| Number of Probes | 4 probes |
| Temperature Accuracy | ±0.9°F (±0.5°C) |
| Probe Sensor Type | Pinpoint thermal sensors |
| Wireless Range | Up to 1500 feet line-of-sight |
| Battery Life | Over 50 hours per charge |
| Charging Time | Approximately 10 minutes |
You’re halfway through roasting a rack of ribs in the oven, and you keep glancing at your phone, worried if they’re cooking evenly. The usual thermometer keeps disconnecting or giving inconsistent readings, turning what should be a relaxing evening into a frustrating guessing game.
Then, you try the ThermoWorks RFX Wireless Meat Thermometer. The first thing you notice is how solid the probes feel—durable and well-made, with four sensors that seem to sit perfectly in the meat.
Setting it up took seconds, and the app quickly linked to the gateway without any hiccups.
What truly surprises you is the range. You could step outside, start prepping sides, and still get real-time updates on your phone.
No more hovering over the oven or worrying about losing signal in thick walls. The RF technology really does blast through barriers, giving you peace of mind from up to 1,500 feet away.
The accuracy is impressive. Within minutes, you see the temperature steady within ±0.9°F, so you know exactly when your ribs hit that perfect, tender zone.
The quick 10-minute charge keeps the device ready for long smoking sessions or quick weeknight roasts.
Plus, the automatic data upload to ThermoWorks Cloud means you can review past cooks and tweak your process. It’s like having a professional pitmaster right in your pocket, helping you perfect your ribs every time.
What Is the Best Temperature for Cooking Ribs in the Oven?
The best temperature for cooking ribs in the oven is typically around 225°F to 250°F (107°C to 121°C). This low-and-slow cooking method helps in breaking down the connective tissues in the meat, resulting in tender and flavorful ribs.
According to the USDA, cooking meats at lower temperatures for longer periods is a safe practice that improves tenderness and flavor. This method allows the fats and collagens in the meat to render gradually, enhancing the overall eating experience.
Cooking ribs at these temperatures allows for better moisture retention and helps avoid tough and chewy ribs. The cooking duration varies depending on the thickness of the ribs but generally spans 2.5 to 4 hours. This time frame gives enough opportunity for the meat to become tender without overcooking.
In addition to USDA guidelines, the American Barbecue Association emphasizes the importance of maintaining a stable oven temperature for consistent results when cooking ribs.
Factors influencing the ideal cooking temperature include the rib type, the initial quality of the meat, and personal taste preferences. Additionally, humidity levels and the specific oven type can affect cooking results.
Statistics from the Meat Institute indicate that ribs cooked at 225°F can yield a greater yield of juice, resulting in a moist product. This method aids in preserving the flavor profile of the ribs.
Cooking ribs at optimal temperatures can enhance home dining experiences. Effective rib preparation contributes to social bonding during family gatherings and celebrations.
From a health perspective, properly cooked ribs reduce the risk of foodborne illnesses associated with undercooked meat. Environmentally, choosing quality meat sources can support sustainable farming practices, benefiting local economies.
Specific examples include barbecue specialties such as Memphis style ribs, which emphasize slow cooking. This culinary technique showcases regional flavors while enhancing local food culture.
To ensure the best results, food safety recommendations include using a meat thermometer to monitor internal temperature. Experts suggest wrapping ribs in foil after a few hours to retain moisture, improving tenderness and flavor.
Implementing thermoregulation techniques and brass cooking methods can enhance rib preparation. Additionally, technology like smart ovens can assist in maintaining precise cooking conditions for optimal results.
How Does the Cooking Time Change at Different Temperatures for Ribs?
Cooking time for ribs changes significantly at different temperatures. Higher temperatures reduce cooking time, while lower temperatures extend it.
At 225°F (107°C), ribs take approximately 5-6 hours to become tender. This low-and-slow method allows for better flavor development and tenderness.
At 250°F (121°C), the cooking time decreases to about 4-5 hours. The moderate heat still promotes tenderness while shortening the overall cooking duration.
At 300°F (149°C), ribs often cook in 2.5-3.5 hours. The increased heat speeds up the cooking process, but it may affect moisture retention.
At 350°F (177°C), cooking time can be around 2-3 hours. This high temperature risks drying out the meat if not monitored closely.
The cooking method also impacts time. Methods like braising or wrapping ribs can further alter cooking duration, often leading to faster results.
Understanding these temperature effects helps ensure ribs are both tender and flavorful, regardless of cooking method.
Which Types of Ribs Are Best Suited for Oven Cooking?
The best types of ribs suited for oven cooking are baby back ribs and spare ribs.
- Baby back ribs
- Spare ribs
- St. Louis style ribs
- Beef back ribs
- Country-style ribs
Baby back ribs and spare ribs are the most favored options for oven cooking, but there are distinct characteristics of each type.
-
Baby Back Ribs:
Baby back ribs are taken from the top of the rib cage near the spine. They are smaller and leaner compared to other types of ribs. Typically weighing between 1.5 to 2.5 pounds, they cook faster and offer a tender, meaty bite. The USDA states that baby back ribs have less fat, making them healthier and easier to cook in the oven. Many prefer this cut for its balance of flavor and tenderness. -
Spare Ribs:
Spare ribs come from the belly of the pig. They are larger and contain more fat than baby back ribs, which can result in a richer flavor. Spare ribs weigh between 2 to 4 pounds. They take longer to cook than baby back ribs. Many cooks appreciate spare ribs for their flavor and texture when slow-cooked in the oven until tender. -
St. Louis Style Ribs:
St. Louis style ribs are simply spare ribs with the cartilaginous end removed. They have a uniform shape, which helps in even cooking in the oven. The cut typically yields meatier portions compared to standard spare ribs. Cook times are similar to spare ribs. The removal of the excess fat and cartilage can enhance the cooking results, creating a more appealing meal. -
Beef Back Ribs:
Beef back ribs, taken from the cow’s rib section, are larger and weigh around 3 to 5 pounds. These ribs have a different taste profile than pork ribs, offering a rich, beefy flavor. When cooked slowly in the oven, they can become tender but require a longer cook time due to their thickness. They are ideal for those seeking a hearty alternative to pork ribs. -
Country-Style Ribs:
Country-style ribs are not true ribs; they are typically cut from the shoulder of the pig. They are meatier and can include some bone. These ribs are versatile and can be cooked in the oven, though they often benefit from braising due to their higher fat content. Their significant meat-to-bone ratio makes them popular among those seeking a filling dish.
Choosing the right type of rib depends on personal preferences for taste, texture, and cooking time.
What Techniques Can Be Used to Enhance the Tenderness and Juiciness of Ribs?
To enhance the tenderness and juiciness of ribs, several techniques can be employed during preparation and cooking.
- Marinating ribs
- Dry rubbing
- Braising
- Slow cooking
- Smoking
- Wrapping in foil during cooking
- Using an appropriate cooking temperature
- Resting the ribs after cooking
The following sections will elaborate on these techniques for maximizing the tenderness and juiciness of ribs.
-
Marinating Ribs:
Marinating ribs involves soaking them in a mixture of acidic ingredients, herbs, and spices prior to cooking. Marinating ribs helps to break down tough muscle fibers and infuse flavors. Acids like vinegar or citrus juices are common in marinades. A study by the USDA suggests that marinating can reduce cooking times and enhance moisture retention. -
Dry Rubbing:
Dry rubbing is the technique of applying a mixture of spices and seasonings directly to the meat surface. Dry rubbing allows for a flavorful crust while enhancing the natural juices within the ribs during cooking. This method is often used in barbecue recipes. K.C. Barbeque experts emphasize using sugar in rubs to create a caramelized crust that retains juiciness. -
Braising:
Braising combines moist and dry cooking methods, where ribs are first seared and then cooked slowly in a flavorful liquid. Braising produces incredibly tender ribs as the long cooking time breaks down connective tissues. Chefs recommend a braising liquid that includes broth, wine, and aromatics for the best results. -
Slow Cooking:
Slow cooking utilizes low temperatures over extended periods. Slow cooking allows fat within the ribs to render, creating moisture and tenderness. According to the National Pork Board, cooking ribs at low heat (around 225°F or 107°C) for several hours yields optimal tenderness. -
Smoking:
Smoking adds flavor and moisture to ribs through indirect heat and wood smoke. Smoking requires dedicated equipment or can be done using a stovetop smoker. The meat fibers absorb smoke during the lengthy cooking period, enhancing both flavor and moistness. BBQ Pitmasters often recommend a smoking time of 4-6 hours for best results. -
Wrapping in Foil During Cooking:
Wrapping ribs in foil during cooking retains moisture and steams the meat. Wrapping in foil during cooking helps create a tender texture by preventing moisture loss. This ‘Texas Crutch’ method is popular among competitive barbeque cooks for its effectiveness in achieving juicy results. -
Using an Appropriate Cooking Temperature:
Maintaining a consistent, moderate cooking temperature is crucial for tenderness. Using an appropriate cooking temperature ensures that ribs cook evenly without drying out. Most experts recommend maintaining temperatures around 225°F to 275°F (107°C to 135°C) throughout the cooking process. -
Resting the Ribs After Cooking:
Allowing ribs to rest before slicing is essential. Resting the ribs after cooking allows juices to redistribute throughout the meat, improving flavor and moisture. Food safety guidelines generally recommend resting for about 10-15 minutes after cooking before serving.
How Do Marinades and Seasoning Affect Ribs Cooked at Ideal Temperatures?
Marinades and seasonings significantly enhance the flavor, tenderness, and moisture of ribs when cooked at ideal temperatures.
Marinades and seasonings influence ribs in several key ways:
-
Flavor enhancement: Marinades typically contain acidic components, herbs, spices, and oils. Acids like vinegar or citrus juice penetrate the meat and alter its flavor profile, making it more savory and aromatic. According to a study by O’Neil et al. (2020), marinating meats results in a more robust flavor, as the spices and herbs infuse into the muscle fibers.
-
Tenderizing effect: Acidic ingredients in marinades help break down tough muscle fibers and connective tissues. This process, known as protein denaturation, leads to a more tender final product. Research shows that acids can improve the tenderness of meat significantly (Williams, 2019).
-
Moisture retention: Marinades can increase the moisture content in ribs. They do this by allowing the meat to absorb water and flavorful compounds during the marinating process. Moore et al. (2018) found that marinated meats retained more moisture during cooking compared to their unseasoned counterparts.
-
Temperature compatibility: Cooking ribs at an ideal temperature, usually between 225°F (107°C) and 275°F (135°C), allows the collagen in the meat to break down slowly. This results in tender, juicy ribs that are flavorful. Marinades work best at these temperatures, as they contribute to the meat’s moisture and flavor retention while cooking.
-
Cooking process: Seasonings added to ribs before cooking can form a flavorful crust during the Maillard reaction, which occurs at higher temperatures. This browning not only adds flavor but also enhances the visual appeal of the ribs.
Thus, the combination of marinades and seasonings, along with ideal cooking temperatures, plays a crucial role in achieving delicious and tender ribs.
What Common Mistakes Should You Avoid When Cooking Ribs in the Oven?
The common mistakes to avoid when cooking ribs in the oven include improper temperature control, skipping the seasoning process, not covering the ribs during cooking, and insufficient cooking time.
- Improper temperature control
- Skipping the seasoning process
- Not covering the ribs during cooking
- Insufficient cooking time
Understanding these mistakes can significantly impact the outcome of your ribs when cooked in the oven.
-
Improper temperature control: Avoid cooking ribs at too high or too low temperatures. Cooking ribs between 225°F to 275°F is ideal. High temperatures can dry out the meat, causing it to become tough. Conversely, cooking at very low temperatures may result in undercooked meat. The USDA recommends cooking pork ribs to a minimum internal temperature of 145°F for safety, but for tenderness, aim for 190°F to 203°F.
-
Skipping the seasoning process: Failing to season ribs properly leads to bland flavors. A dry rub or marinade enhances taste and tenderness. The National Pork Board emphasizes using spices and herbs to enhance meat flavor. For example, a mixture of paprika, garlic powder, salt, and black pepper can significantly improve the overall taste profile of the ribs.
-
Not covering the ribs during cooking: Many cooks make the mistake of leaving ribs uncovered in the oven. Covering the ribs with foil helps retain moisture, promoting a more tender cooking process. Cooking with a cover creates steam, which can prevent the meat from drying out. According to a 2016 study on cooking methods, covered ribs showed an average 30% increase in moisture retention compared to uncovered ribs.
-
Insufficient cooking time: Cooking ribs for too short a time can leave them tough and chewy. Ribs need to cook slowly to break down the connective tissue for tenderness. Typically, spare ribs take 2.5 to 3 hours and baby back ribs around 2 to 2.5 hours at low heat to achieve optimal tenderness. Extending cooking time up to 4 hours at low temperatures can often produce the best results, as suggested in various culinary guides.
What Are the Recommended Cooking Guidelines for Ribs in the Oven?
The recommended cooking guidelines for ribs in the oven involve selecting the right temperature and preparation methods to achieve tender, flavorful results.
- Preheat the oven to 225°F (107°C) – 250°F (121°C).
- Use a dry rub for seasoning.
- Wrap ribs in foil for moist cooking.
- Bake for 2.5 to 3 hours.
- Glaze with barbecue sauce for the final 30 minutes.
- Let rest before serving.
These cooking guidelines can vary based on personal preferences or dietary needs, such as the choice of seasoning or cooking duration. Different opinions exist regarding rib preparation, with some preferring a higher oven temperature for quicker cooking or different types of sauces for flavor.
-
Preheating the Oven:
Preheating the oven is critical for cooking ribs evenly. Preheat the oven to 225°F (107°C) to 250°F (121°C) for low, slow cooking. This gentle heat breaks down collagen in the meat, making ribs tender. The USDA recommends cooking pork ribs to an internal temperature of 145°F (63°C) for safety, but many home cooks opt for higher temperatures for texture and taste. -
Using a Dry Rub for Seasoning:
Using a dry rub enhances ribs with flavors such as garlic powder, onion powder, paprika, and brown sugar. The rub should be applied generously and left to marinate for at least an hour or overnight for better flavor penetration. According to a study by the Culinary Institute of America in 2020, dry rubs contribute to forming a flavorful crust on the ribs during cooking. -
Wrapping Ribs in Foil:
Wrapping ribs in foil helps to retain moisture, resulting in juicy meat. This technique, known as the ‘Texas Crutch,’ is utilized in barbecue and oven cooking. It allows steam to circulate, tenderizing the meat and preventing it from drying out. Research by meat science expert Dr. Greg Blonder indicates that wrapping helps to maintain a consistent cooking temperature, yielding better results. -
Baking for 2.5 to 3 Hours:
Baking ribs for 2.5 to 3 hours at low temperatures allows the fat and connective tissues to break down. This slow cooking method ensures tenderness. The National Pork Board highlights that this slow cooking method is essential to achieving the desired ‘fall-off-the-bone’ texture many barbecue enthusiasts seek. -
Glazing with Barbecue Sauce:
To create a flavorful glaze, ribs should be brushed with barbecue sauce during the last 30 minutes of cooking. This gives the sauce time to caramelize and develop depth. Food scientists recommend this timing, as glaze applied too early may burn or become too sticky. -
Letting Ribs Rest:
Letting ribs rest after cooking is crucial for serving. This process allows juices to redistribute, improving overall moisture and flavor. Chefs often recommend a resting period of 10-15 minutes before cutting. This step ensures the best possible eating experience, ensuring the meat remains succulent and flavorful.