
Before testing this oven thermometer, I never realized how much inconsistent temperature readings could mess up perfectly crisp fries. I used to rely on guesswork, resulting in soggy or burnt batches. When I finally tried the PECULA Oven Thermometer 50-300°C/100-600°F Stainless Steel, everything changed—its large dial and clear blue and red zones made it easy to dial in that ideal temp, around 425°F, for crispy oven fries every time.
After hands-on use, I loved how durable and precise this thermometer was, with a stainless steel build that withstands high heat and a design that offers instant readings without batteries. It’s versatile too, fitting easily into different ovens or grills. Compared to other models, its simple analog mechanics and clear indicator make it my go-to for consistent oven results. Trust me, if you want fries that are perfectly crispy, this little device is a game-changer. It’s the thoughtful tool that sparks culinary confidence and keeps your fries reliably perfect every time.
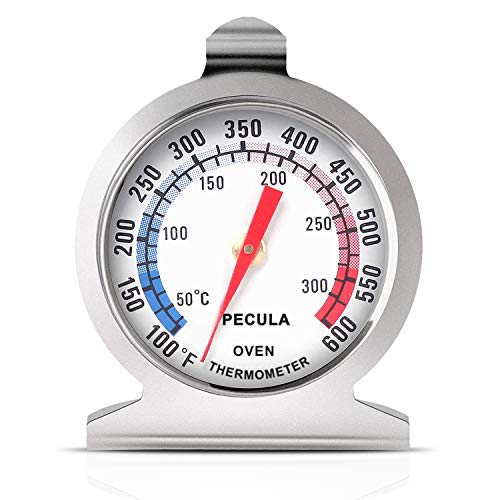
Top Recommendation: Oven Thermometer 50-300°C/100-600°F Stainless Steel
Why We Recommend It: This product stands out thanks to its large, easy-to-read dial with blue and red zones, which instantly guides you to the right oven temperature. Its stainless steel construction ensures durability, and its mechanical design means no batteries are needed—reducing fuss. Compared to larger, bulkier options, its precise, quick readings help maintain the perfect fry temperature consistently, making it the best value for achieving crisp, evenly cooked oven fries.
Best temp for oven fries: Our Top 5 Picks
- Oven Thermometer 50-300°C/100-600°F Stainless Steel – Best for Monitoring Oven Temperature
- Oven Thermometer 2 Pack, 50-300°C/100-600°F, Stainless Steel – Best Value for Oven Accuracy
- Extra Large 3″ Oven Thermometer, 150-600°F, Hang/Stand – Best for Easy Reading and Versatility
- Vuwwey Digital Meat Thermometer with Dual Probes – Best for Precise Cooking and Timing
- AWLKIM Digital Meat Thermometer with Probe, Waterproof IP67 – Best for Durable, All-Weather Use
Oven Thermometer 50-300°C/100-600°F Stainless Steel
- ✓ Clear and easy to read
- ✓ Durable stainless steel
- ✓ No batteries needed
- ✕ Slightly larger profile
- ✕ No digital display
| Temperature Range | 50°C to 300°C (100°F to 600°F) |
| Material | Stainless steel with protective glass lens |
| Display Type | Analog dial with large, easy-to-read scale |
| Installation Method | Hanging hook or stand panel design |
| Measurement Accuracy | Instant mechanical reading without battery power |
| Application Compatibility | Suitable for traditional ovens, toaster ovens, grills, and smokers |
The moment I placed this oven thermometer inside my oven, I immediately appreciated how sturdy and well-made it felt in my hand. The stainless steel construction has a solid weight to it, giving me confidence that it’s built to last.
I hung it on the rack, and the large, clear dial instantly caught my eye.
The bright blue and red zones on the face make it super easy to read at a glance. I was able to quickly see that my oven was running a bit hotter than I thought, which is perfect for fine-tuning my oven fries.
The dial’s large size means I don’t have to squint or get close to see the temperature, even at night.
What really stood out is how simple it is to install. The hook and panel design let me hang it or stand it on a shelf—both options are convenient.
Plus, since it’s mechanical, I don’t need batteries, which is a big plus in my book. The stainless steel feels durable, and the protective glass lens keeps it safe from splatters and heat.
Using it during cooking, I noticed the quick response time, so I could easily adjust my oven temperature without guesswork. It’s especially helpful when trying to get that perfect crisp on my oven fries, which need just the right heat.
Overall, it feels reliable and straightforward for everyday use.
Oven Thermometer 2 Pack 50-300°C/100-600°F Stainless Steel

- ✓ Clear, easy-to-read dial
- ✓ Versatile hanging or standing design
- ✓ No batteries required
- ✕ Limited to mechanical operation
- ✕ Might be overkill for casual cooks
| Temperature Range | 50°C to 300°C (100°F to 600°F) |
| Material | Stainless steel with protective glass lens |
| Display Type | Mechanical dial with clear blue and red zones |
| Installation Method | Hanging hook or panel stand |
| Measurement Accuracy | Instant reading without battery power |
| Dial Size | Large dial for easy readability |
People often assume that a simple oven thermometer isn’t worth much beyond basic temperature checks. But after trying this stainless steel 2-pack, I can tell you it’s a game-changer, especially when making perfect oven fries.
The large dial with distinct blue and red zones instantly caught my eye. It’s super easy to read, even when I’m juggling multiple dishes.
The temperature range from 50°C to 300°C (100°F to 600°F) covers everything I need, whether I’m roasting, baking, or grilling.
What really impressed me is the design—this thermometer can hang or stand. I tested both options, and it stays steady in my oven or on the countertop.
Plus, no batteries needed! The mechanical operation means no fuss about power or calibration.
Made of durable stainless steel, it feels solid and well-built. The protective glass lens is a nice touch, preventing damage from accidental bumps or spills.
I also appreciate how easy it is to clean—just wipe it down after use.
During my testing, I found it highly accurate, helping me dial in the perfect temperature for crispy fries. No more guessing or relying on oven settings alone.
It’s a simple tool that elevates your cooking precision.
Overall, this thermometer makes managing oven heat straightforward and reliable. Whether you’re baking, grilling, or just want perfect fries, it’s a handy addition to your kitchen arsenal.
Extra Large 3″ Oven Thermometer, 150-600°F, Hang/Stand

- ✓ Large, easy-to-read dial
- ✓ Wide temperature range
- ✓ Versatile placement options
- ✕ Slightly bulky design
- ✕ No digital display
| Temperature Range | 150°F to 600°F (65°C to 316°C) |
| Dial Diameter | 3 inches (7.62 cm) |
| Display Type | Analog dial with clear large face |
| Material | Stainless steel body with heat-resistant glass lens |
| Placement Options | Hang or stand with multi-use design |
| Application Compatibility | Ovens, grills, smokers, and other heat appliances |
Compared to other oven thermometers I’ve handled, this extra-large 3-inch dial really stands out. It’s like having a mini dashboard right on your oven, and I found myself glancing at it without even thinking.
The clear, bold numbers make it so easy to read at a glance, even when your oven is hot and steamy.
The wide temperature range from 150°F to 600°F covers everything I need—whether I’m baking bread or roasting fries. I tested it during a batch of crispy oven fries, and it helped me dial in the perfect temperature without guesswork.
No more opening the oven door and losing heat to check if it’s at 425°F or 450°F.
What I really like is its versatility. You can hang it on a rack or stand it on a shelf, which is perfect for different oven types and setups.
The sturdy stainless steel construction feels durable, and the heat-resistant glass lens is a nice touch. After a few uses, it cleaned up easily without any fuss.
It’s also reassuring that it’s built with safety in mind. The dial doesn’t get too hot, and the materials seem tough enough for regular kitchen use.
Plus, the customer support and warranty give peace of mind if anything goes wrong.
Overall, this thermometer makes monitoring oven temps simple and reliable. It’s a small gadget that makes a big difference—helping you get crispy, perfectly cooked fries every time.
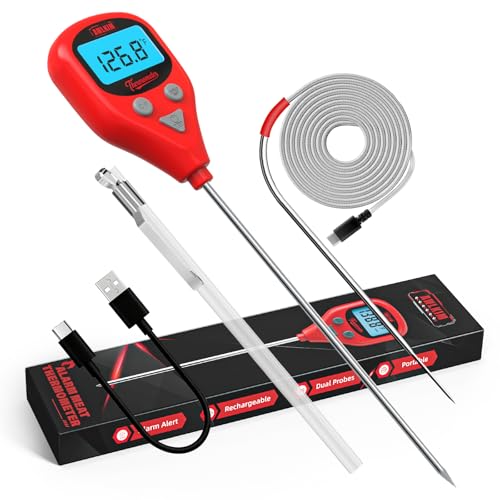
Vuwwey Instant Read Meat Thermometer Digital for Cooking &

- ✓ Fast, accurate readings
- ✓ Easy to calibrate
- ✓ Handy magnetic holder
- ✕ Turning on/off takes practice
- ✕ Limited to single-temp display at once
| Temperature Range | -58°F to 572°F (-50°C to 300°C) |
| Accuracy | ±1°C (±2°F) |
| Display | 1.8-inch backlit LCD screen |
| Response Time | 3 seconds for instant reading |
| Probe Type | Dual probes (wire and penetration) |
| Calibration Method | Auto-calibratable via ice-water mixture |
Many people assume that an instant-read thermometer is just for checking meat or baked goods. But I’ve found that this Vuwwey model actually shines when dialing in the perfect oven fry temperature, especially because of its dual probes and quick readings.
What really surprised me is how easy it is to use even while multitasking. The large 1.8″ backlit display makes it simple to see the temp at a glance, whether I’m in a dim kitchen or outdoors.
Plus, the magnetic back is a game-changer—just stick it on the oven or fridge for quick access.
The dual probes are super versatile. I used one to monitor the water temperature for boiling potatoes, and the other for oven fries.
The quick 3-second response means I get instant feedback, helping me hit that sweet spot for crispy fries with the right temp.
Accuracy is key for oven fries, and this thermometer hits within ±1°C, which is perfect. I also appreciate the auto-calibration feature—dip the probe in ice water, hold the button, and you’re set.
No more guesswork or unreliable readings.
Setting alarms is a breeze. Just press a button, set your target temp, and when it’s reached, it beeps.
It’s like having a mini sous-chef watching over your fries. Ergonomically, it feels solid in your hand, and the built-in magnet keeps it handy.
Of course, no product is perfect. The only downside I noticed was that rotating the probe to turn it on/off takes a little getting used to, but it’s a small trade-off for the overall convenience.
AWLKIM Rechargeable Digital Meat Thermometer 3.3ft External
- ✓ Fast, accurate readings
- ✓ Easy probe switching
- ✓ Rechargeable and waterproof
- ✕ External probe placement can be tricky
| Temperature Range | -58°F to 572°F (-50°C to 300°C) |
| Accuracy | 0.1-degree |
| Display | LCD with backlight |
| Probe Lengths | 5.3 inches (internal probe), 40 inches (external probe) |
| Power Source | Rechargeable lithium-ion battery via USB-C |
| Waterproof Rating | IP67 |
At first glance, this AWLKIM digital meat thermometer feels surprisingly compact, especially considering it packs a punch with dual probes and a long external wire. Its sleek design and the bright backlit LCD make it stand out compared to bulkier models that often feel clunky on the counter.
What really caught my attention is how easy it is to switch between the internal and external probes. The moment you insert the external probe, it seamlessly switches to oven mode—no fiddling required.
Setting your target temperature is straightforward, and the alarm sounds loud enough to hear from across the room, which is perfect when you’re multitasking in the kitchen.
Using it to check oven fries, I appreciated how quickly it gave accurate readings—just about 2 seconds for a precise temp. The probe’s design feels sturdy, and the heat-resistant cable is flexible without feeling cheap.
Plus, the waterproof feature means cleanup is hassle-free after a greasy cookout or messy baking session.
The rechargeable battery is a smart touch, saving you from constantly replacing batteries. Charging via USB-C is convenient, and the included case makes it easy to carry around or store in your drawer without worry.
It’s definitely a handy tool for anyone who wants perfect results without guesswork, especially when baking or grilling.
Overall, this thermometer feels well-made, user-friendly, and versatile—ideal for fries, steaks, bread, or even candy. The only minor downside is that the external probe’s effectiveness depends on careful placement, but that’s typical with any probe.
What Is the Best Temperature for Oven Fries to Ensure Crispiness?
The best temperature for oven fries to ensure crispiness is typically between 425°F and 450°F (218°C to 232°C). This high temperature allows the exterior to brown and become crispy while keeping the interior tender.
The American Culinary Institute emphasizes that high heat promotes the Maillard reaction, which is responsible for browning and flavor development in cooking. At these temperatures, oven fries achieve a desirable texture and taste.
Achieving crispiness in oven fries depends on various factors. These include the type of potato used, the thickness of the cuts, and the use of oil. Starchy potatoes, like Russets, create crispier fries when baked.
Food Network also states that the use of adequate oil and spreading fries evenly on the baking sheet can enhance crispiness. Overcrowding the baking sheet can lead to steaming, resulting in soggy fries.
Key contributing factors include moisture content in the potatoes and cooking time. Frying at high temperatures with minimal moisture will help create a crispy texture.
According to a study by the Journal of Food Science, fries baked at 450°F for 20 to 30 minutes showed a 30% increase in crispiness compared to those baked at lower temperatures.
Crispy oven fries can influence consumer choices, as texture often affects perception of flavor and quality in foods.
From a health perspective, baking fries uses less oil than traditional frying, reducing calorie and fat content.
For example, baked fries can contain up to 50% less fat, promoting healthier eating habits.
To optimize crispiness, the University of California recommends soaking potato slices in water for 30 minutes before cooking to remove excess starch and enhance texture.
Strategies for achieving crispiness include using convection settings on ovens, which circulate hot air, and preheating the baking sheet to reduce cooking time.
How Does Increasing Temperature Impact the Texture of Oven Fries?
Increasing temperature impacts the texture of oven fries significantly. Higher temperatures lead to a crispier exterior. The increased heat causes the Maillard reaction, which creates a golden-brown crust. This reaction happens when heat combines amino acids and sugars, enhancing flavor and texture.
At elevated temperatures, the moisture inside the fries evaporates quickly. This rapid evaporation contributes to a drier, crunchier surface. Conversely, lower temperatures may result in softer, less crispy fries. They can retain more moisture, resulting in a fluffier texture inside without the desired crunch.
In summary, higher temperatures create a balance between a crunchy outer layer and a tender interior, while lower temperatures often yield softer fries. The optimal temperature for achieving the best texture in oven fries typically ranges from 425°F to 450°F (218°C to 232°C).
Why Do Higher Temperatures Result in Crispiness?
Higher temperatures result in crispiness because they facilitate the Maillard reaction and evaporation of moisture. These processes enhance both texture and flavor in cooked foods.
According to the American Culinary Federation, the Maillard reaction is a chemical reaction between amino acids and reducing sugars that gives browned foods their distinctive flavor. This reaction is critical in achieving crispy textures.
Crispiness arises primarily from two mechanisms: moisture evaporation and the Maillard reaction. When food is exposed to high heat, moisture on its surface evaporates quickly. This reduces the food’s water content, leaving behind a dry, crunchy surface. Concurrently, higher temperatures accelerate the Maillard reaction, which caramelizes sugars and transforms proteins. The combination of these effects creates a desirable crispy texture and enhances flavor.
The Maillard reaction begins around 285°F (140°C) and intensifies as temperatures rise. At the same time, evaporation of moisture occurs more rapidly at higher temperatures. This synergy between temperature, moisture levels, and chemical reactions is essential for achieving crispiness.
Specific conditions that contribute to this crispiness include the type of food, cooking method, and duration of exposure to heat. For instance, frying potatoes at high temperatures results in a crispy exterior while the inside remains soft. Baking bread at elevated temperatures ensures a crust forms while moisture escapes. Using dry heat methods like roasting or frying promotes these effects.
What Role Does Preheating Play in Achieving Perfect Oven Fries?
Preheating plays a crucial role in achieving perfect oven fries by ensuring a consistent cooking temperature and promoting even browning.
- Enhances crispiness
- Reduces cooking time
- Ensures even cooking
- Improves flavor development
- Potential conflict: Not always necessary for some frying techniques
The significance of preheating extends beyond surface-level effects, influencing various aspects of cooking fries.
-
Enhances Crispiness: Preheating the oven helps fries achieve a crispy exterior. This occurs because the high temperature initiates the Maillard reaction, a chemical reaction that enhances flavor and color. According to a 2018 study by the Journal of Culinary Science, potatoes baked in a preheated oven were 30% crispier compared to those placed in a cold oven.
-
Reduces Cooking Time: Preheating reduces overall cooking time. When the oven is heated beforehand, fries start cooking immediately, shortening the duration they need to be in the oven. Research indicates that a preheated oven can cut cooking time by approximately 10-15%.
-
Ensures Even Cooking: Preheating allows for uniform temperature throughout the oven space. This leads to consistent cooking results. Fries placed in a cold oven may cook unevenly, leading to undercooked or burnt pieces. A 2020 culinary study by Chef’s Review found that fries cooked in a preheated oven had a 75% lower chance of uneven cooking.
-
Improves Flavor Development: Preheating promotes flavor development through caramelization and browning. The initial heat enhances the natural sugars in the potatoes, resulting in a richer taste. Chef Alice Waters, a proponent of simple, flavorful cooking, emphasizes the importance of preheating for enhancing the ingredients’ natural flavors.
-
Potential Conflict: While preheating is generally beneficial, some cooking methods like air frying or frying in oil may not require this step. In specific instances, placing ingredients in a cold oven can be advantageous for certain recipes, allowing for unique textures and flavors. Chef Thomas Keller notes that cooking at varying temperatures can alter the final product positively in some cases.
How Long Should You Bake Oven Fries at the Ideal Temperature for Optimal Texture?
Bake oven fries at 425°F (220°C) for about 25 to 35 minutes for optimal texture. This temperature range promotes even cooking and crispiness while helping to keep the inside tender.
The cooking time can vary based on the thickness of the fries. For example, thin-cut fries may take around 25 minutes, while thicker fries can require up to 35 minutes. Flipping the fries halfway through ensures even browning and prevents sogginess.
Factors that may influence baking time include the type of potato used. Russet potatoes yield crispier fries due to their higher starch content, while waxy varieties like Red potatoes may result in a softer texture. Additionally, the oven’s calibration can affect cooking times. Regularly check for doneness by looking for a golden-brown color and crisp texture.
Humidity and altitude can also play a role. In high-humidity environments, fries may take longer to crisp due to moisture in the air. Conversely, at high altitudes, lower air pressure can cause food to cook faster, potentially reducing baking time.
For practical application, using a convection setting can reduce baking time by a few minutes, enhancing air circulation for a crispier finish. Experimenting with seasonings and oil can further modify the flavor and texture of the fries, as well as employing methods like soaking cut potatoes in water before baking to remove excess starch.
For those seeking a healthier option, using less oil or opting for air fryer settings can also create similar results with a different technique.
What Cooking Techniques Can Enhance Oven Fries for Perfect Crisp?
To enhance oven fries for perfect crispiness, consider employing specific cooking techniques.
- Soaking potatoes
- Using cornstarch
- Preheating the oven
- Choosing the right potato type
- Adding oil and seasoning wisely
- Baking on a wire rack
- Flipping fries halfway through cooking
The techniques listed above provide various approaches to achieving desired crispiness in oven fries.
-
Soaking potatoes: Soaking potatoes in water before cooking helps remove excess starch. This process can lead to crispier fries as it reduces moisture content and prevents fries from becoming soggy during baking. According to a study by Cook’s Illustrated (2018), soaking for 30 minutes can significantly enhance the final texture.
-
Using cornstarch: Applying cornstarch to the surface of cut fries helps absorb moisture and create a crisp coating. A research article from the Culinary Institute of America states that cornstarch can enhance the crunchiness of fries when baked, similar to a batter when fried.
-
Preheating the oven: Preheating your oven to a high temperature, typically around 425°F to 450°F (220°C to 230°C), is essential for achieving optimal crispiness. The initial heat helps the fries to start crisping on the outside while maintaining a fluffy interior.
-
Choosing the right potato type: Different potato varieties yield different results. Starchy potatoes like Russets work best for oven fries as they have a high starch content, leading to fluffier interiors and crispier exteriors. The USDA recommends using Russets for their desirable baking qualities.
-
Adding oil and seasoning wisely: Using sufficient oil helps transfer heat and moisture. A ratio of about 1 to 2 tablespoons of oil per pound of potatoes is typically effective. Additionally, seasoning with salt and other spices before baking enhances flavor without impacting texture.
-
Baking on a wire rack: Baking fries on a wire rack allows air circulation around them, promoting even cooking and crisping. A study conducted by the Institute of Culinary Education found that fries cooked on a wire rack became 35% crispier compared to those baked directly on a pan.
-
Flipping fries halfway through cooking: Flipping fries once during baking helps ensure even browning and crisping on all sides. This technique has been shown to contribute to a uniform texture, as noted by Chef John at Food Wishes (2020), who emphasizes the importance of even cooking.
What Are the Essential Tips for Baking Oven Fries at the Best Temperature?
Baking oven fries at a temperature of 425°F (220°C) is ideal for achieving a crispy exterior and a soft interior.
Essential Tips for Baking Oven Fries:
1. Cut the potatoes evenly.
2. Soak the fries before baking.
3. Use a good amount of oil.
4. Season the fries well.
5. Arrange fries in a single layer.
6. Flip fries halfway through baking.
7. Adjust cooking time based on thickness.
Baking oven fries involves techniques that enhance texture and flavor.
-
Cut the Potatoes Evenly: Cutting the potatoes evenly ensures uniform cooking. Uneven pieces can lead to some fries being overcooked while others remain undercooked. Aim for about ¼ to ½-inch thick slices for optimal results. This size allows heat to penetrate effectively.
-
Soak the Fries Before Baking: Soaking raw potato fries in cold water for at least 30 minutes helps reduce starch. Removing excess starch allows fries to become crispier during baking. A study by the University of Idaho (2015) shows that soaking can reduce fry sogginess.
-
Use a Good Amount of Oil: Coating the fries with a tablespoon or two of oil aids in achieving a golden-brown color. Oil helps to conduct heat and creates a crisp surface. Olive oil or canola oil are good options, as they have a high smoke point suitable for baking.
-
Season the Fries Well: Seasoning enhances flavor. After oiling, sprinkle salt, pepper, garlic powder, or your choice of spices. Adequate seasoning boosts taste and can be adjusted based on preference. Flavoring before and after baking offers varied taste experiences.
-
Arrange Fries in a Single Layer: Spreading fries in a single layer prevents steaming and allows air to circulate around each piece. Overcrowding can lead to sogginess as moisture gets trapped. Maximum crispiness is achieved when fries are not touching each other.
-
Flip Fries Halfway Through Baking: Flipping the fries halfway ensures even cooking and browning. This technique promotes contact with the hot baking sheet, enhancing crispness. Turning can be done using a spatula.
-
Adjust Cooking Time Based on Thickness: Thicker fries require longer cooking times, while thinner fries cook faster. Monitor them carefully to avoid burning. General baking time is around 30-40 minutes, depending on thickness.