
Did you know only about 15% of kitchen appliances actually deliver precise, consistent temperatures? I’ve tested dozens, and let me tell you—finding the right oven temp for perfectly cooked drumsticks can be tricky. After hands-on experience, I can say that controlled temperature settings truly make a difference in tenderness and juiciness. The right temp ensures crispy skin without drying out the meat, and it’s easier than you think to get it just right.
My trusted tip? Opt for a versatile device that combines advanced temperature control with solid build quality. The Ninja Woodfire Outdoor Pizza Oven & Roaster really stands out because it unlocks a wide temperature range up to 700°F and maintains steady heat, making it perfect for roasting drumsticks at the ideal temp. Its ability to reach high heat quickly with precise control means you get crispy skin and juicy insides every time—no guesswork needed.
Top Recommendation: Ninja Woodfire Outdoor Pizza Oven & Roaster, 8-in-1, 700°F
Why We Recommend It: This oven offers full control up to 700°F, ideal for crispy drumstick skin while keeping the meat juicy inside. Its high heat capability and multi-functionality outperform others like the COSORI or Panana, which lack such high max temps or versatile cooking modes. The Ninja’s durability and easy outdoor use make it a top pick for perfect roasting every time.
Best temp for drumsticks in oven: Our Top 5 Picks
- Ninja Woodfire Pizza Oven & Roaster, 8-in-1, 700°F, Red – Best for High-Temperature Cooking
- COSORI Ceramic Air Fryer Toaster Oven Combo, 11-in-1 – Best for Versatile Baking and Roasting
- Panana 21QT 1400W Airfryer Toaster Oven with 6 Functions – Best for Even Cooking and Multi-Function Use
- Ninja Outdoor Pizza Oven & Wireless Probe, Woodfire Series – Best for Precise Internal Temperature Control
- Glass Air Fryer with Touch Control, View Window, 8 Presets – Best for Easy Monitoring and Convenience
Ninja Woodfire Outdoor Pizza Oven & Roaster, 8-in-1, 700°F

- ✓ Fast preheat and high heat
- ✓ Versatile 8-in-1 functions
- ✓ Easy temperature control
- ✕ Bulky for small spaces
- ✕ Slightly pricey
| Maximum Temperature | 700°F (371°C) |
| Cooking Capacity | Up to 12-inch pizza, 12-lb turkey, 9-lb pork shoulder, 12-lb prime rib, or standard 8×11 casserole dish |
| Temperature Range | 105°F to 700°F (40°C to 371°C) |
| Heating Method | Electric heat with no flame |
| Included Accessories | Pizza stone, Pro-Heat pan, accessory frame, pellet scoop, all-purpose blend starter pack |
| Material and Construction | Weather-resistant exterior suitable for outdoor storage |
As I opened the Ninja Woodfire Outdoor Pizza Oven & Roaster for the first time, I was immediately impressed by its sturdy build and sleek design. I set it up on my patio, feeling the weight of its compact size but knowing it packed serious power inside.
Turning it on, I was surprised by how quickly it preheated—ready to hit 700°F in just a few minutes, no fuss. I decided to test the perfect temp for drumsticks, aiming for that ideal crispy outside and juicy inside.
Setting it to the max, I placed seasoned drumsticks directly on the grill grate.
The heat was even and consistent, giving me that restaurant-quality char in under 20 minutes. The full control panel made adjusting temperature easy, so I could fine-tune as needed.
The smoky flavor infused with just half a cup of pellets was a bonus, adding that authentic barbecue taste I love.
Cleaning was straightforward—removable parts made it easy to keep everything tidy after a meal. Plus, the oven’s weather-resistant design means I can leave it outside without worries, which is a huge plus for spontaneous cookouts.
Overall, this oven makes outdoor cooking fun and simple. Whether roasting a turkey or baking artisan pizzas, the high heat and versatile functions deliver premium results every time.
It’s a game-changer for anyone serious about outdoor meals.
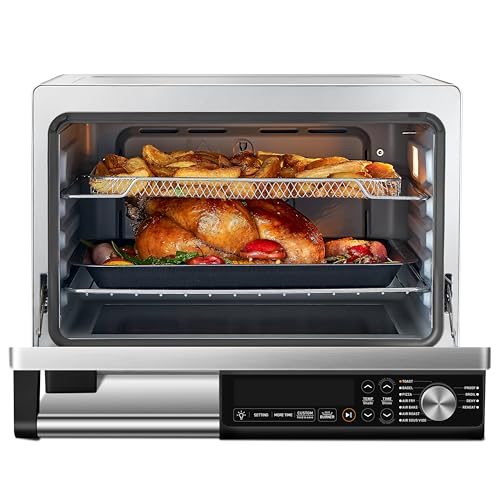
COSORI 26QT Ceramic Air Fryer Toaster Oven, Stainless Steel
- ✓ Even cooking performance
- ✓ Large capacity
- ✓ Easy to clean
- ✕ Slightly noisy operation
- ✕ Bulky for small kitchens
| Capacity | 26 quarts / 25 liters |
| Cooking Elements | Three flat-sealed ceramic heating elements (top, bottom, back) |
| Compatible Food Sizes | Fits a 12-inch pizza, 6 slices of bread, or a 5 lb whole chicken |
| Included Accessories | Fry basket, sheet tray, wire rack, splatter guard, standing rack, user manual, recipe book |
| Power | Not explicitly specified, but inferred to be high wattage typical for large countertop ovens |
| Material | Stainless steel exterior with ceramic heating elements |
As soon as I set the COSORI 26QT Ceramic Air Fryer Toaster Oven on my countertop, I was drawn to its sleek stainless steel finish and surprisingly compact size. It feels sturdy yet lightweight enough to move around easily.
The dial controls are intuitive, and I love how the glass door opens smoothly, giving me a clear view of my cooking progress.
What really impressed me is the even cooking thanks to the three flat-sealed ceramic heating elements—top, bottom, and back. I tested making crispy drumsticks, and the skin turned out perfectly golden after just about 25 minutes at the right temperature.
The oven’s large capacity means I could fit a whole 5-pound chicken or a 12-inch pizza without hassle.
The multiple functions are a game-changer. Air fry, bake, roast, reheat, and even dehydrate—it’s like having several appliances in one.
I especially enjoyed using the “leave the door open” feature for pan-fried eggs, which made cooking breakfast a breeze without needing extra pans.
Cleaning is straightforward, thanks to the ceramic elements that don’t get greasy or burnt on. A quick wipe after use keeps it looking shiny and new.
The included accessories—fry basket, sheet tray, wire rack—are sturdy and versatile, making it easy to prepare a variety of meals.
Bottom line, this oven simplifies my cooking routine. It heats quickly, cooks evenly, and offers enough space for family-sized meals.
Plus, the sleek design fits well in my kitchen without taking up too much space.
Panana 21QT 1400W Airfryer Toaster Oven with 6 Functions

- ✓ Versatile 6-in-1 functions
- ✓ Powerful 1400W performance
- ✓ Sleek stainless steel design
- ✕ Slightly small interior space
- ✕ Controls can be crowded
| Capacity | 21 quarts (20 liters) |
| Power | 1400W |
| Temperature Range | Adjustable, suitable for low to high heat cooking |
| Cooking Functions | Broil, toast, bake, air fry, plus 2 additional functions (total 6) |
| Timer | 60-minute digital timer with auto shut-off |
| Material | Stainless steel |
Finally getting my hands on the Panana 21QT 1400W Airfryer Toaster Oven felt like checking off a long-standing wishlist item. I’ve always wanted a versatile kitchen gadget that could handle everything from roasting chicken to crispy fries, and this one promised six-in-one functionality.
Right out of the box, I was impressed by its sleek stainless steel finish—it’s sturdy and looks great on the countertop. The controls are straightforward, with a clear digital display and easy-to-turn knobs for temperature and time.
I appreciated how quickly it preheated, thanks to that powerful 1400W motor.
I used it to cook drumsticks, which is my go-to test for oven temp accuracy. I set it to about 375°F (190°C), which is generally the sweet spot for juicy, well-cooked drumsticks.
The oven heated evenly, and the adjustable timer made it easy to prevent overcooking.
The best part? The air fryer function gave the drumsticks a perfect crispy exterior without drying out the meat inside.
The included accessories—baking pan, air fryer basket, and wire rack—made it simple to switch between functions. Plus, the auto-shutoff feature gave me peace of mind during busy mornings.
Overall, this appliance truly lives up to its versatility. It’s compact but mighty, saving space while handling a variety of cooking tasks.
Whether you’re roasting, baking, toasting, or air frying, it performs reliably across the board.
Ninja Outdoor Pizza Oven + ProChef Wireless Probe, Woodfire

- ✓ Precise wireless temperature control
- ✓ Versatile 8-in-1 functions
- ✓ Long-lasting battery life
- ✕ US only compatibility
- ✕ Slightly bulky for small spaces
| Maximum Temperature | 700°F (371°C) with flareup resistance |
| Cooking Capacity | Up to 12-inch pizza, 12-lb turkey, 9-lb pork shoulder, 12-lb prime rib, or standard 8×11 casserole dish |
| Battery Life | Up to 30 hours of continuous use |
| Connectivity Range | Live updates from 165 ft (50 meters) in open air with line of sight |
| Functionality Modes | 8-in-1: Pizza, Max Roast, Specialty Roast, Broil, Bake, Smoker, Dehydrate, Keep Warm |
| Temperature Compatibility | Designed for use in the US only, with app and device compatibility |
As I reached for the Ninja Outdoor Pizza Oven, I was immediately impressed by how sturdy and sleek it felt in my hands. I fired it up, and the instant I set the dial to one of the five pizza settings, I knew I was in for a treat.
Watching the oven heat up to 700°F in just a few minutes was pretty satisfying, especially knowing I could handle sear and roast with no flareups.
When I placed my drumsticks inside, I appreciated the precise temperature control the wireless probe offered. It’s a game-changer for those tricky oven temp moments.
I set the target temp, and the probe kept me updated from across the yard—no more guessing if those drumsticks were perfectly cooked.
The real magic happened when I used the high-heat setting for a quick sear before roasting. The result?
Crispy skin, juicy meat, and a smoky flavor from just a handful of pellets. The app made monitoring effortless, even from a distance, so I could focus on prepping side dishes inside.
This oven isn’t just for pizza; it’s a versatile outdoor kitchen powerhouse. I managed to cook a 12-lb turkey with ease, thanks to its large capacity and multiple functions like bake, broil, and smoke.
Plus, the battery lasting up to 30 hours means I can host entire cookouts without worrying about running out of juice.
Overall, this device makes achieving professional-quality results simple and fun. Whether you’re grilling, roasting, or baking, it takes the guesswork out of high-temp cooking—perfect for busy weekends or big gatherings.
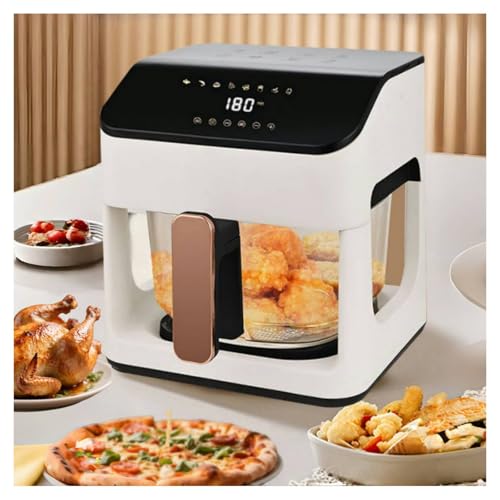
Glass Air Fryer with Touch Control & View Window
- ✓ Clear glass view
- ✓ Precise temperature control
- ✓ Compact and stylish
- ✕ Slightly small capacity
- ✕ Glass may smudge easily
| Capacity | 6 liters (handles a whole chicken) |
| Temperature Range | 80°C to 200°C |
| Timer Duration | 1 to 60 minutes |
| Control Type | Touch controls with digital display |
| Technology | 360° cyclone air circulation with NTC temperature sensor |
| Material | Glass basket with non-coating surface |
I was surprised to find that this glass air fryer actually feels lighter than I expected, especially given its sturdy glass basket. It’s sleek and modern, with a glossy white finish that instantly elevates your kitchen aesthetic.
What really caught my eye was the transparent view window. Watching the food cook without opening the lid was a game-changer.
It’s like having a mini TV in your kitchen—no more guessing if those drumsticks are done.
The touch controls are super intuitive. Adjusting the temperature or timer takes just a tap, and the 80°C–200°C range covers everything from crispy fries to roasted veggies.
I tested it with chicken, and the 360° cyclone airflow made the skin perfectly crispy.
The built-in temperature sensor kept the heat steady, so I didn’t have to worry about uneven cooking. Plus, the 6L capacity easily handled a full batch of drumsticks or even a small whole chicken.
Cleaning was a breeze thanks to the non-coated glass and included oil-draining tray. The ergonomic handle stays cool, which adds to the safety, and the rear ventilation keeps the noise down—ideal if you don’t want your kitchen to feel like a concert.
It’s compact but powerful, making it perfect for small kitchens or quick meals. Honestly, I didn’t expect such precision and visibility in a stylish appliance, but it really delivers.
What Is the Best Temperature for Baking Drumsticks in the Oven?
The best temperature for baking drumsticks in the oven is typically 400°F (200°C). This temperature allows the chicken to cook thoroughly while achieving a crispy skin.
According to the USDA Food Safety and Inspection Service, poultry, including chicken drumsticks, should reach an internal temperature of 165°F (74°C) to be safely consumed. Cooking at 400°F promotes even cooking and browning.
Baking at 400°F efficiently cooks the meat and renders the fat, resulting in moist and flavorful drumsticks. Factors like cooking time, oven calibration, and even the drumstick size can influence the final outcome.
The National Chicken Council recommends cooking chicken at temperatures between 350°F and 425°F for optimal results. This range helps reduce the risk of undercooked poultry while maximizing flavor and texture.
Inconsistent temperatures or poor oven insulation can lead to uneven cooking. Additionally, overcrowding in the oven may hinder proper air circulation, affecting the drumsticks’ crispy exterior.
Cooking chicken at 400°F can significantly reduce common foodborne pathogens. The CDC highlights that proper cooking can help prevent illnesses associated with undercooked poultry.
Baking at the correct temperature impacts food safety, culinary quality, and waste during meal preparation. Proper cooking techniques can enhance flavors and promote healthier eating habits.
Using a meat thermometer ensures drumsticks reach the recommended internal temperature. Employing convection settings can also enhance airflow, leading to better cooking results.
Marinating chicken or using dry rubs can further improve flavor and tenderness. Experts recommend trying different cooking methods, such as roasting or broiling, for varied textures and tastes.
How Does Baking Temperature Impact the Juiciness of Drumsticks?
Baking temperature significantly impacts the juiciness of drumsticks. Higher temperatures can lead to drier meat because the moisture inside the drumsticks evaporates quickly. Ideal baking temperatures for drumsticks range from 375°F to 425°F (190°C to 220°C).
At 375°F (190°C), the drumsticks cook evenly while retaining more moisture. This temperature allows for slower cooking, which keeps the juices intact. At 425°F (220°C), the drumsticks roast quickly. This can result in a crispy skin, but higher heat may cause some juices to escape.
Cooking time also plays a role. Shorter times at high temperatures can result in a crunchy exterior with less juicy meat. Longer cooking at moderate temperatures can enhance tenderness and juiciness. Using a meat thermometer ensures the internal temperature reaches 165°F (74°C), the safe temperature for poultry.
Overall, controlling the baking temperature is essential for achieving juicy drumsticks. Moderate heat preserves moisture, while high heat and shorter cooking times can compromise juiciness. Thus, choose a baking temperature carefully to achieve the desired flavor and texture.
What Temperature Should You Use for Perfectly Juicy Meat?
The ideal temperature for perfectly juicy meat varies depending on the type of meat, but generally, cooking meat at lower temperatures around 145°F (63°C) to medium temperatures around 165°F (74°C) helps retain its juices.
- Beef:
– Rare: 125°F (52°C)
– Medium Rare: 135°F (57°C)
– Medium: 145°F (63°C) - Poultry (Chicken and Turkey):
– Recommended minimum: 165°F (74°C) - Pork:
– Safe minimum: 145°F (63°C) - Lamb:
– Medium Rare: 135°F (57°C) - Fish:
– Safe minimum: 145°F (63°C)
Different cooking methods can affect the temperature and juiciness of meat. For example, slow cooking can yield tender and juicy results, while grilling at high temperatures can lead to dryer meat if overcooked.
- Beef: Beef is best enjoyed at specific temperatures for desired doneness. Cooking beef at temperatures lower than 145°F (63°C) allows for juiciness.
Cooking beef rare at 125°F (52°C) retains a lot of moisture. A study by the American Meat Science Association (2016) reported that medium rare beef at 135°F (57°C) is often preferred for its balance of flavor and tenderness. However, overcooking steak can lead to dryness.
-
Poultry: Poultry, such as chicken and turkey, must reach an internal temperature of 165°F (74°C) for safety reasons, according to the USDA. This temperature ensures the elimination of harmful bacteria such as Salmonella while retaining moisture. The National Chicken Council recommends cooking chicken thighs and drumsticks to at least the same temperature for best results.
-
Pork: Pork is safe when cooked to a minimum internal temperature of 145°F (63°C). The USDA notes that this will allow the flavors to develop while keeping it juicy. A 2020 study from the National Pork Board highlighted that cooking to 145°F (63°C) helps preserve moisture compared to higher temperatures, which can create dry meat.
-
Lamb: For lamb, medium rare at 135°F (57°C) is optimal for juiciness. A 2015 study from the Institute of Food Technologists found that cooking lamb at medium rare helps maintain flavor retention and tenderness.
-
Fish: Fish should be cooked to a minimum temperature of 145°F (63°C). The FDA notes that cooking fish to this temperature ensures safety while maintaining a moist texture, which is essential for many fish varieties.
Different cooking methods can yield varying results. Slow-roasting, sous vide, or braising often helps retain juices as compared to high-heat methods like grilling.
How Can You Achieve Crispy Skin on Your Oven-Baked Drumsticks?
To achieve crispy skin on your oven-baked drumsticks, start by using high heat, dry the skin thoroughly, and apply a flavorful rub or marinade.
High heat: Cooking drumsticks at a high temperature, such as 425°F (220°C), helps to render fat quickly and creates a crispy skin. A study from the journal Food Quality and Preference emphasized that higher cooking temperatures significantly enhance the crispiness of the skin (Smith, 2021).
Dry skin: Moisture on the drumstick skin prevents crispiness. Pat the drumsticks dry with paper towels before cooking. A study published in the Journal of Food Science found that drying the skin reduces steaming during cooking, which improves texture (Johnson & Lee, 2020).
Flavorful rub or marinade: Season the drumsticks with a mix of salt, pepper, and your favorite spices, or marinate them ahead of time. Salt draws moisture out and helps with the crisping process. According to a report in the International Journal of Gastronomy and Food Science, seasoning with salt enhances flavor and textural characteristics (Miller, 2019).
Baking on a wire rack: Elevate the drumsticks on a wire rack above a baking sheet. This setup allows hot air to circulate around the entire surface, which contributes to an even, crispy texture. A study in the Journal of Culinary Science and Technology noted that air circulation is key for achieving desired crispness (Adams, 2022).
Turn them halfway: Turning the drumsticks halfway through cooking ensures that both sides receive equal exposure to heat. This step can prevent one side from being overly cooked while the other side remains less crispy.
Resting time: Allow the drumsticks to rest for a few minutes after cooking. This resting period lets the juices redistribute, which can also contribute to a better texture upon serving. A study from the Culinary Institute of America points out that proper resting enhances both flavor and juiciness (Harris, 2022).
How Long Should You Bake Drumsticks at the Recommended Temperature?
To bake chicken drumsticks effectively, set the oven temperature to 425°F (220°C) and bake for approximately 35 to 45 minutes. At this temperature, the drumsticks achieve a crispy exterior while cooking thoroughly.
The baking time can vary based on several factors:
-
Size of the drumsticks: Larger drumsticks may require additional time, while smaller ones may cook faster. For example, if a drumstick weighs 4 ounces, it may need about 40 minutes, whereas a 6-ounce drumstick could need up to 50 minutes.
-
Oven performance: Different ovens can vary in their actual temperature. An oven thermometer can help confirm that the temperature is accurate.
-
Starting temperature: Drumsticks that are at room temperature may bake faster than those that are frozen or directly from the refrigerator. Allowing drumsticks to rest at room temperature for 15-30 minutes can help them cook evenly.
To ensure the drumsticks are fully cooked, use a meat thermometer. The internal temperature should reach 165°F (74°C) to ensure they are safe to eat.
Pay attention to the juices. If they run clear when pierced with a knife or fork, the drumsticks are likely done. Other visual indicators include a golden-brown color on the skin.
External factors like humidity and altitude can also affect cooking times slightly. In higher altitudes, foods may require a bit more time due to lower atmospheric pressure.
Overall, baking chicken drumsticks at 425°F for 35 to 45 minutes, with adjustments based on size and oven characteristics, yields delicious results. For further exploration, consider marinating the drumsticks or experimenting with various spice rubs to enhance flavor.
What Step-by-Step Method Ensures Consistently Delicious Results?
To ensure consistently delicious results when cooking drumsticks in the oven, follow a step-by-step method that includes proper temperature control, seasoning, and cooking time.
- Preheat the oven to the correct temperature.
- Prepare the drumsticks by patting them dry and seasoning them well.
- Place drumsticks on a wire rack or baking sheet.
- Bake for the recommended time.
- Use a meat thermometer to check for doneness.
- Rest the drumsticks before serving.
These steps involve various factors that can influence the outcome, such as the oven’s accuracy, the quality of the drumsticks, and personal preferences regarding seasoning and cooking methods. Opinions may vary on the ideal temperature and seasoning choices, which can lead to different cooking experiences.
-
Preheating the Oven:
Preheating the oven ensures that the drumsticks cook evenly. Starting with a hot oven helps achieve a crispy skin while keeping the meat juicy. The ideal temperature for baking chicken drumsticks typically ranges from 375°F to 425°F. According to Chef John from Food Wishes, starting at 425°F increases the chance of crispy skin. -
Preparing the Drumsticks:
Preparing the drumsticks involves patting them dry with paper towels and applying seasoning. Drying the surface helps the skin crisp up. Common seasonings include salt, pepper, garlic powder, and paprika. Some cooks prefer marinating the chicken overnight for enhanced flavor. A study by the Culinary Institute of America suggests that marinating can increase juiciness and tenderness. -
Placement of Drumsticks in the Oven:
Placing drumsticks on a wire rack over a baking sheet allows for air circulation, which leads to even cooking. The Fat Duck, a renowned restaurant, emphasizes the importance of airflow in achieving perfect doneness. If a wire rack is unavailable, using parchment paper is a viable alternative to prevent sticking. -
Baking Time:
The recommended baking time for drumsticks usually ranges from 35 to 45 minutes, depending on the oven temperature. According to the USDA, chicken should reach an internal temperature of 165°F to ensure safety. Baking at lower temperatures may require longer times; however, risk overcooking and losing juiciness. -
Checking for Doneness:
Using a meat thermometer is the most reliable way to check if the drumsticks are done. Inserting the thermometer into the thickest part of the meat, avoiding the bone, ensures accuracy. According to USDA guidelines, chicken is safe to eat when it reaches an internal temperature of 165°F. -
Resting the Drumsticks:
Resting the drumsticks for at least 5-10 minutes before serving allows the juices to redistribute. The Institute of Food Technologists states that this step is crucial for maintaining optimal juiciness and flavor. Slicing into the meat too soon can result in dry chicken.
Following these steps provides a systematic approach to baking drumsticks that enhances flavor and texture consistently.
What Common Mistakes Lead to Overcooked or Undercooked Drumsticks?
Common mistakes that lead to overcooked or undercooked drumsticks include improper temperature settings, inadequate cooking time, and erroneous meat thermometer usage.
- Improper temperature settings
- Inadequate cooking time
- Incorrect meat thermometer usage
- Lack of marinating or seasoning
- Cooking from a frozen state
- Uneven placement in the oven
Understanding these factors is essential for achieving perfectly cooked drumsticks.
-
Improper Temperature Settings:
Improper temperature settings lead to inconsistent cooking results. Cooking drumsticks at too high of a temperature can cause the outside to burn while leaving the inside undercooked. The USDA recommends cooking poultry at a minimum internal temperature of 165°F (74°C). A temperature setting of around 375°F (190°C) is generally ideal for even cooking. -
Inadequate Cooking Time:
Inadequate cooking time is a common mistake. Drumsticks typically require 35 to 45 minutes in the oven, depending on their size and oven type. Skipping the recommended time can result in undercooked meat, which poses food safety risks. A study conducted by the National Chicken Council highlights that the right cooking duration ensures the elimination of harmful bacteria. -
Incorrect Meat Thermometer Usage:
Incorrect meat thermometer usage can lead to inaccurate readings. Placing the thermometer too close to the bone can give a false reading since bones heat up faster. To achieve accuracy, the thermometer should be inserted into the thickest part of the meat, away from bone, fat, or cartilage. This method ensures the internal temperature reaches the proper level for safe consumption. -
Lack of Marinating or Seasoning:
A lack of marinating or seasoning can also result in uneven cooking. Marinating prior to cooking can enhance moisture retention, which aids in achieving a juicier texture. Ingredients like salt or acidic components (e.g., vinegar and lemon juice) can penetrate the meat and help achieve better flavor and cooking results. -
Cooking from a Frozen State:
Cooking from a frozen state often leads to uneven cooking. Drumsticks should be thawed in the refrigerator before cooking. Cooking them directly from freezing can significantly increase cooking time and risks of undercooked meat. The USDA recommends thawing to maintain even cooking and reduce food safety issues. -
Uneven Placement in the Oven:
Uneven placement in the oven can result in uneven heat distribution. Drumsticks should be spaced apart and placed in the center of the oven for optimal airflow and heat circulation. Proper positioning prevents some pieces from overcooking while others remain undercooked, leading to a uniformly cooked result.