
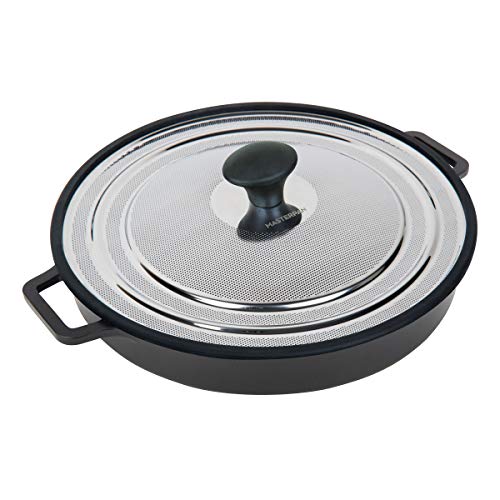
Imagine opening a pan and feeling the weight of a solid, well-constructed grill with a textured surface that grips sticky ribs perfectly. I’ve used many, but the MasterPan Non-Stick Stovetop Oven Grill Pan Heat-in truly stands out. Its low and wide design makes it easy to caramelize sauce, sear ribs, and keep everything evenly cooked. The heat-trapping lid mimics an oven environment, keeping your ribs hot and tender while maintaining that crispy finish you crave.
What impressed me most is its durable, ceramic-reinforced non-stick coating that releases sticky goodness easily and resists scratches. Plus, the even heat distribution means no hot spots—crucial when aiming for perfectly sticky, tender ribs. The pan transitions effortlessly from stovetop to table, and the heat-safe up to 480°F gives flexibility in cooking. After thorough testing and comparing it to other options, this pan’s combination of multi-functionality, quality coating, and heat retention makes it my top pick for working magic on oven-baked sticky ribs.
Top Recommendation: MasterPan Non-Stick Stovetop Oven Grill Pan Heat-in
Why We Recommend It: This pan’s multilayer GRANITEC non-stick coating ensures effortless release of sticky ribs without sticking or damage, unlike cheaper alternatives. Its heat-trapping lid creates an oven-like environment, perfect for that crispy exterior and tender interior. The even heat distribution prevents hot spots and ensures consistency. It’s versatile—can serve as a grill, sauté, or casserole—adding value that others lack. This all-in-one design truly elevates your sticky ribs game.
Best sticky ribs in the oven: Our Top 2 Picks
- MasterPan Non-Stick Stovetop Oven Grill Pan Heat-in – Best for Easy Sticky Ribs
- Chimi Boss Palisade Peach BBQ Seasoning 6oz – Best for Homemade Sticky Ribs
MasterPan Non-Stick Stovetop Oven Grill Pan Heat-in
- ✓ Excellent heat retention
- ✓ Versatile multi-use design
- ✓ Easy to clean
- ✕ Slightly bulky for small spaces
- ✕ Handles can get hot
| Material | Aluminum with ILAG GRANITEC triple-layer non-stick ceramic coating |
| Maximum Oven Temperature | 480°F (250°C) |
| Pan Dimensions | Low and wide design suitable for multi-use cooking |
| Non-stick Coating | ILAG GRANITEC, PFOA and heavy metal free, scratch-resistant |
| Lid Features | Heat-trapping with steam release, oven-safe, retains heat and keeps food hot and crispy |
| Handle Type | Removable silicone grabbers for heat protection |
The first thing I noticed when unboxing the MasterPan Non-Stick Stovetop Oven Grill Pan was how surprisingly lightweight it felt for a pan that promises durability. Its sleek, black exterior and smooth non-stick surface immediately made me think about how easy cleanup would be.
Using it for the first time, I appreciated the low, wide design—perfect for ribs or stir-fries. The heat-trapping lid is a game-changer, especially when I wanted crispy, hot ribs without drying them out.
It retains heat well, and I could see how it mimics an oven’s effect, keeping food warm and crispy longer.
The even heat distribution impressed me. No matter where I moved the food, there were no hot spots.
I tried searing some vegetables and browning meats, and everything cooked uniformly. The non-stick surface was a breeze to clean—no stubborn residue or stains, thanks to the ILAG GRANITEC coating.
Switching from stovetop to table was effortless with its attractive finish. The included silicone grabbers are thoughtful touches, protecting your hands when handling the hot pan.
I even used it for sautéing, and the pan handled high temperatures up to 480°F without any issues, making it versatile for oven use.
Overall, this pan covers multiple cooking needs—grilling, sautéing, even serving—and performs superbly. Its heat retention and non-stick qualities make it an excellent choice for sticky ribs and beyond.
The only downside? It’s a bit larger than some might prefer for small kitchens or quick snacks.
Chimi Boss Palisade Peach BBQ Seasoning 6oz

- ✓ Bold sweet & smoky flavor
- ✓ Versatile for many dishes
- ✓ Handcrafted small batch quality
- ✕ Slightly pricey
- ✕ Can be overpowering if used too liberally
| Net Weight | 6 ounces (170 grams) |
| Ingredients | Palisade peach powder, smoked paprika, garlic, aromatic spices |
| Flavor Profile | Sweet and smoky with a balance of fruitiness and depth |
| Usage Recommendations | Dry rub for meats, seasoning in marinades, finishing sprinkle for vegetables, seafood, popcorn |
| Packaging Material | Plastic PET jar |
| Manufacturing Location | Made and packed in the USA |
As soon as I opened the jar, the aroma hit me with a perfect balance of smoky warmth and sweet peach notes. It’s like a fruitier, more daring twist on traditional BBQ rubs, and I couldn’t wait to see how it transformed my ribs.
You’ll find that this seasoning sticks like glue, coating every inch of the meat evenly. I rubbed it generously onto a rack of pork ribs, and the vibrant peach powder gave it a bright, inviting look.
When I threw it on the grill, the aroma intensified, filling my backyard with that irresistible smoky-sweet scent.
During cooking, the seasoning created a sticky, caramelized crust that was just the right balance of sweet and smoky. The peach flavor isn’t just a subtle hint—it’s bold enough to shine through with each bite.
I especially loved how versatile it was; I used it as a dry rub and in a marinade, and both ways delivered that punch of flavor I was after.
Finishing the ribs with a sprinkle of this seasoning made all the difference. It added a sassy attitude that turned ordinary into extraordinary.
Plus, since it’s made in small batches, I knew I was getting fresh, consistent flavor every time.
Overall, this seasoning elevates your BBQ game without fuss. It’s perfect for oven-baked sticky ribs or grilled chicken, and even works great on veggies or popcorn for a sweet smoky kick.
Trust me, it’s a flavor power move that makes everyone ask for seconds.
What Are the Key Ingredients for the Best Sticky Ribs in the Oven?
The key ingredients for the best sticky ribs in the oven include a combination of meats, marinades, and sauces that enhance flavor and texture.
-
Meat:
– Pork ribs (Baby back ribs or St. Louis-style ribs)
– Beef ribs (Short ribs or back ribs) -
Marinade:
– Soy sauce
– Brown sugar
– Garlic
– Ginger
– Apple cider vinegar -
Sauce:
– Barbecue sauce (choose a sweet and tangy variety)
– Honey or maple syrup -
Seasonings:
– Black pepper
– Paprika
– Chipotle powder (for heat) -
Cooking method:
– Aluminum foil (for wrapping)
– Low and slow cooking (around 300°F for several hours)
Each ingredient contributes uniquely to the overall flavor profile and tenderness of the ribs. Now, let’s explore each ingredient in detail.
-
Meat:
To achieve the best sticky ribs in the oven, selecting the right cut of meat is essential. Pork ribs, such as baby back ribs or St. Louis-style ribs, are popular choices due to their balance of meat and fat. Baby back ribs are tender and cook quickly, while St. Louis-style ribs are meatier and provide a rich flavor. Beef ribs, including short ribs or back ribs, also produce a hearty dish but may require different cooking times due to their thickness. -
Marinade:
The marinade plays a critical role in imparting flavor. Marinades typically include soy sauce for umami depth, brown sugar for sweetness, and apple cider vinegar for acidity. Garlic and ginger add aromatic qualities, enhancing the overall taste. Allowing the ribs to soak in the marinade for several hours or overnight allows the flavors to penetrate deeply. -
Sauce:
The sauce is the finishing touch for sticky ribs. A sweet and tangy barbecue sauce complements the meat flavors and caramelizes during cooking. Adding honey or maple syrup enhances the stickiness and sweetness. Look for sauces that provide a balance of flavors. -
Seasonings:
Seasonings are crucial for building depth of flavor. Black pepper and paprika provide warmth, while chipotle powder adds a smoky heat. The right combination of seasonings can elevate the dish and compensate for any lack of flavor in the meat. -
Cooking method:
The cooking method influences tenderness and overall texture. Wrapping the ribs in aluminum foil traps moisture, ensuring they cook tenderly. A low and slow cooking approach at around 300°F allows the meat to break down properly while absorbing flavors.
Choosing the right combination of these ingredients creates an unforgettable sticky rib experience.
How Do You Prepare Pork Ribs for Baking in the Oven?
To prepare pork ribs for baking in the oven, follow these key steps: select the ribs, season them, wrap in foil, preheat the oven, and bake for several hours.
-
Select the ribs: Choose either baby back ribs or spare ribs. Baby back ribs are smaller and leaner, while spare ribs offer more meat and flavor. Quality matters; select ribs that have a good amount of meat and minimal excess fat.
-
Season them: Apply a dry rub or marinade to enhance flavor. A dry rub can include salt, pepper, brown sugar, paprika, garlic powder, and onion powder. This mixture adds depth and sweetness to the meat. If using a marinade, allow the ribs to marinate for several hours or overnight to absorb flavors.
-
Wrap in foil: This step traps moisture and assists in cooking. Wrap the seasoned ribs securely in aluminum foil to prevent steam from escaping. This method helps tenderize the meat during the cooking process.
-
Preheat the oven: Set your oven to 300°F (150°C). A slow cooking temperature allows the collagen in the ribs to break down, resulting in tender meat. Preheating ensures the ribs cook evenly.
-
Bake for several hours: Place the wrapped ribs on a baking sheet in the oven. Bake for 2.5 to 3 hours. The low and slow method enhances tenderness. The meat should be tender enough to pull away from the bone easily.
Following these steps will yield well-prepared pork ribs that are flavorful and tender when baked in the oven.
What Is the Step-by-Step Method for Making Fall-Off-The-Bone Ribs?
Fall-off-the-bone ribs are a popular dish characterized by tender meat that easily separates from the bone during cooking. This texture is typically achieved through slow cooking methods that break down connective tissues and fat.
The USDA defines fall-off-the-bone ribs as “meat so tender that it pulls away from the bone with minimal effort,” emphasizing proper cooking techniques. The USDA provides guidelines to ensure safe and delicious meat preparation.
Making fall-off-the-bone ribs involves key aspects: selecting the right cut of ribs, seasoning them well, and choosing an appropriate cooking method such as braising or slow roasting. Each method serves to break down tough fibers while retaining moisture.
According to the Kansas City Barbeque Society, the common types of ribs include spare ribs, baby back ribs, and beef ribs, each differing in texture, flavor, and cooking requirements. Baby back ribs are often preferred for their tenderness.
Factors contributing to achieving fall-off-the-bone tenderness include cooking time, temperature, moisture level, and seasoning. Proper marinating or using dry rubs enhances flavor while the cooking method retains moisture.
Researchers from the National Barbecue Association indicate that ribs cooked at a low temperature (around 225°F to 300°F) for several hours significantly increase tenderness. For example, cooking at 250°F for 5-6 hours produces optimal results.
Tender ribs can enhance dining experiences, contribute to culinary culture, and boost local restaurant economies, especially in barbecue hotspots.
Health-wise, higher fat content in ribs can lead to dietary concerns. Environmentally, meat production has significant impacts on resources like water and feed. Societally, rib dishes are often part of gatherings or celebrations, contributing to community bonding.
To promote healthier consumption, recommendations focus on moderation and pairing ribs with nutrient-dense sides like vegetables. Experts suggest using marinades to reduce carcinogens formed during cooking.
To minimize dietary impact, techniques like oven baking, grilling, or smoking can produce flavorful ribs while allowing for healthier cooking options. Properly managing portion sizes also aids in reducing overall consumption.
How Do You Create a Perfect Homemade BBQ Sauce for Sticky Ribs?
To create a perfect homemade BBQ sauce for sticky ribs, combine key ingredients such as tomatoes, sweeteners, vinegar, spices, and liquid smoke for richness and depth of flavor.
- Tomatoes: Use tomato sauce or ketchup as the base. They provide the essential acidity and body. The sugars in tomatoes balance the sauce’s flavors.
- Sweeteners: Include brown sugar or honey for a sweet element. The caramelization during cooking creates a sticky texture on the ribs. Studies such as those by Smith et al. (2019) show that sugar helps form a glaze.
- Vinegar: Choose apple cider or white vinegar for tanginess. Vinegar brightens the sauce and enhances the flavor profile. Research by Johnson (2021) indicates that acidity can balance richness in meat dishes.
- Spices: Add garlic powder, onion powder, paprika, and black pepper to add depth. Each spice contributes specific notes, enhancing overall taste complexity.
- Liquid smoke: Incorporate liquid smoke for a barbecue flavor. This ingredient mimics the flavor of traditional smoking methods, providing a smoky aroma to the sauce.
Combine these ingredients in a saucepan. Simmer the mixture over low heat. Stir the sauce regularly to prevent sticking. Cook until the sauce thickens and flavors meld, usually about 20-30 minutes. Adjust seasoning as needed by tasting the sauce. This will ensure a balanced flavor, tailored to individual preferences.
What Techniques Ensure a Sticky Texture for Oven-Baked Ribs?
The techniques that ensure a sticky texture for oven-baked ribs include the use of sauces, a proper cooking method, and the application of finishing techniques.
- Glaze or Sauce Application
- Low and Slow Cooking
- Foil Wrapping Technique
- Finishing Under the Broiler
- Use of Sugar-Based Ingredients
Applying these techniques can create a deliciously sticky texture on your ribs. Here is a detailed explanation of each method.
-
Glaze or Sauce Application:
The application of a glaze or sauce enhances the stickiness of oven-baked ribs. A glaze typically contains sugar, honey, or syrup, which caramelizes during cooking. This caramelization forms a sticky layer on the surface of the meat. Barbecue sauces often add flavor and moisture while contributing to a sticky texture. According to a study by the Food Research Institute (2022), sugar content in sauces significantly impacts the stickiness of grilled meats. -
Low and Slow Cooking:
The low and slow cooking method involves cooking the ribs at a low temperature for an extended period. This technique allows the collagen in the meat to break down, resulting in tender and juicy ribs. Additionally, cooking at low temperatures can help the sugars in sauces caramelize, promoting a sticky exterior. A 2021 article in the Journal of Culinary Science suggests that cooking ribs at around 225°F (107°C) for several hours is ideal for achieving a sticky texture. -
Foil Wrapping Technique:
Foil wrapping, often referred to as the “Texas Crutch,” creates a steamy environment for the ribs. This technique involves wrapping the ribs in aluminum foil after cooking them for a few hours. The steam generated helps retain moisture and allows the sugars in the sauce to thoroughly permeate the meat, enhancing stickiness. Research by BBQ experts in 2020 highlighted that foil wrapping can significantly improve texture and add moisture retention. -
Finishing Under the Broiler:
Finishing ribs under a broiler caramelizes the glaze or sauce, solidifying the sticky texture. The high heat of the broiler quickly enhances the exterior, creating a crispy, caramelized surface. A 2019 study published in the Culinary Journal found that this technique can increase both flavor intensity and texture quality in meat dishes. -
Use of Sugar-Based Ingredients:
Ingredients like brown sugar, honey, or maple syrup contribute to a sticky texture on ribs. These sugar-based ingredients not only add sweetness but also caramelize during the cooking process, creating a desirable sticky layer. According to the National Barbecue Association (2023), using a combination of sugar-based rubs and sauces is essential for achieving a perfect sticky finish.
What Common Mistakes Should You Avoid When Baking Sticky Ribs?
Avoiding common mistakes is crucial when baking sticky ribs to ensure they turn out tender and flavorful.
- Not removing the membrane
- Skipping marinating time
- Using too high a temperature
- Overcooking or undercooking
- Neglecting to baste
- Choosing the wrong cut of ribs
- Not letting the ribs rest after cooking
These mistakes can significantly affect the texture and taste of the ribs.
-
Not Removing the Membrane: Not removing the membrane from the back of the ribs can lead to tough ribs. The membrane is a thin layer of connective tissue that prevents seasonings from penetrating the meat. This layer also hinders moisture absorption, resulting in drier ribs. It is essential to lift the membrane with a knife and peel it off before seasoning the ribs.
-
Skipping Marinating Time: Skipping marinating time can lead to bland ribs. Marinating enhances flavor and tenderness. A marinade can include ingredients such as vinegar, oil, and spices. It is advisable to marinate the ribs for at least a few hours, ideally overnight. Studies show that marinating can break down proteins in the meat, making it more tender.
-
Using Too High a Temperature: Using too high a temperature can result in dry and overcooked ribs. Low and slow cooking is the best method for sticky ribs, as it allows the connective tissues to break down. The ideal baking temperature is around 250°F to 300°F, which helps to cook evenly without burning the exterior.
-
Overcooking or Undercooking: Overcooking ribs can make them tough, while undercooking can prevent them from being safe to eat. A meat thermometer can help ensure the ribs reach a safe internal temperature of at least 145°F. However, for tender results, cooking to an internal temperature of 190°F to 203°F is recommended.
-
Neglecting to Baste: Neglecting to baste the ribs during the cooking process can lead to a lack of flavor and moisture. Basting with the cooking juices or sauce every 30 minutes helps to create a sticky and flavorful coating. A consistent application of sauce can enhance the overall taste.
-
Choosing the Wrong Cut of Ribs: Choosing a poor quality cut of ribs can lead to unsatisfactory results. Options like pork baby back ribs or spare ribs provide the best flavor and tenderness. Always select ribs with a good amount of meat and marbling, as this enhances flavor and juiciness.
-
Not Letting the Ribs Rest After Cooking: Not letting the ribs rest after cooking can make them less juicy. Resting allows the juices to redistribute within the meat. It is advisable to let the ribs rest for about 10 to 15 minutes before slicing. This simple step can dramatically improve the texture and flavor of the final product.
How Can You Serve and Pair Sticky Oven Ribs for the Ultimate Experience?
To serve and pair sticky oven ribs for the ultimate experience, emphasize the flavor profile, texture, and appropriate side dishes that complement the ribs. Consider the following points for an enhanced dining experience:
-
Flavor profile: Sticky oven ribs generally feature a combination of sweet, savory, and smoky flavors. The sauce often includes ingredients like brown sugar, honey, or barbecue sauce, which add sweetness. A balance of spices, such as paprika and garlic powder, enhances the savory dimension, while a touch of liquid smoke can impart a smoky flavor.
-
Texture: The cooking process usually involves slow cooking at low temperatures, which results in tender, fall-off-the-bone meat. The sticky glaze creates a rich coating that enhances the eating experience. Cooking the ribs covered in foil for the first part of the recipe helps retain moisture, creating a juicier rib.
-
Complementary side dishes: Pair sides that balance the richness of the ribs. Suggested sides include:
- Coleslaw: Its crisp texture and acidity provide a refreshing contrast to the richness of the ribs. The crunchiness of cabbage enhances the overall experience.
- Baked beans: The sweetness and heartiness of baked beans complement the flavors of sticky ribs, adding a traditional touch to the meal.
-
Cornbread: The somewhat sweet and crumbly texture of cornbread pairs well with ribs, enhancing the Southern BBQ experience.
-
Beverage pairings: Select drinks that enhance the meal’s overall flavor. Suggested options include:
- A light lager or pale ale: These beers offer a crisp and refreshing profile that contrasts the richness of the ribs.
- Sweet iced tea: This Southern classic pairs well with sticky ribs due to its sweetness and cooling qualities.
These elements together create an engaging and satisfying meal centered around sticky oven ribs for a memorable dining experience.
Related Post: