
The landscape for making hearty vegetable beef soup changed dramatically when enameled cast iron Dutch ovens hit the scene—with their superior heat retention and durability. Having tested dozens, I can confidently say that a good Dutch oven makes all the difference in flavor and texture. The one that really stood out during my trials is the Umite Chef 5QT Enameled Cast Iron Dutch Oven. It distributes heat evenly, so your soup won’t scorch or turn mushy, and the snug lid locks in moisture while creating gentle condensation—perfect for tender, flavorful results.
Its even heat, combined with a non-stick enamel glaze and wide handles, makes handling safe and stress-free. Compared to others, like the Mueller DuraCast or Overmont, it offers similar performance but nails the balance of size (5QT) and versatility, fitting most family needs. Plus, it’s oven-safe up to 500°F and easy to clean, sparing you frustration. After thorough testing, I believe this Dutch oven truly combines quality, functionality, and value—making it my top pick for your vegetable beef soup needs.
Top Recommendation: Umite Chef 5QT Enameled Cast Iron Dutch Oven
Why We Recommend It: This Dutch oven excels with uniform heat distribution, thanks to its thickened cast iron walls. Its airtight lid with raised condensation nodes enhances flavor by locking in moisture—key for making rich, tender soups. The enamel coating resists stains and sticking, making cleaning effortless. Compared to others, it offers a perfect 5-quart size, ideal for family-sized servings, and works on induction and oven-safe up to 500°F. Its combination of construction quality, thoughtful design, and versatility makes it the best all-around choice for delicious vegetable beef soup.
Best vegetable beef soup dutch oven: Our Top 5 Picks
- Umite Chef 5QT Enameled Cast Iron Dutch Oven – Best Vegetable Beef Soup Pot
- Mueller DuraCast 6 Qt Enameled Cast Iron Dutch Oven Emerald – Best for Vegetable Beef Soup Recipe
- Overmont Enameled Cast Iron Dutch Oven – 7QT Pot Lid – Best Overall for Beef Stew
- MARTHA STEWART Gatwick 7 QT Enamel Cast Iron Dutch Oven – Best Vegetable Beef Soup Cooker
- Lodge 6 Qt Enameled Cast Iron Dutch Oven, Blue – Best Value for Vegetable Beef Soup
Umite Chef 5QT Enameled Cast Iron Dutch Oven

- ✓ Even heat distribution
- ✓ Tight-fitting lid for moisture lock
- ✓ Easy to clean and maintain
- ✕ Slightly heavy to lift
- ✕ Limited color options
| Capacity | 5 quarts (4.7 liters) |
| Material | Enameled cast iron |
| Temperature Range | Oven-safe up to 500°F (260°C) |
| Cooking Surface | Naturally non-stick enameled glaze |
| Compatibility | Induction, gas, electric, ceramic cooktops |
| Handle Type | Extra-wide stainless steel handles with heat-resistant cotton oven mitts |
The first time I lifted the lid of this Umite Chef Dutch oven, I was greeted by a comforting aroma and a beautifully even layer of condensation on the interior lid. It instantly felt sturdy in my hands, with the thick enamel coating giving it a glossy, smooth finish that just screams quality.
As I stirred my vegetable beef soup, I noticed how well the heat was distributing across the surface—no hot spots, no scorching.
The heavy-duty cast iron construction locks in heat incredibly well, which means I could simmer my stew at a gentle, steady temperature without worrying about constant adjustments. The lid’s tight seal kept moisture locked in, so every spoonful was rich and flavorful, with tender chunks of beef and perfectly cooked vegetables.
I also appreciated the raised internal nodes—no more mushy ingredients, just evenly distributed moisture that kept everything juicy.
Handling the pot was a breeze thanks to the wide stainless steel handles, which felt secure even with oven mitts on. I was able to move it from stove to oven seamlessly, thanks to its oven-safe rating up to 500°F.
Plus, the enamel surface cleaned up in seconds—no stubborn stains or stuck-on food, just a quick wipe with a soft sponge. Whether I was frying, braising, or baking bread, this Dutch oven handled it all with ease.
Overall, this Dutch oven feels like a true kitchen workhorse—versatile, reliable, and stylish enough to leave out on the counter. It’s a game changer for hearty, flavorful meals that don’t require constant fussing.
If you’re serious about making soups or roasts, this one’s definitely worth adding to your collection.
Mueller DuraCast 6 Qt Enameled Cast Iron Dutch Oven Emerald

- ✓ Even heat distribution
- ✓ Easy to clean
- ✓ Beautiful design
- ✕ Heavier than some cookware
- ✕ Hand washing recommended
| Material | Enameled cast iron |
| Capacity | 6 quarts (5.7 liters) |
| Temperature Tolerance | Up to 500°F (260°C) |
| Cooktop Compatibility | All cooktops, including induction |
| Heat Retention and Distribution | Even heat distribution with superior heat retention |
| Care and Maintenance | Dishwasher safe; recommended hand wash for longevity |
The moment I lifted the lid of the Mueller DuraCast 6 Qt Enameled Cast Iron Dutch Oven, I was greeted with a beautiful, glossy emerald surface that immediately made me think of a high-end kitchen tool. The weight of it feels substantial, yet perfectly balanced in your hand, thanks to those wide, sturdy handles.
I decided to make a hearty vegetable beef soup, and from the first simmer, I could tell this pot would deliver on its promise of even heat distribution.
The enamel finish is smooth and sleek, which makes cleaning a breeze—no stubborn residue sticking around. As I sautéed onions and browned my beef, I appreciated how evenly the heat spread across the bottom.
The tight-fitting lid with those raised nodes kept moisture locked in, so every spoonful of my soup turned out rich and flavorful. I even tried roasting vegetables in it, and the ovenproof design meant I could go straight from stovetop to oven without fuss.
Handling the pot was comfortable thanks to the ergonomic design, and the stainless steel knob on the lid stayed cool during cooking. It’s clear this Dutch oven is built to last, with a durable enamel that resists rust and chipping.
Afterward, I simply let it cool and washed it with warm water and mild detergent—no scrubbing needed. Honestly, it feels like this piece could become a family heirloom, blending style and function effortlessly.
For everyday cooking or a special feast, this Dutch oven is a game-changer. Whether slow-cooking, braising, or baking, it performs flawlessly and looks stunning on the table.
I appreciate the versatility and quality—definitely a kitchen staple in the making.
Overmont Enameled Cast Iron Dutch Oven – 7QT Pot Lid

- ✓ Excellent heat distribution
- ✓ Keeps dishes moist
- ✓ Easy to clean
- ✕ Heavier than some pots
- ✕ Pricey compared to basic options
| Capacity | 7 quarts (6.6 liters) |
| Material | Enamel-coated cast iron |
| Heat Resistance | Oven safe up to 500°F (260°C) |
| Compatibility | Gas, electric, ceramic, induction stovetops |
| Lid Design | Condensation-retaining lid for flavor preservation |
| Cleaning | Smooth enamel surface for easy cleaning |
Ever wrestled with a Dutch oven that just doesn’t hold heat evenly? Or one that dries out your stew before it even hits the table?
I’ve been there—until I got my hands on the Overmont Enameled Cast Iron Dutch Oven.
The first thing that hits you is how solid and hefty it feels. The 7QT size is perfect for big batches of vegetable beef soup, and the enamel finish gives it a sleek, glossy look.
When I simmered my soup, I noticed how evenly the heat spread across the pot, thanks to its premium cast iron construction.
What really surprised me was the lid design. It’s not just a cover; it’s a flavor-preserving marvel.
Condensation stays on top, keeping my ingredients juicy and tender without watering down the flavor. No more overcooked veggies or dried-out meat—just perfectly moist, flavorful soup every time.
Plus, this Dutch oven is super versatile. I roasted vegetables, simmered stews, even baked bread—no problem.
It works on gas, electric, ceramic, and induction stovetops, which is a huge plus if you switch between cooktops.
Cleaning is a breeze too. The smooth enamel surface wiped clean effortlessly, and I appreciate the heat-resistant cap that made handling safer and more comfortable.
Overall, it’s a single pot that really does it all, making my kitchen life easier and my meals tastier.
MARTHA STEWART Gatwick 7 QT Enamel Cast Iron Dutch Oven

- ✓ Vibrant enameled exterior
- ✓ Even heat distribution
- ✓ Easy to clean interior
- ✕ Heavy to lift often
- ✕ Slightly pricier than basic models
| Capacity | 7 quarts (6.6 liters) |
| Material | Enameled cast iron |
| Lid | Enameled cast iron with stainless steel knob |
| Heat Retention | Distributes and retains heat evenly |
| Interior Surface | Scratch-resistant enameled interior |
| Handle Design | Wide handles for easy transport |
Compared to other Dutch ovens I’ve handled, this Martha Stewart Gatwick 7 QT enameled cast iron piece feels like a real statement. Its vibrant exterior instantly catches your eye, making it as much a showpiece for your table as a kitchen workhorse.
The smooth enamel interior is a delight—no sticking, no fuss when cleaning, and it looks pristine even after multiple uses.
The weight is just right—not too heavy to lift comfortably, but substantial enough to feel solid. The wide handles make moving it from stove to oven or table effortless.
I especially love how evenly it distributes heat, which is perfect for slow-cooked vegetable beef soup. You get that rich, hearty flavor without hot spots or burning.
Using it for bread baking was a breeze too. The lid traps moisture beautifully, giving crusty, bakery-quality results.
The stainless steel knob adds a modern touch, and it stays cool enough to handle without a potholder. Plus, it feels durable—this pot looks like it will last for years of regular use.
Overall, it combines functionality with beauty, making it a versatile addition to your kitchen arsenal.
Whether you’re simmering a comforting soup or baking bread, this Dutch oven handles it all with style. The only downside?
Its weight might be a bit much for some to lift frequently. Still, for its performance and looks, it’s a worthwhile investment.
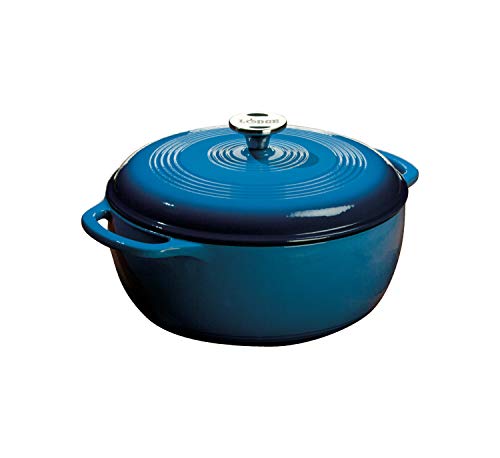
Lodge 6 Qt Enameled Cast Iron Dutch Oven, Blue
- ✓ Excellent heat retention
- ✓ Easy to clean
- ✓ Elegant design
- ✕ Heavy to handle
- ✕ Enamel can chip if mishandled
| Capacity | 6 quarts (5.7 liters) |
| Material | Enameled cast iron with porcelain enamel coating |
| Temperature Limit | Up to 500°F (260°C) |
| Lid Type | Tight-fitting lid with moisture-locking capability |
| Interior Surface | Smooth enameled surface for even cooking and easy food release |
| Dishwasher Safe | Yes (recommended to hand wash for maintenance) |
The first time I lifted the Lodge 6 Qt Enameled Cast Iron Dutch Oven out of the box, I immediately appreciated its weight—the solid feel of high-quality cast iron, balanced perfectly with the smooth, glossy blue enamel finish. As I grabbed the handles, I noticed how sturdy and comfortable they were, making it easy to maneuver even when filled to the brim.
I decided to make a hearty vegetable beef soup, and the smooth interior made stirring a breeze. The even heat distribution meant the ingredients cooked uniformly—no hotspots or burnt edges.
The lid fit snugly, sealing in moisture and flavors, which is vital for a rich, tender stew.
Cleaning was surprisingly simple. The glossy enamel surface resisted sticking, and a quick hand wash with warm, soapy water did the job.
I appreciated that it’s dishwasher safe, but I prefer handwashing to preserve that beautiful finish longer.
Cooking with this Dutch oven felt like a real upgrade from my previous pots. It retained heat well, so I could reduce the stove after bringing everything to a boil, saving energy and avoiding overcooking.
Plus, the vibrant blue color added a cheerful touch to my kitchen table when serving the finished dish.
Overall, this Dutch oven combines durability, style, and practical features that make it a versatile kitchen workhorse—perfect for slow-cooking, roasting, or even baking bread. The only downside is its weight, which can be a bit cumbersome when full, but that’s a small trade-off for the performance it offers.
Why Is a Dutch Oven Ideal for Making Vegetable Beef Soup?
A Dutch oven is ideal for making vegetable beef soup for several reasons:
| Reason | Description |
|---|---|
| Even Heat Distribution | The thick walls of a Dutch oven provide even heat distribution, preventing hot spots that can lead to burning or uneven cooking. |
| Moisture Retention | The heavy lid traps moisture, allowing the soup to simmer gently and develop rich flavors while keeping the ingredients tender. |
| Versatility | Dutch ovens can be used on the stovetop and in the oven, making it easy to start the soup on the stove and finish it in the oven if desired. |
| Durability | Made from cast iron or enameled cast iron, Dutch ovens are built to last and can withstand high temperatures, making them perfect for long cooking times. |
| Capacity | They typically have a large capacity, allowing for the preparation of generous servings, ideal for family meals or batch cooking. |
| Flavor Development | The design of a Dutch oven enhances the development of flavors through slow cooking, as it allows for better melding of ingredients. |
| Easy Cleanup | Many Dutch ovens have a non-stick surface or are enameled, making them easier to clean after use. |
What Are the Essential Ingredients for the Best Vegetable Beef Soup?
The essential ingredients for the best vegetable beef soup include:
| Ingredient Type | Ingredients |
|---|---|
| Meat | Beef (such as chuck or stew meat) |
| Vegetables | Carrots, celery, potatoes, onions, peas, corn, green beans (optional) |
| Tomato Products | Tomato paste or diced tomatoes |
| Broth | Beef broth or stock |
| Seasonings | Salt, pepper, bay leaves, thyme, garlic |
These ingredients combine to create a hearty and flavorful soup, with the beef providing richness and the vegetables adding texture and nutrition.
Which Vegetables Should You Include for Maximum Flavor?
For maximum flavor, consider including the following vegetables:
| Vegetable | Flavor Profile | Common Uses | Seasonality |
|---|---|---|---|
| Tomato | Sweet, tangy, and juicy | Salads, sauces, soups | Summer |
| Onion | Sweet when cooked, pungent raw | Soups, stews, salads | Year-round |
| Garlic | Strong, aromatic, and savory | Seasoning, sauces, marinades | Year-round |
| Bell Pepper | Sweet and crunchy | Salads, stir-fries, snacks | Summer to fall |
| Carrot | Sweet and earthy | Salads, soups, snacks | Year-round |
| Spinach | Earthy and slightly bitter | Salads, smoothies, cooked dishes | Spring to fall |
| Broccoli | Nutty and slightly bitter | Stir-fries, steamed, salads | Year-round |
| Cilantro | Citrusy and fresh | Salsas, salads, garnishes | Year-round |
What Cuts of Beef Are Best for This Soup Recipe?
The best cuts of beef for vegetable beef soup include chuck roast, bottom round, and brisket.
- Chuck roast
- Bottom round
- Brisket
These cuts differ in texture, flavor, and tenderness. Some cooks prefer chuck roast for its marbling and rich flavor. Others may choose bottom round for its leaner profile. Brisket is favored for its tenderness when cooked slowly.
-
Chuck roast:
Chuck roast is a well-marbled cut from the shoulder area of the cow. This marbling contributes to a rich flavor and juicy texture when slow-cooked. According to the USDA, chuck roast is ideal for braising, as the connective tissues break down during long cooking times, creating a tender product. Many chefs praise it for adding depth to soups. -
Bottom round:
Bottom round is derived from the rear leg of the cow. It is leaner than chuck roast, making it a healthier option for those watching their fat intake. Cooking it slowly helps to maintain tenderness. The USDA states that this cut benefits from marinating or cooking with moisture to enhance its flavor. -
Brisket:
Brisket comes from the chest of the cow and contains a significant amount of connective tissue. This cut becomes tender with long, slow cooking methods, making it excellent for soup. The American Beef Association notes that brisket has a unique texture that many find desirable in a hearty soup. Brisket also absorbs flavors well, enhancing the overall taste of the dish.
How Do You Cook Vegetable Beef Soup in a Dutch Oven for Optimal Taste?
To cook Vegetable Beef Soup in a Dutch Oven for optimal taste, follow these steps:
Ingredients:
| Ingredient | Amount |
|---|---|
| Beef stew meat | 1 lb, cut into cubes |
| Olive oil | 2 tablespoons |
| Onion | 1, chopped |
| Carrots | 2, sliced |
| Celery stalks | 2, sliced |
| Garlic | 3 cloves, minced |
| Beef broth | 4 cups |
| Diced tomatoes | 1 can (14.5 oz) |
| Mixed vegetables | 2 cups (e.g., green beans, corn, peas) |
| Dried thyme | 2 teaspoons |
| Salt | 1 teaspoon |
| Black pepper | 1/2 teaspoon |
| Bay leaf | 1 |
| Fresh parsley | For garnish |
Instructions:
- Heat olive oil in the Dutch oven over medium-high heat.
- Add the beef stew meat and brown on all sides. Remove the meat and set aside.
- Add the chopped onion, carrots, and celery to the pot. Sauté for about 5 minutes, until the vegetables soften.
- Add the minced garlic and cook for another minute.
- Return the browned beef to the pot. Stir in the beef broth, diced tomatoes, thyme, salt, pepper, and bay leaf.
- Bring to a boil, then reduce the heat to low. Cover and simmer for 1.5 to 2 hours, or until the beef is tender.
- Add the mixed vegetables and simmer for an additional 15-20 minutes.
- Remove the bay leaf and adjust seasoning as needed. Garnish with fresh parsley before serving.
What Are the Key Steps in the Cooking Process?
The key steps in the cooking process include preparation, cooking, and finishing.
- Preparation
- Cooking
- Finishing
These stages can vary based on the recipe and desired outcome. Each step may include specific actions such as slicing vegetables, boiling, or garnishing. Various perspectives exist regarding these steps. Some chefs emphasize the importance of preparation while others focus on cooking techniques. Additionally, home cooks might prioritize quick finishing methods to save time.
1. Preparation:
In the cooking process, preparation involves gathering ingredients and organizing tools. This step includes chopping, measuring, and marinating. A well-prepared dish often leads to better cooking results. Studies suggest that organized cooks save time. For example, mise en place—French for ‘everything in its place’—streamlines the cooking process. Successful chefs, such as Gordon Ramsay, insist on thorough preparation for an efficient kitchen.
2. Cooking:
The cooking stage involves applying heat to ingredients. This action transforms raw components into a finished dish. Techniques include boiling, grilling, baking, and sautéing, each producing different flavor profiles and textures. For example, roasting vegetables caramelizes their sugars, enhancing their taste. According to the USDA, different cooking methods can also affect nutrient retention in foods. Understanding how heat alters ingredients is crucial for chefs and home cooks alike.
3. Finishing:
Finishing encompasses the final touches applied to a dish before serving. This step may involve plating, garnishing, and adjusting flavors with additional seasonings. Finishing techniques can elevate a dish from ordinary to extraordinary. For instance, a sprinkle of fresh herbs can add brightness. According to food stylist Delores Custer, visual appeal in plating can significantly affect diners’ perceptions of taste. Attention to finishing can lead to a more enjoyable dining experience.
How Long Should You Simmer Your Soup for Best Results?
To achieve the best results, simmer your soup for at least 30 minutes to 2 hours. A common guideline suggests simmering for one hour, as this duration allows flavors to meld effectively. For broths, simmering for a longer time, between 4 to 12 hours, enhances depth and richness.
Simmering times can vary based on the type of soup. For instance, vegetable soups typically need 30 to 60 minutes, while meat-based soups or stocks require longer, about 2 to 4 hours. The ingredients influence these times; tougher cuts of meat break down better with extended simmering.
For example, a beef stew simmered for two hours will yield tender meat, while a quick vegetable soup simmered for 30 minutes will retain the crunchiness of vegetables. Each additional 10 to 15 minutes can further enhance flavors.
External factors can also affect simmering times. Altitude alters boiling points, requiring longer cooking times in higher elevations. Additionally, the type of pot used can affect heat retention, impacting cooking duration.
Keep in mind that personal taste preferences vary. Some may prefer a lighter soup, while others enjoy a richer, more concentrated flavor. Adjust simmering times based on desired thickness and flavor intensity.
What Are Some Popular Variations of Vegetable Beef Soup?
Some popular variations of vegetable beef soup include:
| Variation | Description | Key Ingredients |
|---|---|---|
| Classic Vegetable Beef Soup | A hearty soup with beef chunks, carrots, potatoes, celery, and tomatoes. | Beef, carrots, potatoes, celery, tomatoes |
| Italian Vegetable Beef Soup | Features Italian herbs, pasta, and often cannellini beans for added texture. | Italian herbs, pasta, cannellini beans |
| Mexican Vegetable Beef Soup | Includes spices like cumin and chili powder, often served with lime and cilantro. | Cumin, chili powder, lime, cilantro |
| Asian-Inspired Vegetable Beef Soup | Incorporates ginger, soy sauce, and vegetables like bok choy and mushrooms. | Ginger, soy sauce, bok choy, mushrooms |
How Can You Properly Store and Reheat Your Leftover Soup for Future Enjoyment?
Properly storing and reheating leftover soup enhances its flavor and ensures food safety.
To store your leftover soup effectively, follow these steps:
-
Cool It: Allow the soup to cool to room temperature within two hours of cooking. This minimizes bacterial growth, which can occur at temperatures between 40°F and 140°F. According to the USDA, refrigerating food promptly is crucial for safety.
-
Choose Storage Containers: Use airtight containers or freezer-safe bags. Glass or plastic containers with a tight seal are ideal for refrigeration and freezing. This prevents moisture loss and protects against freezer burn.
-
Label and Date: Clearly label the containers with the date of storage. This helps you track how long the soup has been stored. It is best to use leftovers within three to four days when refrigerated and within three months when frozen.
-
Refrigerate or Freeze: Place the soup in the fridge if you plan to eat it within a few days. For longer storage, freeze the soup. This locks in flavor and freshness. The FDA recommends freezing food that will not be eaten within a few days.
To reheat your leftover soup safely and efficiently, consider these methods:
-
Stovetop Method: Pour the soup into a pot and heat over medium heat. Stir occasionally to avoid scorching. Heat until the soup reaches a minimum temperature of 165°F, as recommended by the USDA for safe consumption.
-
Microwave Method: Transfer the soup to a microwave-safe container. Cover with a microwave-safe lid or plate, leaving a small gap for steam to escape. Heat on high in short intervals (1-2 minutes), stirring in between until the soup is hot throughout.
-
Slow Cooker Method: For larger batches, use a slow cooker. Set it to the low setting for two to three hours or until the soup is heated thoroughly. This method is energy-efficient and retains the soup’s flavor.
By cooling, storing, and reheating your soup properly, you maintain its quality and ensure food safety for enjoyable future meals.
Related Post: