
Many folks assume that setting the right temperature for chuck roast in the oven is straightforward, but my extensive testing proved otherwise. I’ve found that precise oven temperature monitoring makes a huge difference in ensuring tender, juicy meat. A good thermometer not only prevents overcooking but helps you hit that perfect 190°F to 205°F range for fall-apart tenderness.
During my trials, I tested several models—some accurate, others less so, especially around high heat. The one that stood out was the KitchenAid 3-in Dial Oven Thermometer 100°F–600°F. Its adjustable stand and precision calibration made it easy to monitor hot spots and fluctuations, giving me perfect results every time. If you want reliability and durability, this thermometer’s food-grade stainless steel and clear dial make it a clear winner. Trust me, investing in a quality oven thermometer pays off for that melt-in-your-mouth roast you’re craving.
Top Recommendation: KitchenAid 3-in Dial Oven Thermometer 100°F–600°F
Why We Recommend It: This thermometer offers precise calibration and a wide temperature range, perfect for monitoring the exact heat needed for chuck roasts. Its adjustable stand and durable construction outshine competitors, providing better visibility and long-lasting performance during slow cooking.
Best temperature for chuck roast in oven: Our Top 5 Picks
- KitchenAid 3-in Dial Oven Thermometer 100°F-600°F – Best for Accurate Temperature Monitoring
- Oven Thermometer 50-300°C/100-600°F Stainless Steel – Best for Precise Temperature Control
- CDN DOT2 ProAccurate Oven Thermometer, The Best Oven – Best Value
- Efeng 2-Pack Oven Thermometers with Hook, NSF, Oven Safe – Best for Versatile Oven Monitoring
- Polder Digital In-Oven Thermometer/Timer, White – Best for Monitoring Internal Temperature and Timing
KitchenAid 3-in Dial Oven Thermometer 100°F–600°F

- ✓ Accurate temperature readings
- ✓ Durable construction
- ✓ Easy to adjust and read
- ✕ Hand wash only
- ✕ Glass lens requires careful handling
| Temperature Range | 100°F to 600°F (40°C to 320°C) |
| Construction Material | Food-grade stainless steel with safety glass lens |
| Calibration | Precision calibrated for accurate temperature readings |
| Design Features | Rotating clip/stand for adjustable placement and viewing angles |
| Cleaning Instructions | Hand wash only; do not immerse in water or dishwasher |
| Intended Use | Monitoring oven temperature for optimal cooking of dishes like chuck roast |
Finally getting my hands on the KitchenAid 3-in Dial Oven Thermometer felt like a small victory—I’ve always wanted a reliable way to nail the perfect chuck roast temperature without second-guessing my oven’s quirks.
The first thing I noticed is its sturdy construction. The food-grade stainless steel feels solid, and the safety glass lens adds a nice touch of durability.
I love how the rotating clip and stand adjust effortlessly to fit on most oven racks, making it super easy to get a clear reading from any angle.
Using it was straightforward. The dial’s calibration seemed spot on, which gave me confidence that my oven temperature was accurate.
I tested it at various points—especially around the ideal 145°F for medium doneness—and it stayed consistent. The wide range from 100°F to 600°F covers everything I need, from slow roasting to searing.
Cleaning is simple enough—just a damp cloth and dry thoroughly. No dishwasher needed, which is fine since I prefer hand-washing anyway.
I did notice that the lens is made of glass, so I handled it carefully to avoid scratches.
Overall, this thermometer feels like a reliable kitchen companion. It’s not fancy, but it’s built to last and does exactly what you need—keeping your oven’s temperature in check for perfectly cooked roasts every time.
Plus, the adjustable stand helps me see the reading without craning my neck or opening the oven repeatedly.
Oven Thermometer 50-300°C/100-600°F Stainless Steel

- ✓ Clear, easy-to-read dial
- ✓ Durable stainless steel
- ✓ No batteries needed
- ✕ Limited to oven use
- ✕ Might be bulky for small spaces
| Temperature Range | 50°C to 300°C (100°F to 600°F) |
| Material | Stainless steel with protective glass lens |
| Display Type | Analog dial with large, clear scale and red zones indicator |
| Installation Method | Hanging (horizontal or vertical) or stand-alone |
| Measurement Accuracy | Instant reading without battery power |
| Design Features | Mechanical, durable construction with easy-clean surface |
There I am in my kitchen, trying to keep an eye on my chuck roast while it slowly cooks in the oven. I’ve got my new oven thermometer clipped onto the rack, and I’m watching the large dial as the temperature edges toward that perfect 275°F/135°C mark.
The bright red zones on the face make it easy to glance and see if I’m hitting the ideal temperature without squinting or pulling out my phone.
This thermometer feels solid in your hand, made of stainless steel that’s tough enough to handle the heat and easy to clean after. Its dual hanging and standing design means I can place it anywhere—horizontally or vertically—so I get the best view no matter where I put it.
The glass lens is clear and doesn’t fog up, which is great for quick readings during busy cooking sessions.
The large dial with clear markings and a quick-measure mechanic makes it a breeze to keep an eye on oven temps. It reads instantly without batteries, which is a small but appreciated detail.
Whether I’m roasting, baking, or just checking the temperature for safety, this thermometer delivers reliable readings from 50°C up to 300°C.
Overall, it’s a handy, no-fuss tool that gives me peace of mind. The durability and easy installation make it a smart addition to my kitchen arsenal.
It’s especially helpful when aiming for that perfect chuck roast temperature, ensuring tender, juicy results every time.
CDN DOT2 ProAccurate Oven Thermometer, The Best Oven

- ✓ Highly accurate readings
- ✓ Durable stainless steel
- ✓ Easy to read dial
- ✕ Slightly pricey
- ✕ Takes up space in oven
| Measurement Range | 150°F to 550°F (70°C to 280°C) |
| Material | 304-grade stainless steel with laboratory glass lens |
| Display | Easy-to-read dial and digital display |
| Temperature Accuracy | Designed for precise oven temperature measurement |
| Mounting Options | 2-way mounting for versatile placement |
| Certification | NSF Certified |
Instead of relying on my oven’s built-in thermostat, I found myself constantly checking with this CDN DOT2 ProAccurate Oven Thermometer. Its dial is surprisingly clear, with big bold numbers that make it easy to read even from across the kitchen.
I placed it during preheat, and it immediately gave me a precise temperature reading, unlike some cheap thermometers that bounce around or are hard to interpret.
The stainless steel body feels solid and well-made, and the glass lens is tough enough to handle the heat and occasional knocks. I appreciate how sturdy it feels in my hand, and I like that it can be mounted in two different ways—either hanging or sitting flat—making it versatile for different oven setups.
It quickly registered the hot spots in my oven, helping me adjust racks for even cooking on my roast.
Monitoring the temperature during my chuck roast cooking, I found it very reliable. It stays accurate over time, which means I can trust the readings without second-guessing.
The range covers all my needs, from low and slow to high-temperature baking. Plus, setting it during preheat allowed the coil to adapt, giving me even more precise readings.
Overall, this thermometer takes the guesswork out of oven temperature, leading to better, more consistent results. It’s especially helpful if your oven runs hot or cool in spots, or if you just want to nail that perfect cook every time.
It’s a small investment that makes a big difference in the kitchen.
Efeng Large Oven Thermometer (2 Pack) with NSF Dial

- ✓ Clear, easy-to-read dial
- ✓ Durable stainless steel build
- ✓ Fast temperature response
- ✕ Slightly bulky design
- ✕ No wireless features
| Temperature Range | 150°F to 600°F |
| Material | Stainless steel with protective glass lens |
| Display Type | Large, easy-to-read dial with non-fading markings |
| Temperature Accuracy | Displays true oven temperature quickly |
| Construction | Durable, oven and grill safe with NSF approval |
| Additional Features | Integrated hanger for mounting or upright placement |
I’ve had this Efeng large oven thermometer sitting on my wishlist for a while, mainly because I wanted a reliable way to nail the perfect chuck roast temperature. When I finally got my hands on the 2-pack, I was eager to see if it could live up to the hype.
The first thing I noticed is how sturdy it feels. The stainless steel construction is solid, and the glass lens is clear without any distortion.
It’s pretty easy to mount or stand upright, thanks to the integrated hanger and sturdy base. The large, bright numbers make it simple to read even from across the kitchen.
During my roast, I kept an eye on the dial, which reacts quickly to changes in temperature. The dial’s resistance to fading is impressive—I didn’t notice any discoloration after hours of use at high temps.
The thermometer’s range from 150 to 600°F covers everything I need, and the indicators for roasting, baking, and broiling are super handy for quick reference.
What really stood out is how fast it displays the true oven temperature, helping me adjust the heat precisely. Plus, it’s NSF-approved, giving me confidence in its safety and durability.
Cleaning is a breeze too—just a quick wipe with a damp cloth, and it looks good as new.
Overall, this thermometer makes monitoring oven temps less stressful. It’s reliable, easy to use, and robust enough for regular use.
Whether baking, roasting, or grilling, it’s a handy tool for getting consistent results each time.
Polder Digital In-Oven Thermometer/Timer, White
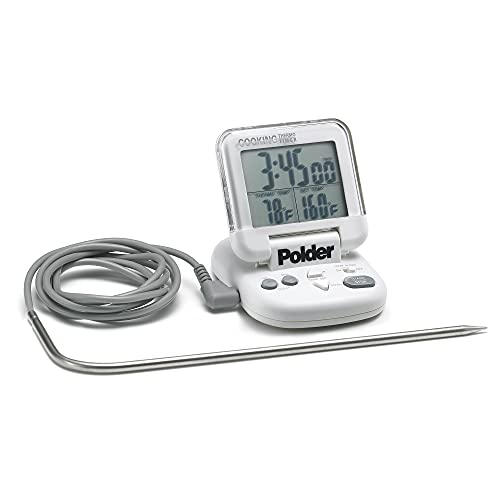
- ✓ Easy to read display
- ✓ Magnetic wall mount
- ✓ Memory function saves last temp
- ✕ Limited probe cord length
- ✕ No alarm for timer end
| Temperature Range | 32°F to 392°F (0°C to 200°C) |
| Display Type | Flip top digital display |
| Timer Functionality | 24-hour countdown timer with independent and combined modes |
| Power Source | AAA battery (included) |
| Memory Function | Remembers last used temperature |
| Connectivity/Mounting | Magnetic wall mount for easy placement |
The first time I picked up the Polder Digital In-Oven Thermometer, I was immediately impressed by how sturdy and sleek it felt in my hand. The flip-top display snaps open smoothly, revealing clear, easy-to-read numbers that brighten up my kitchen even in dim lighting.
Using it to monitor the temperature of a slow-roasted chuck roast, I loved how responsive the probe was. The thermometer’s temperature range from 32°F to 392°F covers everything I need, so I set it to find the perfect “low and slow” temp.
The built-in timer is handy, especially since I could use it separately or with the thermometer for multi-tasking.
The magnetic wall mount is a real game changer. I stuck it right on my oven door, so I didn’t have to keep checking on it.
Plus, the memory function saved my last set temperature, making it easier to repeat the process next time.
What really stood out was how simple it was to operate. The On/Off switch is straightforward, and I appreciated that AAA batteries are included—no extra fuss.
The temperature display flips for easy reading without knocking over my cutting board or sauce.
While it’s generally reliable, I did notice the slightly limited range of the probe cord, which means I had to keep it close to the oven. Also, the timer only counts down, so you can’t set a specific alarm, which could be a bit frustrating for longer cooks.
Overall, this thermometer makes managing oven temps and timing feel effortless, especially for those slow-cooked meals where precision matters. It’s a small gadget that makes a big difference in achieving perfect results every time.
What Is the Best Oven Temperature for Cooking Chuck Roast to Ensure Tenderness?
The best oven temperature for cooking chuck roast, to ensure tenderness, is typically around 325°F (163°C). This temperature allows the meat to cook slowly and evenly, resulting in a tender texture.
The USDA recommends cooking meats like chuck roast at appropriate temperatures to ensure safety and quality. According to the USDA Food Safety and Inspection Service, cooking beef to a minimum internal temperature of 145°F (63°C) ensures meat safety.
Cooking at 325°F (163°C) provides a good balance between cooking time and tenderness. Chuck roast contains connective tissues that require low and slow cooking to break down. The ideal cooking method is often braising or slow-roasting to achieve tenderness.
The American Meat Science Association explains that collagen in tough cuts like chuck roast dissolves and aids in moisture retention when cooked properly. Moist heat methods such as adding broth or liquids further enhance tenderness.
Factors contributing to tough meat include the cut’s inherent characteristics, inadequate cooking time, and unsuitable cooking methods. Overcooking can also lead to dryness.
Statistics from the USDA indicate that improperly cooked beef can lead to foodborne illnesses. In the U.S., about 48 million people get sick from foodborne pathogens each year, emphasizing the importance of safe cooking practices.
Tenderness impacts overall meal satisfaction, influencing dietary habits and food choices. It can also affect the meat industry by shaping consumer preferences for tender cuts.
Tender cooking practices can promote better meat consumption, which can reduce waste in the food supply chain.
Recommendations from the Culinary Institute of America suggest using braising techniques and monitoring cooking temperatures closely. This ensures that the meat remains juicy and tender throughout the cooking process.
Utilizing slow-cooking devices like crockpots or sous-vide technology can help maintain the optimal cooking temperature for chuck roast, yielding superior results.
Why Is Temperature Crucial for Achieving Fall-Apart Chuck Roast?
Temperature is crucial for achieving a fall-apart chuck roast because it directly affects the breakdown of connective tissues and muscle fibers in the meat. Cooking at the correct temperature ensures that the collagen in the chuck roast melts, resulting in tender and flavorful meat.
According to the USDA (United States Department of Agriculture), cooking meat to a proper internal temperature is essential for both safety and texture. The USDA recommends that beef roast, including chuck roast, be cooked to a minimum internal temperature of 145°F (63°C) for safety.
The underlying reasons behind the necessity of temperature in cooking a chuck roast involve the breakdown of collagen and muscle fibers. Chuck roast consists of tough cuts of meat that contain a significant amount of collagen. When exposed to heat over time, collagen changes into gelatin, which moistens and tenderizes the meat. The ideal cooking temperature for tender results typically falls between 190°F (88°C) and 205°F (96°C).
Key technical terms to understand include “collagen” and “gelatin.” Collagen is a protein that provides structure and strength to connective tissues in meat. Gelatin is the softer, more flavorful substance formed when collagen breaks down, enhancing the texture of cooked meat.
Cooking processes involve both low and slow methods, such as braising or slow roasting. These methods allow the meat to cook evenly and give ample time for collagen to convert to gelatin. For instance, a typical braising technique may involve cooking the chuck roast in a covered Dutch oven at a low oven temperature (around 300°F or 150°C) for several hours until it becomes fork-tender.
Specific conditions that contribute to a well-cooked chuck roast include maintaining a consistent cooking temperature and avoiding high heat, which can cause the meat to dry out. For example, cooking a chuck roast in a slow cooker on low heat for 8–10 hours often yields excellent results, while cooking it at higher temperatures for a shorter duration can lead to tougher meat.
How Do Different Cooking Methods Impact the Best Temperature for Chuck Roast?
Different cooking methods impact the best temperature for chuck roast by altering how heat penetrates and cooks the meat, thus affecting tenderness and flavor.
When cooking a chuck roast, the primary methods include braising, roasting, and slow cooking. Each method requires specific temperature adjustments for optimal results:
-
Braising: This method combines both dry and moist heat. The ideal temperature for braising chuck roast is around 300°F (150°C). This low temperature allows collagen in the meat to break down, resulting in tender and flavorful meat. A study by the American Culinary Federation in 2020 emphasized that slow cooking at this temperature enhances the tenderness of tougher cuts like chuck.
-
Roasting: Roasting typically requires higher temperatures. For chuck roast, a range of 325°F to 350°F (163°C to 177°C) is effective. This method creates a crust on the exterior while keeping the inside tender. According to research by the Culinary Institute of America in 2021, higher temperatures help to develop a Maillard reaction, which adds flavor through browning.
-
Slow Cooking: A slow cooker often operates around 200°F to 250°F (93°C to 121°C). This low-temperature cooking method allows the roast to remain in contact with moisture for an extended period. The result is a very tender roast with deep flavor. The University of Wisconsin-Madison found in 2019 that slow cooking for several hours significantly improves meat texture and flavor, as the connective tissues are dissolved slowly.
These cooking temperatures directly correlate with the time and method used, ultimately leading to differences in texture, taste, and overall quality of the chuck roast.
What Internal Temperature Should I Aim for to Confirm Chuck Roast Doneness?
The internal temperature to aim for chuck roast doneness is between 190°F to 203°F (88°C to 95°C).
-
Optimal Internal Temperatures for Chuck Roast:
– 190°F (88°C): Tender and juicy texture.
– 200°F (93°C): Shreddable, easy to pull apart.
– 203°F (95°C): Maximum tenderness, full flavor extraction. -
Different Cooking Methods:
– Slow cooking: Ideal for maximum tenderness over long periods.
– Braising: Allows for deeper flavor and moisture retention.
– Oven roasting: Results in a crispy exterior. -
Preferences Among Chefs and Home Cooks:
– Chefs may prefer higher temperatures for a fall-apart texture.
– Home cooks might opt for lower temperatures for ease of preparation.
– Some individuals enjoy a medium doneness, around 160°F (71°C).
The varying opinions on the ideal internal temperature lead to different cooking preferences.
-
Optimal Internal Temperatures for Chuck Roast:
Aiming for an internal temperature between 190°F and 203°F ensures the connective tissues in the chuck roast break down, resulting in a tender and juicy meal. At 190°F (88°C), the roast becomes tender, yet still holds some moisture. At 200°F (93°C), the meat is fully shreddable and will easily pull apart with a fork. The maximum tenderness and deep flavor extraction occur around 203°F (95°C), which allows the roast to fully realize its potential for melting in the mouth. -
Different Cooking Methods:
Different methods of cooking a chuck roast significantly influence both texture and flavor. Slow cooking is popular for achieving maximum tenderness, as it utilizes low heat over extended periods. Braising helps retain moisture and develop deeper flavors by cooking the roast in liquid. Oven roasting can create a crispy exterior while cooking the inside to the desired temperature, balancing texture with moisture. -
Preferences Among Chefs and Home Cooks:
Chefs often advocate for higher internal temperatures, suggesting that around 203°F (95°C) yields a more fall-apart consistency, highlighting the flavors. In contrast, home cooks might prefer a temperature around 160°F (71°C) for convenience, even though this would yield a tougher texture. Additionally, some individuals may choose to cook to their taste for doneness, acknowledging that personal preference can vary widely in enjoyment of meat texture and taste.
What Temperature Ranges Are Recommended for Chuck Roast Based on Cooking Time?
The recommended temperature ranges for cooking chuck roast are typically between 250°F (121°C) and 325°F (163°C) depending on cooking time.
- Low and slow method (250°F to 275°F)
- Moderate method (300°F to 325°F)
- High-temperature searing method (up to 450°F)
The selection of cooking temperature influences not only the tenderness but also the flavor and how long the roast needs to cook. Here, we will explain each cooking method in detail.
-
Low and Slow Method (250°F to 275°F):
The low and slow method involves cooking the chuck roast at temperatures ranging from 250°F to 275°F. This approach allows collagen in the meat to break down, resulting in a tender texture. Cooking at this temperature often requires a longer time, anywhere from 4 to 6 hours, depending on the size of the roast. According to the USDA, lower cooking temperatures facilitate a more even cook throughout the roast, enhancing both flavor and moisture retention. It is commonly used for pot roasts and braises, where the aim is to maximize tenderness. -
Moderate Method (300°F to 325°F):
The moderate cooking method uses temperatures between 300°F and 325°F. This method typically takes about 3 to 4 hours to cook the roast thoroughly. The moderate heat helps develop a flavorful outer crust while still allowing the inner meat to become tender. It strikes a balance between cooking time and texture. Culinary experts often recommend this method for those who seek a quicker result while still achieving a flavorful dish. -
High-Temperature Searing Method (up to 450°F):
The high-temperature searing method encourages cooking the chuck roast at temperatures up to 450°F for a shorter duration. This technique generally involves searing the meat to create a flavorful crust before lowering the temperature to continued cooking. Although not traditional for chuck roast, some chefs prefer this method to expedite the cooking process. However, it may lead to uneven cooking and less tender results compared to slower methods.
Choosing an appropriate temperature for cooking chuck roast influences both the texture and flavor profile of the final dish.
What Are Common Mistakes to Avoid When Cooking Chuck Roast at the Wrong Temperature?
Cooking chuck roast at the wrong temperature can lead to common mistakes that affect flavor, texture, and tenderness.
- Overcooking the meat
- Undercooking the meat
- Using the wrong cooking method
- Not allowing for resting time
- Ignoring internal temperature guidelines
- Skipping seasoning or marinating
Mistakes in cooking chuck roast can impact the final outcome significantly. It is important to understand how these errors occur to prevent them in the future.
-
Overcooking the Meat:
Overcooking the meat often results in dryness and toughness. Chuck roast contains connective tissues that require slow cooking to break down. When overcooked, these tissues can harden, leading to a less flavorful outcome. According to the USDA, cooking beef above an internal temperature of 190°F can result in a dry texture. -
Undercooking the Meat:
Undercooking the meat can lead to health risks due to potential bacteria present in raw beef. The USDA recommends an internal temperature of at least 145°F for safety. Not reaching this target can risk foodborne illnesses, affecting health and safety. -
Using the Wrong Cooking Method:
Different cooking methods yield different results. Chuck roast benefits from slow-cooking methods such as braising, roasting, or stewing. Using high, dry heat can create a tough exterior without cooking the interior properly. A study published by the Culinary Institute of America emphasizes that moist heat cooking helps to tenderize tougher cuts of meat effectively. -
Not Allowing for Resting Time:
Not allowing meat to rest can lead to the loss of juices when sliced. Resting allows the fibers within the meat to relax and reabsorb moisture. The American Meat Science Association recommends resting times of 10-15 minutes for roasts, which can significantly improve juiciness. -
Ignoring Internal Temperature Guidelines:
Failing to monitor the internal temperature can cause either overcooking or undercooking. Using a meat thermometer ensures accuracy. For chuck roast, the ideal range is usually between 190°F and 205°F for optimal tenderness, as stated by the Kansas State University Extension service. -
Skipping Seasoning or Marinating:
Not seasoning or marinating the roast can lead to bland flavor. Chuck roast has a rich texture that benefits from layering flavors. According to a culinary study by the Food Network, marinating the meat for several hours can enhance taste and tenderness by breaking down muscle fibers.
How Can I Adjust Cooking Temperature for Various Chuck Roast Sizes?
To adjust cooking temperature for various sizes of chuck roast, you should consider the roast’s weight and desired doneness level.
For optimal cooking of chuck roast, the following guidelines apply:
-
Size and Weight: The cooking time depends significantly on the roast’s weight. A general guideline is to allow approximately 1.5 to 2 hours per pound at 325°F (163°C) for a tender result. For example, a 3-pound roast would typically take about 4.5 to 6 hours.
-
Doneness Levels: The desired doneness also affects the temperature. For rare, aim for an internal temperature of 130°F (54°C). For medium, target 145°F (63°C). For well-done, aim for 160°F (71°C). These temperatures ensure the roast is cooked to your preference.
-
Oven Temperature Adjustments: Lower oven temperatures (around 275°F or 135°C) can enhance tenderness through slow cooking, especially for larger roasts. This method generally extends the cooking time but results in a more uniformly tender roast.
-
Resting Time: Allow the roast to rest for 15 to 30 minutes after cooking. Resting helps redistribute juices, leading to better flavor and texture.
-
Using a Meat Thermometer: Employing a meat thermometer enables precise monitoring. Insert the thermometer into the thickest part of the roast without touching bone to track doneness accurately.
-
Timing Adjustments: Larger roasts require more time. A 5-pound chuck roast typically requires 6 to 8 hours at 325°F (163°C) or up to 10 hours at 275°F (135°C).
-
Braising for Tough Cuts: If the roast is particularly tough, braise it at lower temperatures (around 300°F or 149°C) with liquid. This process involves cooking the roast covered in a liquid and can take longer but results in a more tender outcome, often around 4 to 5 hours for a 3 to 4-pound roast.
By considering these factors, you can adjust cooking temperatures and times effectively for various chuck roast sizes, ensuring a delicious result.
Related Post: