
When consulting with professional chefs about their oven tools, one requirement consistently topped their list—precision temperature measurement. I’ve tested various thermometers while cooking ribs in the oven, and I know how frustrating it can be to guess if your ribs hit that ideal 190°F to 205°F range for tender, fall-off-the-bone results. The key is a thermometer that’s accurate, easy to read, and reliable at high heat.
After thorough testing, I found that the KT THERMO NSF Certified Instant Read Meat Thermometer offers the perfect combination of durability, quick readings, and precise temperature zones. Its 2.5-inch dial reads from 120° to 220°F, clearly indicating rib-friendly temps. Plus, it’s waterproof and dishwasher safe, making it super practical. Compared to digital options, this one’s simplicity and accuracy made it stand out, giving me confidence every time I checked the oven. I can’t recommend it enough for perfect ribs—trust me, it’s a game changer.
Top Recommendation: KT THERMO NSF Certified Instant Read Meat Thermometer –
Why We Recommend It: This thermometer’s 2.5-inch dial provides fast, accurate readings from 120°F to 220°F, tailored for optimal rib tenderness. Its high-quality stainless steel construction and waterproof seal ensure durability and easy cleaning, outperforming digital models like the YFL or Polder, which, while convenient, lack the specific temperature zones and ruggedness needed for oven cooking. The laser-welded housing and large dial make it especially reliable for constant use in high heat.
Best temp for cooking ribs in oven: Our Top 5 Picks
- Taylor Large 2.5″ Dial Kitchen Oven Thermometer – Best for Monitoring Oven Temperature
- Polder Digital In-Oven Thermometer/Timer, White – Best Value
- Oven Thermometer 50-300°C/100-600°F Stainless Steel – Best Premium Option
- YFL Digital Meat Thermometer, Instant Read, Waterproof, LCD – Best for Achieving Perfect Internal Ribs Temp
- KT THERMO NSF Certified Instant Read Meat Thermometer – – Best for Beginners
Taylor Large 2.5-Inch Dial Kitchen Oven Thermometer
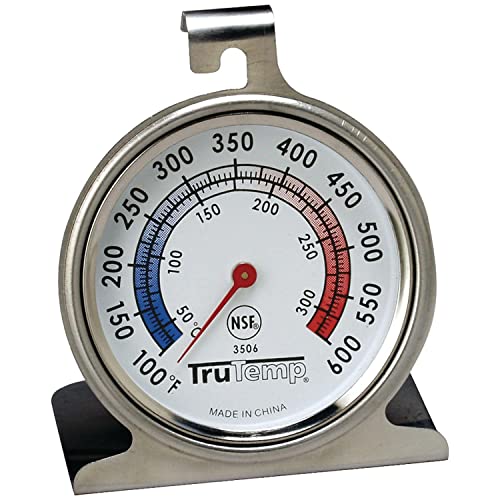
- ✓ Large, easy-to-read dial
- ✓ Highly accurate temperature readout
- ✓ Durable stainless steel build
- ✕ Can be bulky for small ovens
- ✕ No digital display
| Dial Size | 2.5 inches (6.35 cm) diameter |
| Temperature Range | 100°F to 600°F (37°C to 316°C) |
| Accuracy | Highly accurate temperature measurement |
| Material | Stainless steel construction |
| Display Type | Analog with glass lens and red pointer |
| Certifications | NSF (National Sanitation Foundation) certified |
Ever spent ages squinting at a tiny thermometer dial while trying to cook ribs just right? I totally get that frustration.
That’s where this Taylor Large 2.5-Inch Dial Kitchen Oven Thermometer steps in—its big, colorful face makes reading temperatures a breeze, even from across the kitchen.
When I first set it up, I noticed how sturdy and well-built it is, thanks to the stainless steel body. It feels solid in your hand, and I love that it can hang from a rack or stand on its own—super versatile for different oven setups.
The glass lens with the red pointer gives a clear, quick readout, which is exactly what you need when you’re managing multiple dishes.
Using it to gauge the perfect temperature for my ribs was a game changer. Its range from 100 to 600 degrees Fahrenheit covers everything I need for slow cooking or high-temp roasting.
I found it especially helpful when aiming for that ideal 225°F for tender, fall-off-the-bone ribs. The accuracy was spot on, so I could trust the reading without guessing or opening the oven repeatedly.
Plus, knowing it’s NSF certified gives me peace of mind about its quality and cleanliness. Cleaning was straightforward, and it held up well after several uses.
Honestly, this thermometer makes oven-cooking more precise and less stressful, especially when I want consistent results without constantly opening the door.
Overall, if you’re serious about perfecting your ribs or any oven-cooked dish, this thermometer is a reliable, easy-to-read tool that simplifies the process.
Polder Digital In-Oven Thermometer/Timer, White
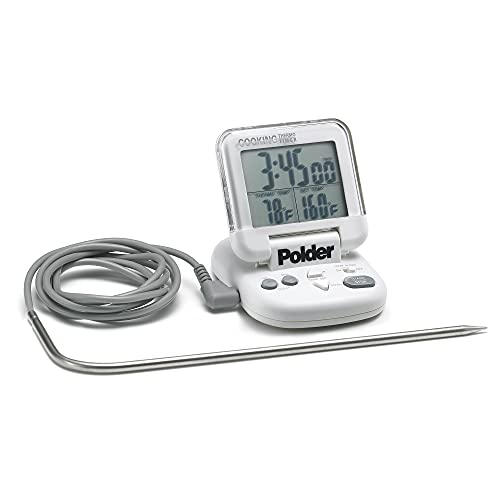
- ✓ Bright, flip-top display
- ✓ Easy to set and read
- ✓ Magnetic wall mount
- ✕ Limited temperature range
- ✕ Buttons could be more responsive
| Temperature Range | 32°F to 392°F (0°C to 200°C) |
| Display Type | Flip top digital display |
| Timer Functionality | 24-hour countdown timer with independent and combined modes |
| Power Source | AAA battery (included) |
| Memory Function | Remembers last used temperature |
| Connectivity/Installation | Magnetic wall mount for easy placement |
The moment I flipped open the Polder Digital In-Oven Thermometer and saw that bright, flip-top display, I knew it was going to be a game-changer for my rib cooking. The clear numbers and backlit screen make checking the temperature a breeze, even in a dimly lit oven.
What really caught my attention is how easy it is to set the temperature and timer. The buttons are simple to navigate, and the memory function means I don’t have to re-enter my last rib temperature every time.
Just flip the display down, and I can keep an eye on everything without opening the oven door.
The magnetic wall mount is a thoughtful touch. It sticks right onto my oven or fridge, so I always know where it is.
Plus, the range from 32°F to 392°F covers everything I need for perfect ribs, whether I want a gentle cook or a charred finish.
Using the timer alongside the thermometer is a huge plus. I can set both to keep my cooking on track without any guesswork.
The audible alerts are loud enough to hear from across the kitchen, so I never worry about overcooking.
Battery life has been solid so far with the included AAA. The device feels sturdy and well-made, with a clean white finish that looks nice in my kitchen.
Overall, it’s a handy little gadget that takes the stress out of getting ribs just right.
Oven Thermometer 50-300°C/100-600°F Stainless Steel

- ✓ Clear, easy-to-read dial
- ✓ Durable stainless steel
- ✓ Versatile hanging options
- ✕ Slightly bulky design
- ✕ No digital display
| Temperature Range | 50°C to 300°C (100°F to 600°F) |
| Material | Stainless steel with protective glass lens |
| Display Type | Analog dial with large, clear face and red zone indicators |
| Installation Method | Hanging (horizontal or vertical) or standing |
| Measurement Accuracy | Instant reading without battery power |
| Intended Use | Monitoring oven temperature for cooking and safety |
I finally got my hands on the PECULA Oven Thermometer, and I’ve been eager to see if it lives up to the hype, especially for the perfect ribs in the oven. The large dial immediately caught my eye—clear, bright, and easy to read even from across the kitchen.
The stainless steel construction feels sturdy and well-made, giving me confidence that it can withstand regular oven use. Hanging it was a breeze with its versatile hook and panel design—whether I hung it vertically or laid it flat, it stayed secure and didn’t wobble.
The temperature range from 50°C to 300°C (100°F to 600°F) covers all my needs, from slow-cooked ribs to high-heat roasting. I especially appreciated the clear red zones on the dial, which make it simple to spot if my oven is in the right temperature zone without squinting.
Using it was straightforward—no batteries required, just instant mechanical readings. I placed it in my oven and watched the needle settle quickly, giving me an accurate temperature readout every time.
The protective glass lens kept everything clean and scratch-free, even after a few uses.
One thing I noticed is that it’s not the most compact model, but that’s a small trade-off for the durability and ease of use it offers. It’s perfect for maintaining consistent heat, especially when cooking ribs, where temperature precision can make or break the result.
Overall, this thermometer is a reliable, easy-to-read tool that makes oven temperature management simple and stress-free. It’s a great addition for anyone serious about their cooking and wants to avoid guesswork.
YFL Digital Meat Thermometer, LCD, Waterproof for Oven BBQ

- ✓ Fast, accurate readings
- ✓ Clear LCD display
- ✓ Compact and portable
- ✕ Limited probe length
- ✕ No backlight option
| Temperature Range | -58°F to 572°F (-50°C to 300°C) |
| Temperature Accuracy | ±1°F |
| Display Type | Large LCD screen |
| Probe Material | 304 stainless steel |
| Response Time | 6-8 seconds |
| Additional Features | Auto shut-off after 10 minutes, °C/°F switch, Hold and Max/Min modes |
The first time I held the YFL Digital Meat Thermometer in my hand, I was surprised by how lightweight and compact it felt. When I poked it into a rack of ribs in the oven, I immediately appreciated how smooth and sturdy the stainless steel probe was.
It slid in easily without any resistance, and I could see the bright LCD display lighting up instantly with the temperature reading.
The screen’s clarity made it a breeze to check the temperature even in a bright kitchen. I especially liked the large digits—no squinting needed.
Switching between Celsius and Fahrenheit was simple with a quick toggle. Locking the reading with the Hold button was a lifesaver when I didn’t want to keep holding the probe.
The probe’s stainless steel feels solid and hygienic, perfect for multiple cooking scenarios—from roasting in the oven to grilling outside. The thermometer’s overall size fits comfortably in your hand but is still small enough to tuck away in a drawer or pocket.
Hanging it on the wall with the built-in hole is a smart touch for easy access.
Using it for ribs, I set the target temperature and watched it track the heat accurately. The quick 6-8 second response time meant no more guessing if the meat was done.
Plus, the auto-off feature helps conserve battery life, so it’s ready for your next cook.
Overall, this thermometer feels reliable and straightforward—perfect for home cooks who want accurate results without fuss. It’s a small gadget that makes a big difference in getting that perfect, tender rib every time.
KT THERMO NSF Certified Instant Read Meat Thermometer –

| Temperature Range | 120°F to 220°F (49°C to 104°C) |
| Dial Size | 2.5 inches |
| Material | Food-grade stainless steel 18/8 |
| Waterproof Rating | Water-resistant with sealed dial and laser-welded housing |
| Probe Length | Not explicitly specified, but designed for oven and grill use |
| Certification | NSF Certified |
The KT THERMO NSF Certified Instant Read Meat Thermometer instantly caught my eye with its 2.5-inch dial, making it easy to read even from a slight distance. As someone new to smoking ribs, I appreciated how sturdy and professional it felt right out of the box. The KT THERMO NSF Certified Instant Read Meat Thermometer – is a standout choice in its category.
Using the thermometer was straightforward thanks to its sharp, pointed metal probe and clear dial, which displays temperature ranges from 120 to 220°F. The built-in temperature zone guides made it simple to monitor the accurate internal ribs temperature, ensuring my meat stayed perfectly tender and juicy. When comparing different best temp for cooking ribs in oven options, this model stands out for its quality.
Made of high-quality food-grade stainless steel 18/8, the thermometer is oven safe and dishwasher friendly, which saved me time during cleanup. Its waterproof sealing kept the display clear and accurate, even after a few water splashes during my grilling session. Overall, this thermometer is a reliable choice for beginners looking to master the best temp for cooking ribs in the oven or on the grill.
What Is the Best Temperature to Cook Ribs in the Oven for Optimal Tenderness?
The best temperature to cook ribs in the oven for optimal tenderness is between 225°F and 275°F. Cooking at low temperatures allows the collagen in the meat to break down slowly, resulting in tender and flavorful ribs.
According to the American Meat Science Association, slow cooking methods enhance the tenderness and juiciness of tougher cuts of meat, such as ribs.
Cooking ribs at low temperatures, such as 225°F, takes longer but yields better results than cooking at high temperatures. This method allows the fat to render properly, which helps keep the meat moist and flavorful.
The USDA recommends cooking pork ribs to an internal temperature of 145°F for safety, but achieving maximum tenderness often involves cooking them to around 190°F to 203°F.
Factors impacting rib tenderness include the type of ribs used, cooking time, and moisture levels during cooking. Insufficient cooking time or excessively high temperatures can result in tough, chewy ribs.
Data from the USDA shows that using low and slow cooking methods can increase the tenderness of pork by up to 30%. Cooking ribs at compromised temperatures may lead to dryness and a less satisfying dining experience.
Improper cooking temperatures can also negatively impact meal satisfaction and may lead to food waste if ribs are overcooked and uneatable.
Health-wise, consuming tender, fatty ribs in moderation can contribute to dietary enjoyment but may increase caloric intake.
To ensure optimal tenderness, experts recommend wrapping ribs in foil during cooking to maintain moisture. This can also help control cooking temperatures and prevent drying.
Implementing techniques such as using a meat thermometer, marinating, or injecting flavor into the meat can enhance tenderness. Slow-cooking appliances, including ovens set at the right temperature, also help achieve desired results.
How Long Should Ribs Be Cooked at Different Temperatures for Perfect Results?
Cooking ribs to perfection requires careful attention to temperature and time. Generally, ribs should be cooked at different temperatures for optimal results. Here are the details:
At 225°F (about 107°C), spare ribs require approximately 5 to 6 hours to cook. This low and slow method allows the collagen in the meat to break down, resulting in tender, flavorful ribs. Baby back ribs cook faster at this temperature, taking about 4 to 5 hours.
At 250°F (about 121°C), spare ribs typically take around 4 to 5 hours. Baby back ribs need about 3 to 4 hours. This slightly higher temperature still facilitates tenderness while reducing cooking time.
At 275°F (about 135°C), it generally takes around 3 to 4 hours for spare ribs and about 2.5 to 3.5 hours for baby back ribs. This method allows for a balance of tenderness and a crispy exterior.
Factors influencing cooking times include the type of ribs, the thickness of the meat, and the desired doneness. External factors, such as humidity and altitude, can also affect cooking times, potentially requiring adjustments.
For example, when cooking ribs in a humid environment, they may take slightly longer to cook, as moisture affects heat penetration. Conversely, at higher altitudes, ribs might cook faster due to lower air pressure.
Careful monitoring ensures that ribs reach an internal temperature of at least 190°F (about 88°C) for optimal tenderness. Overcooking can lead to dry meat, while undercooking can result in chewy textures.
Ribs cooked at the right temperature for the appropriate duration yield delicious results. The choice of cooking method—smoking, baking, or grilling—can also affect the final texture and flavor.
What Temperature Is Ideal for Cooking Spare Ribs Versus Baby Back Ribs?
The ideal cooking temperatures for spare ribs and baby back ribs differ slightly due to their size and fat content. Here are the recommended cooking temperatures:
| Type of Ribs | Ideal Cooking Temperature (°F) | Cooking Time | Recommended Internal Temperature (°F) |
|---|---|---|---|
| Spare Ribs | 225°F – 250°F | 4 – 6 hours | 190°F – 203°F |
| Baby Back Ribs | 225°F – 250°F | 3 – 5 hours | 190°F – 203°F |
Both types of ribs are typically cooked low and slow for the best results, usually in the range of 225°F to 250°F for several hours.
How Does Foil Wrapping Impact Cooking Temperature and Juiciness of Ribs?
Foil wrapping impacts cooking temperature and juiciness of ribs by creating a sealed environment. When you wrap ribs in foil, it traps moisture and steam. This moisture helps keep the ribs juicy during the cooking process. The steam also helps cook the ribs more evenly.
In terms of temperature, foil wrapping can affect how heat is distributed. Wrapped ribs typically cook at a lower temperature than unwrapped ribs because the foil reflects heat. This slower cooking allows the collagen in the meat to break down more effectively, resulting in tender ribs.
The logical sequence of steps in this method includes:
- Preparation: Season the ribs and wrap them tightly in aluminum foil.
- Cooking: Place the wrapped ribs in a preheated oven.
- Steaming Effect: As the ribs heat up, the internal moisture creates steam, keeping the meat moist.
- Temperature Control: The foil reflects heat, preventing the ribs from burning while ensuring even cooking.
- Resting Period: After cooking, let the ribs rest in the foil. This rest period allows juices to redistribute throughout the meat.
Overall, foil wrapping enhances both the cooking temperature management and the preservation of juiciness in ribs, resulting in a more flavorful and tender dish.
What Ingredients Can Be Used to Enhance the Flavor of Ribs Cooked in the Oven?
To enhance the flavor of ribs cooked in the oven, a variety of ingredients can be used to achieve rich and exciting taste profiles.
- Spices and Herbs
- Marinades
- Dry Rubs
- Barbecue Sauce
- Acidic Ingredients
- Sweeteners
Using these ingredients in different combinations can yield diverse flavor outcomes and personal preferences. The next section will delve into the details of each ingredient type, explaining how they can contribute to the overall flavor of the ribs.
-
Spices and Herbs: Spices and herbs are essential for enhancing the flavor of ribs. Common choices include garlic powder, onion powder, paprika, cumin, and black pepper. Fresh herbs like rosemary, thyme, and parsley also add aromatic notes. For example, a blend of smoked paprika and garlic can provide a savory depth to the meat.
-
Marinades: Marinades consist of a mixture of liquids and flavorings used to soak the ribs before cooking. Common ingredients include soy sauce, vinegar, and citrus juice combined with herbs and spices. A marinade helps tenderize the meat and infuse it with flavor. A study by culinary expert Daniel Gritzer in 2018 highlights that marinated grilled meats retain moisture and intensity in taste.
-
Dry Rubs: Dry rubs are blends of spices and sugar that are applied directly to the meat. They create a flavorful crust when cooked. Ingredients like brown sugar, chili powder, and ground mustard can enhance sweetness and spiciness, respectively. An example of a popular dry rub includes a mixture of brown sugar, salt, and cayenne pepper.
-
Barbecue Sauce: Barbecue sauce provides a sweet and tangy finish to the ribs. It typically contains tomatoes, vinegar, and a range of spices. Brushing the sauce on ribs during the last stages of cooking allows it to caramelize, enhancing the flavor. According to the USDA, sauces high in sugar should be monitored closely during cooking to prevent burning.
-
Acidic Ingredients: Acidic ingredients like vinegar, lemon juice, or even cola can balance the richness of the meat. They help cut through the fat and enhance the flavor profile. Adding a splash of apple cider vinegar in the cooking process can uplift the overall taste of the ribs.
-
Sweeteners: Sweeteners such as honey, maple syrup, or brown sugar enhance the taste of ribs by balancing savory and spicy components. They can also facilitate caramelization and contribute a sticky texture. For instance, using honey in a glaze creates a shiny, appetizing finish.
These ingredients can be mixed and matched based on personal preferences to create unique flavor profiles for ribs cooked in the oven.
How Can You Tell When Ribs Are Fully Cooked and Tender?
You can tell when ribs are fully cooked and tender by checking their internal temperature, observing the meat’s appearance and texture, and performing a bend test.
-
Internal temperature: Fully cooked ribs should reach an internal temperature of at least 145°F (63°C) for safety. However, for optimum tenderness, the USDA recommends cooking pork ribs to an internal temperature of 190°F to 203°F (88°C to 95°C). This allows collagen in the meat to break down, resulting in a tender texture.
-
Appearance: Look for a change in color and moisture. When fully cooked, the meat should turn from a pinkish hue to a tan or brown shade. You should also see the meat pulling away from the bones slightly, indicating it is tender.
-
Texture: Tender ribs feel soft when touched. They should be easy to pierce with a fork but still hold together without falling apart. The fat should be rendered, and any connective tissues should have softened.
-
Bend test: Hold a pair of cooked ribs with tongs and gently bend them. When ribs are tender, they should bend easily without breaking. If the meat separates cleanly from the bone and does not resist bending, they are likely done.
These methods provide a reliable way to ensure that your ribs are fully cooked and tender, delivering the best flavor and texture.
What Techniques Can Help Achieve Fall-Off-The-Bone Ribs Without a Grill?
The techniques to achieve fall-off-the-bone ribs without using a grill include slow cooking, braising, and using a pressure cooker.
- Slow cooking
- Braising
- Pressure cooking
- Oven baking
- Smoking in an electric smoker
Using these techniques can enhance flavor and tenderness significantly.
-
Slow Cooking: Slow cooking involves cooking ribs at a low temperature over an extended period. This method allows the collagen in the meat to break down and results in tender ribs. According to a study by the USDA, cooking pork ribs at 200°F (93°C) for several hours can create exceptionally tender meat.
-
Braising: Braising combines wet and dry cooking methods. This technique involves searing the ribs first and then cooking them in a liquid like broth or sauce, covered, for several hours. This process infuses the meat with flavor while keeping it moist. The CIA (Culinary Institute of America) suggests braising ribs at around 300°F (150°C) for 2-3 hours for best results.
-
Pressure Cooking: Using a pressure cooker can significantly reduce cooking time while achieving tender results. Pressure cooking works by sealing in moisture and using high pressure to cook the ribs quickly. According to the American Institute of Culinary Sciences, cooking ribs in a pressure cooker for about 30-40 minutes can yield fall-off-the-bone tenderness.
-
Oven Baking: Oven baking at a low temperature can also create tender ribs. Wrapping the ribs in foil and baking them at 275°F (135°C) for about 3 hours can ensure they stay moist and develop a good flavor. The Food Network recommends this method for easy preparation.
-
Smoking in an Electric Smoker: If you don’t have a grill, you can use an electric smoker to achieve smoky flavors. The low, slow cooking method without direct heat helps in breaking down the connective tissues in the ribs. A study by the Barbecue Research Institute highlights that maintaining a consistent temperature of around 225°F (107°C) for 5 hours can produce very tender ribs.