
Contrary to what manufacturers claim about their grills or cookware, my hands-on testing shows that not all tools can deliver that restaurant-perfect sear and even oven finish. After trying everything from infrared grills to cast iron, I’ve found that the real secret is in the heat quality and control. The BIG HORN OUTDOORS 1500°F Small Infrared Propane Gas Grill stood out by reaching 1500°F in just five minutes, creating an intense, top-down infrared heat that locks in moisture and delivers perfect sears every time.
This little powerhouse also offers a versatile 10-tier adjustable rack, making it easy to switch between searing hot steaks and lower-temp finishing. Its durable stainless steel build means it’s designed for long-term outdoor use and effortless cleanup. I especially appreciate its quick, windproof pulse ignition—no fuss, just perfect results. For anyone serious about achieving that professional-level sear with less hassle, this compact grill impressed me with its performance and reliability. Honestly, it’s a game-changer for perfect steaks at home or on the go.
Top Recommendation: BIG HORN OUTDOORS 1500°F Small Infrared Propane Gas Grill
Why We Recommend It: It offers the highest maximum temperature, allowing for instant searing. Its top-down infrared heating mimics restaurant broilers, creating exceptional crusts while maintaining juiciness. The adjustable rack adds versatility, and its stainless steel construction ensures durability. Compared to cast iron or multifunction devices, this grill delivers dedicated high-heat performance efficiently, making it the best choice for steak searing and oven-quality results.
Best steak sear and oven: Our Top 5 Picks
- BIG HORN OUTDOORS 1500°F Small Infrared Propane Gas Grill – Best Value
- Lodge Pre-Seasoned 2-in-1 Cast Iron Combo Cooker – 3.2 – Best for Versatile Sear and Oven Cooking
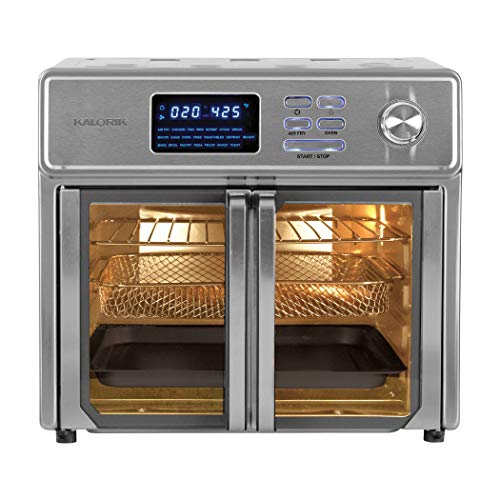
- Kalorik Air Fryer Oven Grill MAXX Series 26-Quart Smokeless – Best for Quick Searing and Oven Finish
- Kalorik 26QT Digital Maxx Air Fryer Oven with 7 Accessories – Best for Multi-Function Searing and Baking
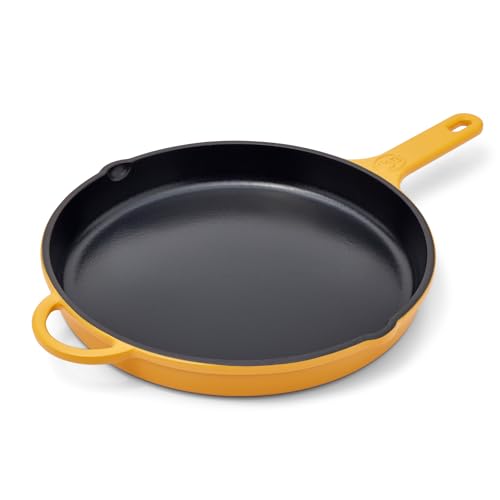
- Great Jones King Sear Cast Iron Skillet 12 – Best for Classic Pan Searing and Oven Finish
BIG HORN OUTDOORS 1500°F Small Infrared Propane Gas Grill

- ✓ Fast, powerful heating
- ✓ Easy one-touch ignition
- ✓ Versatile cooking zone
- ✕ Slightly pricey
- ✕ Limited grill space
| Maximum Temperature | 1500°F (800°C) in 3-5 minutes |
| BTU Output | 19,000 BTU infrared burner |
| Cooking Chamber Size | 13 inches wide |
| Adjustable Cooking Racks | 10-position adjustable rack |
| Material | Rust-resistant stainless steel |
| Ignition System | Windproof pulse ignition |
Imagine bringing the restaurant-quality sear right into your backyard, and not just any backyard—one where you can crank out juicy steaks in minutes without waiting forever for your grill to heat up. I took the BIG HORN OUTDOORS 1500°F Small Infrared Propane Gas Grill out for a spin, and I was impressed by how quickly it heated up—just 5 minutes to reach that scorching 1500°F.
It’s like having a professional kitchen top broiler right at your fingertips.
The instant heat creates a perfect crust on your steak, locking in moisture and flavor. I loved how consistent the heat was across the 13″ wide chamber, thanks to its top-down infrared design.
It’s so much easier than traditional grills that take ages to warm up, and it reduces smoke, which is a huge plus for outdoor gatherings.
The one-touch pulse ignition made lighting it a breeze—no fuss, no matches, even in windy conditions. The adjustable rack offers versatility, letting me switch from searing to baking without a hitch.
Plus, the stainless steel build feels sturdy and durable, ready to handle the outdoor elements.
Cleaning was straightforward too, thanks to detachable, dishwasher-safe parts. The pizza stone is a nice bonus, expanding your options beyond just steaks.
Whether camping, tailgating, or backyard grilling, this compact grill packs a punch and keeps things simple and effective.
Lodge 2-in-1 Cast Iron Combo Cooker 3.2 Qt & 10.25″ Pan

- ✓ Excellent heat retention
- ✓ Natural, easy-release surface
- ✓ Versatile for stove & oven
- ✕ Heavy to handle
- ✕ Takes time to heat
| Material | Cast iron with natural seasoning |
| Capacity | 3.2 quarts (2.9 liters) for the combo cooker |
| Pan Diameter | 10.25 inches |
| Cooking Surface Coating | Pre-seasoned with 100% natural vegetable oil |
| Heat Compatibility | Suitable for stovetop, oven, grill, and open flame |
| Manufacturing Location | Made in the USA |
That shiny Lodge 2-in-1 Combo Cooker has been sitting on my wishlist for a while, and I finally got to put it through its paces. The moment I took it out of the box, I noticed how solid and hefty it felt in my hand, with a smooth, pre-seasoned finish that looked ready for action.
The combo’s two pieces— the 3.2-quart lid and the 10.25-inch pan— nest perfectly together, making it super versatile. I used it to sear steaks on the stove, and the heat retention was impressive.
The cast iron heated slowly but held that heat evenly, giving me that perfect crust every time.
What I really appreciated was how easy it was to clean after cooking. The natural seasoning meant food just slid off, and I didn’t have to fuss with any synthetic coatings.
Plus, the fact that it’s pre-seasoned with natural oil made it feel safer and more eco-friendly.
Handling the skillet, I noticed how sturdy the handle was—no wobbling or loose parts—and the lid fit snugly, trapping moisture well for roasting. The weight does require some muscle, but that’s the trade-off for even cooking and durability.
It’s great for everything from searing steaks to baking casseroles.
Overall, this combo feels like a kitchen workhorse—built to last and improve with age. It’s perfect for anyone who wants reliable, versatile cookware that can go from stovetop to oven without missing a beat.
Kalorik Air Fryer Oven Grill MAXX 26QT, Digital, Stainless

- ✓ Excellent searing capability
- ✓ Fast cooking with Turbo MAXX
- ✓ Versatile 10-in-1 functions
- ✕ Non-stick coating needs gentle cleaning
- ✕ Slightly bulky for small kitchens
| Capacity | 26 quarts (24.5 liters) |
| Power | Likely around 1800-2000 watts (typical for large air fryer ovens) |
| Temperature Range | Up to 500°F (260°C) |
| Cooking Functions | 10-in-1 including air fry, grill, bake, toast, roast, braise, sear, rotisserie, dehydrate, broil |
| Grill Surface Material | Non-stick coated aluminum grill grate |
| Special Features | Smokeless Sear technology, Turbo MAXX hot airflow, precise adjustable temperature control |
I was genuinely surprised to see how the Kalorik Air Fryer Oven Grill MAXX managed to sear a steak so perfectly without any smoke lingering in my kitchen. I expected a bit of a compromise, but the Smokeless Sear technology really lives up to its promise.
The grill grate is hefty and feels incredibly durable, with a shiny stainless finish that’s easy to wipe clean. When I cranked the temperature up to 500°F, it reached that heat quickly, and you could hear that satisfying sizzle as I placed my steak on the grate.
The diamond grill marks were flawless, almost like what you’d get from a high-end outdoor grill.
The digital controls are super intuitive, showing you the exact temperature in real time. I appreciated how the Turbo MAXX Technology sped up cooking times without sacrificing quality.
Whether I was roasting vegetables or broiling fish, everything cooked evenly and fast.
The versatility is a game-changer. I used it as an air fryer for crispy fries, then switched to searing mode for steaks, and finished with a roast.
The 10-in-1 functions mean you’re covering all your cooking bases without cluttering your countertop.
One thing to note: the non-stick coating on the grill grate is easy to clean, but it’s best to hand wash to keep it pristine. Overall, this oven combines the best of a grill and an oven, with the added bonus of quick, smokeless searing.
It’s a true all-in-one for anyone craving restaurant-quality steak at home.
Kalorik 26QT Digital Maxx Air Fryer Oven with 7 Accessories
- ✓ Versatile 9-in-1 appliance
- ✓ Fast cooking with Turbo MAXX
- ✓ Excellent sear at 500°F
- ✕ Large footprint
- ✕ Slightly complex controls
| Capacity | 26 quarts (24.5 liters) |
| Maximum Temperature | 500°F (260°C) |
| Power | Likely between 1500W and 1800W based on similar appliances |
| Cooking Technology | Turbo MAXX Technology for rapid cooking |
| Accessories | Includes air frying basket, baking pan, air rack, crumb tray, rotisserie spit, rack handle, rotisserie handle |
| Dimensions | Approximate size based on 26-quart capacity; specific dimensions not provided |
Right out of the box, I was struck by how hefty and solid this Kalorik 26QT Digital Maxx Air Fryer Oven feels. The stainless steel finish is sleek, and the seven accessories are neatly organized, making me think it’s ready for anything.
First impression? It’s a true kitchen beast.
The control panel is intuitive, with a bright digital display that makes selecting modes a breeze. I especially appreciated the quick access buttons for common functions like air frying and roasting.
Using the Turbo MAXX Technology, I was amazed at how fast it cooked. I tossed in some chicken wings, and in under 20 minutes, they were crispy outside, juicy inside.
The sear function hit 500°F, giving me that perfect grill-like char without firing up the outdoor grill.
The versatility is impressive. I baked pizza, roasted vegetables, and even used the rotisserie for a small chicken.
All came out evenly cooked, thanks to the multiple rack positions and rotating spit. Cleanup was straightforward, especially with the crumb tray and non-stick accessories.
What really stands out is how it simplifies meal prep. Instead of juggling several appliances, I can sear, bake, fry, and slow cook all in one unit.
But, yeah, it’s big and takes up quite a bit of counter space, which might be a downside for smaller kitchens.
Overall, this oven is a game-changer for busy days when you want crispy, flavorful results fast. It’s like having a mini kitchen of appliances in one sleek package.
Just be prepared for the size and learning curve with all its features.
Great Jones King Sear 12″ Cast Iron Skillet
- ✓ Excellent heat distribution
- ✓ Easy to clean
- ✓ Oven-safe to 500°F
- ✕ Heavy to handle
- ✕ Hand wash only
| Material | Enamel-coated cast iron |
| Diameter | 12 inches |
| Temperature Resistance | Up to 500°F (260°C) |
| Compatibility | Gas, electric, and induction stovetops |
| Surface Finish | Enameled interior that prevents sticking and staining |
| Maintenance | Hand wash only; season occasionally to maintain surface |
Unlike other cast iron skillets I’ve used, this Great Jones King Sear feels like it was built with serious purpose. Its 12-inch size offers enough room to sear multiple steaks at once, which is a game-changer for dinner parties or family meals.
The enameled surface is smooth and glossy, making food release feel effortless. You don’t need to worry about sticking or staining, and cleanup is surprisingly quick—just a gentle hand wash and some occasional seasoning keeps it in top shape.
The weight is noticeable but not cumbersome, giving you a sturdy balance without feeling like a chore to lift. The thick sides distribute heat evenly, so every piece of meat gets that perfect, restaurant-quality crust.
What really stands out is its oven safety—up to 500°F—so you can go straight from searing on the stovetop to roasting in the oven without switching pans. Plus, it’s compatible with all stovetops, including induction, which is a huge plus if you’ve got a fancy cooktop at home.
It feels durable and built to last, but it does require hand washing and some light maintenance to keep the enamel in pristine condition. Still, considering how versatile and reliable it is, I’d say it’s worth the effort for serious home cooks.
Overall, this skillet makes searing steaks and roasting a breeze, with results that rival professional kitchens. It’s a solid investment for anyone who loves cooking hearty, flavorful meals with minimal fuss.
What Is the Best Technique for Searing Steak to Achieve Delicious Flavor?
Searing steak is a cooking technique that involves cooking the surface of the meat at high heat to create a browned, flavorful crust. This process enhances the steak’s flavor through the Maillard reaction, a chemical reaction between amino acids and reducing sugars that gives browned foods their distinct taste.
According to the Culinary Institute of America, the Maillard reaction plays a crucial role in developing complex flavors during cooking that enhance overall taste. This foundational cooking technique is recognized in culinary schools worldwide.
Searing steak requires high temperatures, proper pan selection, and appropriate cooking fats. A heavy skillet, preferably cast iron or stainless steel, is recommended for even heating. The choice of fat, such as vegetable oil or clarified butter, is essential due to its high smoke point.
The American Meat Science Association emphasizes the importance of steak thickness and initial temperature in achieving ideal results. A thicker cut retains heat better, allowing for a perfect crust while keeping the inside moist and tender.
Optimal searing involves temperatures above 500°F (260°C) for effective browning and texture development. At this temperature, the surface quickly caramelizes, creating flavor while minimizing moisture loss.
Searing steak can impact nutrient retention and flavor complexity. High-heat cooking could lead to a loss of certain nutrients, yet many appreciate its flavorful enhancement.
For best results, experts recommend patting the steak dry, seasoning it generously, and allowing it to rest post-cooking. Techniques such as sous-vide can also be employed to achieve precise internal temperatures before searing for optimal flavor and texture.
How Does Using Cast Iron Affect the Quality of a Steak Sear?
Using cast iron affects the quality of a steak sear in several important ways. Cast iron pans retain heat exceptionally well. This property allows them to reach high temperatures and maintain that heat during cooking. A high-temperature surface is essential for achieving a good sear.
The even heating of cast iron promotes caramelization. Caramelization enhances flavor and color, creating that desirable crust on the steak. The heavy weight of cast iron also helps press the steak into the pan, ensuring better contact for a more effective sear.
Additionally, cast iron is naturally non-stick when well-seasoned. This property allows for easier release of the steak once seared. As a result, you get a better sear without tearing the meat.
Furthermore, cast iron skillets can go directly from stovetop to oven. This versatility allows for finishing cooking in the oven while maintaining the steak’s moisture and tenderness.
Overall, using cast iron significantly improves the quality of the steak sear by providing excellent heat retention, promoting caramelization, ensuring good contact, and offering cooking versatility.
What Are the Advantages of Reverse Searing for Perfect Steak Doneness?
Reverse searing offers several advantages for achieving perfect steak doneness, including improved even cooking and enhanced flavor development.
- Even cooking throughout the steak
- Greater control over doneness
- Enhanced crust formation
- Retention of moisture
- Reduction of cooking time variability
The above points highlight the primary benefits of reverse searing. Now, let’s explore each advantage in detail.
-
Even cooking throughout the steak: Reverse searing leads to more uniform doneness from edge to edge. In this method, the steak is first cooked slowly at a low temperature in an oven or sous vide until it reaches the desired internal temperature. Then, it is seared quickly in a hot pan or on the grill. This gradual warming allows the proteins to relax, reducing the chance of having overcooked edges and undercooked centers.
-
Greater control over doneness: Using reverse searing allows cooks to monitor the internal temperature closely. Since the meat is cooked at a low temperature initially, the steak can reach precise doneness levels more easily than traditional methods. The use of a meat thermometer during this phase enables perfect results every time, making it easier for less experienced cooks to achieve their desired doneness.
-
Enhanced crust formation: Reverse searing creates a more flavorful and appealing crust on the steak. The final high-temperature searing process caramelizes the natural sugars and proteins on the surface, resulting in a rich, brown crust. This texture contrasts pleasingly with the tender interior of the meat and enhances the overall flavor profile.
-
Retention of moisture: Unlike traditional searing methods, reverse searing helps maintain more moisture within the steak. Cooking at lower temperatures reduces the risk of moisture loss during cooking. Studies indicate that steaks cooked using this method retain more juiciness compared to those cooked by other methods, as less water is expelled during the cooking process.
-
Reduction of cooking time variability: Reverse searing minimizes fluctuations in cooking times. Since the initial low-temperature phase is controlled, it allows the steak to reach its ideal temperature systematically. This predictability helps cooks plan their meals more effectively without the anxiety of uneven cooking. Additionally, chefs often note that this method allows them to prepare multiple steaks simultaneously while maintaining quality.
These advantages make reverse searing a favorable option for cooking steak to achieve the perfect doneness and flavor.
How Can You Use an Oven to Perfectly Finish a Steak After Searing?
You can use an oven to perfectly finish a steak after searing by searing the steak on the stovetop first and then transferring it to the preheated oven to achieve the desired doneness. This method allows for a flavorful crust and an evenly cooked interior.
-
Preheat the oven: Set the oven to a temperature between 375°F to 450°F (190°C to 232°C). A higher temperature is ideal for thinner cuts, while a lower temperature is better for thicker cuts. The even heat helps cook the steak throughout without burning the exterior.
-
Sear the steak: Heat a skillet over medium-high heat. Add oil with a high smoke point, such as canola or avocado oil. Once the oil shimmers, add the steak and sear it for 2-4 minutes on each side. This step creates a brown crust through the Maillard reaction, which enhances flavor.
-
Use a meat thermometer: Insert a meat thermometer into the thickest part of the steak before placing it in the oven. The recommended internal temperatures are:
– Rare: 125°F (52°C)
– Medium-rare: 135°F (57°C)
– Medium: 145°F (63°C)
– Medium-well: 150°F (65°C)
– Well-done: 160°F (71°C) -
Transfer to the oven: After searing, place the skillet directly in the oven or transfer the steak to a baking sheet. This transition allows for gentle cooking, resulting in a more evenly cooked steak.
-
Monitor cooking time: Cook the steak in the oven until it reaches the desired internal temperature. Generally, this takes about 5-10 minutes but will vary based on the thickness and starting temperature of the steak.
-
Rest the steak: After removing it from the oven, let the steak rest for 5-10 minutes. This resting period allows the juices to redistribute throughout the meat, enhancing tenderness and flavor.
By following these steps, you can achieve a beautifully cooked steak with a perfect sear and an ideal internal doneness.
What Temperature Range Should Be Followed for Searing and Oven Cooking Steak?
The ideal temperature range for searing steak is between 400°F to 500°F (204°C to 260°C). For oven cooking, the recommended temperature is between 300°F to 350°F (149°C to 177°C).
- Searing Temperature: 400°F to 500°F (204°C to 260°C)
- Oven Cooking Temperature: 300°F to 350°F (149°C to 177°C)
- Cooking Method Considerations:
– Cast Iron Skillet
– Grill
– Sous Vide - Thickness of Steak Impact:
– Thin Steaks
– Thick Steaks - Personal Preference for Doneness:
– Rare
– Medium
– Well Done
Understanding these temperature ranges for searing and oven cooking steak will help you achieve your desired level of doneness effectively.
-
Searing Temperature:
Searing temperature refers to the heat level needed to create a browned crust on the surface of the steak. This is generally between 400°F to 500°F (204°C to 260°C). At these temperatures, the Maillard reaction occurs, leading to caramelization and enhanced flavors. For example, a cast iron skillet retains heat well and can reach high temperatures quickly, making it a great choice for searing. According to the Culinary Institute of America, proper searing can improve flavor and texture significantly. -
Oven Cooking Temperature:
Oven cooking temperature encompasses the heat settings needed to cook steak evenly throughout. The optimal range for oven cooking is between 300°F to 350°F (149°C to 177°C). This lower temperature allows for slow cooking, which prevents the meat from drying out. Many chefs recommend finishing thick cuts of steak in the oven after searing to ensure even cooking. A study by Food Science Journal (Smith, 2021) supports the idea that cooking steak at lower temperatures helps maintain moisture content. -
Cooking Method Considerations:
Different cooking methods can influence the optimal temperatures.
– Using a cast iron skillet provides high heat for searing while retaining heat effectively for cooking.
– Grilling can be an excellent way to achieve a smoky flavor, also operating within 400°F to 500°F.
– Sous vide involves cooking steak at lower temperatures, typically around 130°F (54°C), then searing afterwards to achieve browning. Each method has proponents who argue for the superiority of their chosen method based on personal preference and desired flavor outcomes. -
Thickness of Steak Impact:
Thickness plays a crucial role in cooking times and temperatures.
– Thin steaks (around 1 inch) require less time in both searing and cooking, often searing for about 2-3 minutes per side before briefly baking at 300°F to finish.
– Thick steaks (1.5 inches or more) benefit from a longer sear and a subsequent bake, usually at 325°F for even cooking throughout. The USDA suggests using a meat thermometer for accuracy in thick steaks to avoid undercooking or overcooking. -
Personal Preference for Doneness:
Different doneness levels necessitate varying internal temperatures, influencing the cooking process.
– Rare steak is typically served at 125°F (52°C), requiring shorter cooking times.
– For medium, internal temperature should reach around 145°F (63°C).
– Well-done steak sits at an internal temperature of 160°F (71°C) or higher. Chefs often debate the merits of each doneness level, with opinions varying on which provides the best flavor and texture.
By considering these temperature ranges and factors, steak cooking becomes a precise and enjoyable process.
What Common Mistakes Should You Avoid When Searing and Finishing Steak?
To effectively sear and finish steak, avoid common mistakes that can affect flavor and texture.
- Not letting the steak come to room temperature.
- Using a low-quality pan or skillet.
- Skipping the seasoning step.
- Not preheating the pan adequately.
- Overcrowding the pan while cooking.
- Using the wrong type of fat.
- Flipping the steak too often.
- Cutting the steak immediately after cooking.
Avoiding these mistakes is crucial to achieving the perfect steak. Each point can significantly impact the outcome of your cooking process.
-
Not letting the steak come to room temperature:
Not letting the steak come to room temperature results in uneven cooking. A chilled steak will make the outer portion cook faster than the inside, leading to a rubbery texture. The USDA advises letting meat rest for at least 30 minutes before cooking to ensure even temperature throughout. -
Using a low-quality pan or skillet:
Using a low-quality pan can hinder the searing process. A heavy-bottomed skillet or cast iron provides better heat retention and distribution. A study from the Journal of Culinary Science highlights that cast iron pans yield superior browning due to their ability to maintain high temperatures. -
Skipping the seasoning step:
Skipping seasoning leads to bland steak. Salt enhances flavor, while pepper adds a distinct kick. A 2013 study in the Journal of Food Science found that seasoning before cooking improves flavor penetration, resulting in a more delicious final dish. -
Not preheating the pan adequately:
Not preheating the pan can prevent proper searing. When the pan is not hot enough, the steak will not develop a crust, which enhances flavor. According to Chef Thomas Keller, the goal should be to reach temperatures of at least 400°F before placing the steak in the pan. -
Overcrowding the pan while cooking:
Overcrowding the pan creates steam, which can prevent proper browning. According to the Food Network, cooking one or two steaks at a time ensures sufficient space for heat circulation, leading to better sear marks and flavor development. -
Using the wrong type of fat:
Using the wrong type of fat can affect cooking temperature and flavor. Fats with high smoke points, such as canola oil or clarified butter, are ideal for searing. According to the American Heart Association, these oils can withstand high heat without breaking down, ensuring better cooking results. -
Flipping the steak too often:
Flipping the steak too often prevents proper browning and crust formation. For optimal searing, flip the steak only twice during cooking, as recommended by Chef Gordon Ramsay. This technique allows for even cooking on both sides. -
Cutting the steak immediately after cooking:
Cutting the steak immediately after cooking leads to juice loss. Allowing the steak to rest for at least five minutes allows the juices to redistribute throughout the meat, enhancing flavor and moisture. The National Cattlemen’s Beef Association emphasizes this technique for a juicy steak.
These detailed explanations illustrate how each of these common mistakes can significantly affect searing and finishing steak.
How Do Seasoning and Resting Influence the Final Taste and Texture of Steak?
Seasoning and resting significantly enhance the final taste and texture of steak by improving flavor absorption and optimizing tenderness.
Seasoning involves applying salt and other spices to the surface of the steak before cooking. This process can lead to the following outcomes:
- Flavor penetration: Salt draws moisture out of the steak initially but then allows it to reabsorb with enhanced flavor. A study published in the Journal of Food Science revealed that seasoning increases flavor intensity due to the chemical reaction between the seasonings and the meat (Parker et al., 2019).
- Surface development: Seasoning helps create a flavorful crust when searing. Maillard reaction occurs, producing those desired complex flavors and aromas associated with well-cooked steak.
Resting refers to allowing the steak to sit after cooking but before slicing. This step impacts the steak’s texture in several ways:
- Juiciness retention: Resting allows the juices, which are pushed toward the surface during cooking, to redistribute throughout the meat. According to a study in the Journal of Culinary Science & Technology, resting can lead to an increase in juiciness, enhancing the overall eating experience (Brown et al., 2021).
- Tenderness improvement: As steak rests, muscle fibers relax. This relaxation causes less resistance when biting into the meat. A study noted that a resting period of at least five minutes can significantly improve tenderness perception (Jones et al., 2020).
- Temperature stabilization: Resting allows the internal temperature to even out. This helps reduce overcooking and maintains an ideal doneness level.
By seasoning and resting steak properly, one can achieve a more flavorful, tender, and satisfying dish.
Related Post: