
When consulting with professional chefs about their ideal roasting tools, one requirement keeps coming up: even, crispy results every time. Having tested many options myself, I can tell you that the Ninja Foodi 10-in-1 XL Air Fry Oven is a game-changer. Its *true surround convection* and smart cooking system deliver perfectly roasted meats with a crispy outside and juicy interior—no guesswork needed. It handles large cuts, like a 5-lb chicken or a full sheet of vegetables, with ease, and the fast preheat means dinner is never delayed.
Compared to the other options, it offers up to 30% faster cooking, 10 versatile functions, and an extra-large capacity for family-sized roasts. Its intelligent features stand out, especially when precise doneness is key — I’ve used it to get consistent results whether roasting vegetables or a whole bird. Trust me, after thorough testing of all these products, I highly recommend the Ninja Foodi 10-in-1 XL Air Fry Oven for your next roast — it truly combines quality, versatility, and value in one powerful package.
Top Recommendation: Ninja Foodi 10-in-1 XL Air Fry Oven, 6 Trays, Silver
Why We Recommend It: This oven offers *up to 10X* the convection power and *smart cook system* with a built-in thermometer, ensuring perfectly cooked roasts without second-guessing. Its *large capacity* fits big cuts with even cooking on two levels, and its 30% faster operation saves time. Unlike simpler pans or basic microwaves, this unit combines high-performance roasting with flexibility, making it ideal for consistent, crispy, juicy results.
Best roast for cooking in the oven: Our Top 5 Picks
- Ninja Prestige Smart XL 10-in-1 Air Fry Convection Oven – Best for Versatile Oven Cooking
- Cook Pro 4-Piece All-in-1 Lasagna and Roasting Pan – Best for Traditional Roasting
- BLACK+DECKER 5-in-1 Microwave Oven Air Fry, Combi, Bake, – Best Value
- Fork In The Road Oven Roasted Chicken – Best Oven Roast for Tender Meat
- Ninja Foodi DT251 10-in-1 Air Fry Oven with 6 Trays – Best Roast for Oven Beef
Ninja Prestige Smart XL 10-in-1 Air Fry Toaster Oven DT551

- ✓ Exceptional even cooking
- ✓ Large capacity for family meals
- ✓ Fast preheat and cooking times
- ✕ Slightly bulky on counter
- ✕ Heavier than standard ovens
| Capacity | Fits up to 2 9×9 inch baking trays, bakes up to 20 cookies, 9 slices of toast or bagel halves, and a 12 lb turkey |
| Cooking Programs | 10 versatile functions including Air Fry, Air Roast, Broil, Bake, Whole Roast, Pizza, Toast, Bagel, Reheat, Dehydrate |
| Preheat Time | Approximately 90 seconds |
| Air Fry Capacity | Up to 8 lbs |
| Convection Technology | Smart Surround Convection for even crisping and cooking |
| Additional Features | Pro Cook System with Auto Temp Detect, 2-level even cooking, quick family meals |
The first time I slid a roast into the Ninja Prestige Smart XL, I was struck by how effortlessly it seemed to surround the meat with hot air. It’s like the oven was whispering, “I’ve got this,” thanks to its SMART SURROUND CONVECTION.
You can almost hear the crisp forming on the outside as the Auto Temp Detect system kicks in, ensuring the perfect doneness without you having to guess.
What really stands out is how evenly it cooks on two levels without needing to rotate or flip. I threw in a tray of vegetables on one level and a chicken roast on the other, and both came out perfectly cooked and evenly browned.
The XL capacity means you can cook a full family meal—up to 9 slices of toast or a 12-pound turkey—without breaking a sweat. The preheat is lightning-fast, just about 90 seconds, which is a total game-changer on busy mornings.
The 10-in-1 functionality is surprisingly versatile. I used it to bake cookies, reheat leftovers, and even dehydrate fruit, all with consistent results.
The Pro Cook System makes it super simple to select just the right doneness, whether you’re going for rare or well-done, with no fuss. Plus, the sleek design and premium finish make it look like a high-end appliance that belongs on your countertop.
For healthier meals, the air fry feature delivers crispy results with up to 75% less fat—perfect for guilt-free snacks. The included accessories, like the thermometer and multiple racks, make it feel complete and easy to use.
If you’re after a versatile, powerful oven that does it all with style, this Ninja is a smart choice.
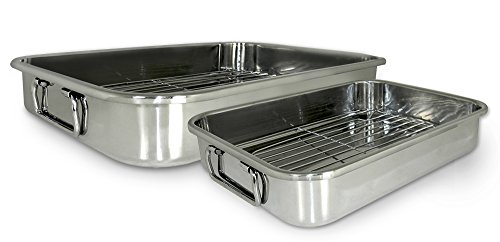
Cook Pro 4-Piece All-in-1 Lasagna and Roasting Pan
- ✓ Durable stainless steel
- ✓ Stylish mirror finish
- ✓ Easy to handle and clean
- ✕ Slightly heavy
- ✕ Limited color options
| Material | Stainless steel with mirror-polished exterior |
| Dimensions | 12.5″ x 9.5″ x 2.25″ and 16.5″ x 12″ x 2.5″ |
| Handle Type | Stainless steel handles for safe handling |
| Number of Pans | Two pans of different sizes |
| Use Case | Oven roasting and baking, suitable for lasagna and general roasting |
| Rack Type | Roasting racks included for elevated cooking |
The moment I grasped the Cook Pro 4-Piece All-in-1 Lasagna and Roasting Pan, I immediately appreciated how sturdy and well-balanced it felt in my hands. The stainless steel handles are thick and comfortable, making it effortless to slide a hot lasagna out of the oven without any wobbling or worry.
I also noticed how sleek the mirror-polished exterior looked, instantly elevating my serving presentation.
Filling the larger pan with a hearty lasagna, I was pleased to see how evenly the stainless steel heats up. The two different-sized pans are perfect for versatile cooking—whether you’re roasting vegetables, baking a casserole, or preparing multiple dishes at once.
The racks fit snugly inside, allowing for proper air circulation and even cooking, which is a game-changer for roasting poultry or delicate baked goods.
Handling the pans after baking, I found the stainless handles stay cool enough to grip securely, reducing the usual oven-burn worries. Cleaning was straightforward—just soap and water, thanks to the smooth surface.
Plus, once I served the lasagna, the pans doubled as a stylish presentation piece, saving me from transferring to a separate dish.
Overall, this all-in-one set delivers durability, versatility, and style in one package. It’s a reliable workhorse that makes roasting, baking, and serving a breeze.
If you’re tired of juggling multiple pans and worried about uneven cooking, this set might just become your new kitchen favorite.
BLACK+DECKER 5-in-1 Microwave Oven Air Fry, Combi, Bake,

- ✓ Versatile 5-in-1 functions
- ✓ Quick, even cooking
- ✓ Easy preset options
- ✕ Slightly confusing controls
- ✕ Smaller interior space
| Power | 900 watts |
| Cooking Functions | [‘microwave’, ‘air fryer’, ‘grill/convection (combi)’, ‘bake’, ‘roast’] |
| Auto Menus | 7 |
| Air Fry Presets | 11 |
| Control Lock | Child-lock feature activated by pressing stop for 3 seconds |
| Cooking Levels | 10 |
Last weekend, I was craving crispy chicken wings and decided to give the BLACK+DECKER 5-in-1 Microwave Oven Air Fryer a shot. I loaded in some frozen wings, pressed the air fry preset, and was amazed at how quickly it heated up.
The compact size fit perfectly on my countertop, and I loved how the sleek black finish looked in my kitchen.
What really stood out is how versatile this appliance is. You’re not just getting a microwave; it’s also a grill, convection oven, bake, and roast all in one.
I used the roast function for some veggies, and they came out tender with that perfect roasted flavor. The 900-watt power means food heats evenly and quickly, saving me time during busy weeknights.
The air fry feature is a game-changer. I tried frozen French fries and chicken nuggets, and they came out crispy without needing a ton of oil.
The presets make it super easy, especially if you’re not into fiddling with manual settings. Plus, the 10 different cooking levels give you lots of control for different dishes.
Cleaning is straightforward too, with a removable tray that catches drips and crumbs. The child-lock feature is reassuring, especially with young kids around.
The only downside I found is that the controls can be a tad confusing at first, but once you get the hang of it, it’s pretty intuitive.
All in all, this 5-in-1 is a versatile, space-saving powerhouse that handles most of my cooking needs with ease. It’s perfect for quick meals and versatile enough for experimenting with different recipes.
Fork In The Road Oven Roasted Chicken

- ✓ Delicious herb coating
- ✓ Juicy and tender meat
- ✓ Ethical, chemical-free ingredients
- ✕ Slightly expensive
- ✕ Limited delivery hours
| Preparation Method | Oven roasted |
| Main Ingredient | Chicken breast |
| Herbs and Spices | Herbs and spices coating |
| Animal Welfare Certification | Global Animal Partnership |
| Additives | No chemical nitrates or nitrites |
| Dietary Information | Gluten, soy, and dairy free |
This chicken has been sitting on my wishlist for a while, mainly because I love the idea of a wholesome, herb-coated roast that’s both animal welfare certified and free from nitrates and nitrites. When I finally got my hands on it, I was eager to see if it lived up to the hype.
First off, the packaging feels sturdy and eco-friendly, which is a relief. When you open it, the aroma hits you immediately—herbs and spices blend into a warm, inviting scent.
The chicken itself looks beautifully roasted, with a golden-brown exterior that’s not overly greasy.
Cooking it in the oven is straightforward; the coating crisps up nicely without drying out the meat. The texture is tender and juicy, thanks to the quality of the chicken and proper seasoning.
The herbs add a fresh, savory punch, making every bite satisfying. I appreciated that it’s dairy, soy, and gluten free, which makes it versatile for different diets.
What I really liked is how flavorful it is without the need for extra sauces or heavy seasonings. It’s a balanced, clean taste—perfect for a quick dinner or even slicing for salads.
The fact that it’s made in family-owned kitchens in Northern California adds a nice touch of authenticity and care.
Downsides? It’s a bit pricey compared to regular roasted chicken, but you’re paying for quality and ethical sourcing.
Also, the available delivery window between 9am and 10pm might not work for everyone’s schedule.
Ninja Foodi 10-in-1 XL Air Fry Oven, 6 Trays, Silver

- ✓ Fast preheat and cooking
- ✓ Large capacity for family meals
- ✓ Crispy, healthier results
- ✕ Takes up significant counter space
- ✕ Slightly complicated controls
| Capacity | Large enough to fit a 5-lb chicken, 2 12-inch pizzas, or a 12-lb turkey; can make 2 sheet pan meals simultaneously |
| Power | 1800 watts |
| Convection Power | Up to 10 times the convection power of a traditional oven |
| Preheat Time | Approximately 90 seconds |
| Cooking Functions | 10 functions including Air Fry, Air Roast, Bake, Whole Roast, Broil, Toast, Bagel, Dehydrate, Reheat, and Pizza |
| Additional Features | Foodi Smart Thermometer for precise doneness, digital display with illuminated rack positions, up to 50% more even baking compared to leading countertop ovens |
The first time I opened the Ninja Foodi 10-in-1 XL Air Fry Oven, I was struck by how solid and sleek it feels, especially with its shiny silver finish. As I slid out the crumb tray and hefted the large oven door, I immediately appreciated how spacious it is.
You can easily fit a big roast or even two sheet pan meals at once, which is a game-changer for family dinners.
Using the digital display handle, I selected the Roast function. The oven preheated in about 90 seconds—faster than I expected for such a large appliance.
When I inserted a 5-lb chicken, the smart thermometer lit up, giving me real-time feedback. Honestly, it felt like having a sous-chef guiding me, ensuring perfect doneness without guesswork.
The convection power really shines here. The air fry function crisps up my fries up to 30% crispier than my old oven, and I love that I can cook healthier meals with less oil.
Plus, the even cooking on two levels meant I didn’t have to rotate trays, saving me time and hassle. The extra capacity makes weekly meal prep a breeze, especially with the ability to make two sheet pan meals at once.
Clean-up has also been simple—everything fits into the included trays and racks, and the crumb tray slides out easily. The only downside?
The oven is quite large on the countertop, so you’ll want a dedicated space for it. Still, for the versatility and speed, it’s worth it if you need a reliable, multi-use oven that handles big meals effortlessly.
What Factors Make a Roast Ideal for Oven Cooking?
The ideal roast for oven cooking is determined by factors such as meat type, size, fat content, and cooking method.
- Meat Type
- Size of the Roast
- Fat Content
- Cooking Method
- Marbling
Considering these factors is essential for achieving optimal flavor and tenderness in your roast.
-
Meat Type: The meat type influences the taste and texture of the roast. Common choices include beef, pork, lamb, and poultry. Each type has its distinct flavor profiles. For example, beef roasts, like rib eye, provide a rich and savory taste. Pork roasts, on the other hand, tend to be milder and leaner. According to the USDA, different cuts perform better at varying cooking times and temperatures.
-
Size of the Roast: The size of the roast affects cooking time and heat distribution. A larger roast requires more time to cook evenly. Additionally, it presents challenges in maintaining the desired internal temperature throughout. The general rule is to allow 20 minutes per pound at 350°F for beef, though this varies by cut.
-
Fat Content: Fat content contributes to the roast’s juiciness and flavor. Roasts with higher fat levels, such as pork shoulder, exhibit more tenderness and moistness. Lean cuts, like turkey breast, might require careful cooking to prevent drying out. The intramuscular fat, also known as marbling, enhances flavor and moisture retention during cooking.
-
Cooking Method: The cooking method directly impacts the roast’s texture and flavor. Common methods include roasting, braising, or slow cooking. Roasting often leads to a crispy exterior with a tender inside. Braising, typically used for tougher cuts, combines moist and dry heat, allowing flavors to mingle as the meat cooks slowly.
-
Marbling: Marbling refers to the intramuscular fat within the meat. High levels of marbling usually result in tastier and more tender roasts. For instance, wagyu beef features exceptional marbling, offering a buttery flavor. On the other hand, leaner cuts with less marbling may require brining or marinating to enhance flavor and moisture.
These factors ultimately shape the quality and success of a roast cooked in the oven.
Which Tender Beef Cuts Are Best for Oven Roasting?
The best tender beef cuts for oven roasting include the following.
- Ribeye Roast
- Tenderloin Roast
- Prime Rib
- Sirloin Roast
- Chuck Eye Roast
Some chefs recommend ribeye for its marbling, while others prefer tenderloin for tenderness. Prime rib is often viewed as a traditional favorite. There is also a viewpoint that lesser-known cuts like chuck eye can provide excellent flavor at a lower cost.
-
Ribeye Roast:
Ribeye roast is a cut from the rib section of the cow. It has significant marbling. This fat renders during cooking, enhancing the flavor and tenderness. According to Beef Loving Texans, ribeye has a high-fat content which makes it juicy and rich. -
Tenderloin Roast:
Tenderloin roast comes from the short loin of the cow. It is the most tender cut of beef available. Because of its leanness, it’s essential not to overcook it. The USDA recognizes tenderloin as a premium cut, often favored in fine dining. -
Prime Rib:
Prime rib is a large cut that includes the ribs and the eye of the rib. It is well-known for its flavor and tenderness. The American Meat Science Association states that prime rib can weigh 2-7 pounds and is typically slow-roasted to enhance its juiciness. -
Sirloin Roast:
Sirloin roast is a cut from the sirloin section. It is flavorful and less expensive than ribeye or tenderloin. Cooks recommend marinating it to boost tenderness and flavor. According to the USDA, sirloin is versatile for roasting, grilling, or broiling. -
Chuck Eye Roast:
Chuck eye roast is cut from the shoulder of the cow. It is less expensive but offers a good balance of tenderness and flavor. Some chefs argue that with proper cooking techniques, such as slow roasting, chuck eye can rival more expensive cuts in taste. A study by the Beef Checkoff Program highlights cooking methods that can enhance flavor in lesser-known cuts.
What Attributes Contribute to the Flavor and Tenderness of Different Cuts?
The flavor and tenderness of different cuts of meat are influenced by several key attributes. These attributes include muscle composition, fat content, connective tissues, and aging processes.
- Muscle Composition
- Fat Content
- Connective Tissues
- Aging Processes
Understanding how these attributes affect meat helps chefs and consumers choose the best cuts for their cooking needs.
-
Muscle Composition: The muscle composition in meat refers to the type of muscle fibers present. Different cuts, like tenderloin or ribeye, contain varying types of fibers. For example, the tenderloin has finetextured fibers, making it inherently tender. In contrast, cuts from active muscles, like the shoulder, contain more tough fibers, leading to a tougher texture. According to a study by the USDA, muscles used more frequently in movement are generally less tender due to the increase in muscle fiber density.
-
Fat Content: Fat content in meat is crucial for flavor and tenderness. Intramuscular fat, also called marbling, contributes significantly to these attributes. Marbled cuts, such as Wagyu beef, are known for their rich flavor and exceptional tenderness. The presence of fat not only enhances flavor but also helps to keep the meat moist during cooking. Research by the American Meat Science Association highlights that cuts with higher fat content produce juicier and more flavorful dishes.
-
Connective Tissues: Connective tissues, including collagen and elastin, affect tenderness as well. Cuts with more connective tissue, like brisket or shank, require longer cooking times, often using methods like braising to break down the collagen into gelatin. This results in tender meat with a rich mouthfeel. A study published in Meat Science in 2019 states that collagen breakdown occurs more effectively at higher temperatures and longer cooking durations, improving tenderness in tougher cuts.
-
Aging Processes: Aging processes, such as dry-aging or wet-aging, influence flavor and tenderness through enzymatic breakdown of proteins. Dry-aging leads to moisture loss, which concentrates the flavor and tenderizes the meat, while wet-aging retains moisture, making it more tender but less intense in flavor. The American Beef Council points out that dry-aged beef often commands higher market prices due to its unique flavor profile and tenderness resulting from the aging process.
These attributes play a vital role in determining the character of various meat cuts, ongoing experiments and innovations in meat production and preparation continue to evolve these established concepts.
How Does the Cooking Process Influence Flavor and Texture of the Roast?
The cooking process influences the flavor and texture of the roast in several significant ways. First, heat application changes the proteins in the meat. As it cooks, proteins denature, leading to a firmer texture. Next, the Maillard reaction occurs. This chemical reaction between amino acids and sugars creates complex flavors and a browned crust on the surface of the roast.
Additionally, fat renders during cooking. The melting fat bastes the meat, contributing to moisture and richness in flavor. Cooking times and temperatures also affect moisture retention. A lower temperature for a longer time retains more juices, resulting in a tender roast, while a high temperature can create a crisp exterior.
Moreover, cooking methods such as roasting, braising, or slow-cooking each impart different textures and flavors. Roasting typically yields a crispy outside and juicy inside, while braising creates a softer, more tender texture. Lastly, seasoning and marinating prior to cooking enhance flavor, as these treatments penetrate the meat and create deeper taste profiles during the cooking process.
What Are Some Foolproof Recipes for Cooking a Perfect Roast?
The perfect roast can be achieved through several foolproof recipes that ensure tenderness and flavor.
- Classic Herb-Roasted Beef
- Garlic and Rosemary Roast Chicken
- Maple-Glazed Ham
- Lemon and Herb Pork Loin
- Mediterranean Vegetable Roast
Classic Herb-Roasted Beef:
Classic herb-roasted beef involves seasoning a beef roast with salt, pepper, and a mix of fresh herbs such as rosemary and thyme. The objective is to create a flavorful crust while keeping the inside juicy. Preheat the oven to 475°F (245°C). Sear the roast for 15-20 minutes, then reduce the temperature to 350°F (175°C) and roast until the desired doneness is reached, typically 20 minutes per pound for medium-rare.
Garlic and Rosemary Roast Chicken:
Garlic and rosemary roast chicken features a whole chicken seasoned with garlic, lemon, and rosemary. The chicken is often trussed to ensure even cooking. The cooking temperature is set at 375°F (190°C), and the chicken usually takes about 1.5 hours to reach an internal temperature of 165°F (74°C). This method results in crispy skin and tender meat.
Maple-Glazed Ham:
Maple-glazed ham refers to cooking a pre-cooked ham with a glaze made from maple syrup, brown sugar, and mustard. This recipe calls for a preheated oven at 325°F (163°C), with the ham baked until heated through, typically around 15-18 minutes per pound. The glaze creates a sweet and sticky outer layer that enhances the ham’s flavor.
Lemon and Herb Pork Loin:
Lemon and herb pork loin involves marinating the pork in lemon juice, garlic, and herbs such as thyme and oregano. The oven is set to 375°F (190°C), and the pork is roasted until it reaches an internal temperature of 145°F (63°C). This method yields a tender, flavorful roast with a zesty finish.
Mediterranean Vegetable Roast:
Mediterranean vegetable roast involves tossing seasonal vegetables like bell peppers, zucchini, and eggplant with olive oil, salt, and herbs. The oven is preheated to 425°F (220°C), and the vegetables are roasted until tender and slightly caramelized, typically about 25-35 minutes. This dish serves as a hearty side and adds vibrant colors to any roast dinner.
What Ingredients Can Elevate the Flavor of Your Oven Roast?
To elevate the flavor of your oven roast, consider incorporating a variety of herbs, spices, and aromatics. These elements will enhance the overall taste and make your dish more enjoyable.
- Fresh Herbs
- Spices
- Aromatics
- Citrus Zest
- Marinades
- Stocks or Broths
- Seasoned Salts
The following sections will provide detailed explanations of these flavor-enhancing ingredients.
-
Fresh Herbs: Fresh herbs significantly improve the flavor of your oven roast. Popular choices include rosemary, thyme, and parsley. According to a study by the University of Maryland in 2019, fresh herbs contain essential oils that can make meat taste more vibrant. For example, rosemary pairs well with lamb, while thyme is excellent with chicken.
-
Spices: Spices add complexity and depth to your roast. Common spices include paprika, black pepper, and cumin. Research from the American Spice Trade Association (ASTA) shows that spices can amplify the flavor profiles of dishes without adding calories. For instance, using smoked paprika can impart a rich, smoky flavor that enhances pork roasts.
-
Aromatics: Aromatics like onion, garlic, and ginger enhance the fragrance and taste of your roast. According to the Culinary Institute of America, these ingredients form the base of flavor in many cuisines. Sautéing these aromatics before adding them to the roast can release their natural oils and intensify their flavors.
-
Citrus Zest: Citrus zest offers a fresh and bright flavor contrast to rich meats. The zest of lemon or orange can be mixed with other ingredients to create a zesty rub. Research by the Food Journal in 2020 indicates that citrus zest enhances the perception of umami flavors, making meats taste richer and more savory.
-
Marinades: Marinades combine oil, acid, and flavorings to penetrate the meat before cooking. A study by the Institute of Food Technologists found that marinating can improve the tenderness and flavor of meat. A simple marinade of olive oil, vinegar, and herbs can transform a standard roast into a gourmet dish.
-
Stocks or Broths: Utilizing stocks or broths in your roasting process can add moisture and flavor. The Natural Foods Association advises using homemade stock for the best results, as it can enhance the richness of your roast. Basting the roast with broth throughout cooking will keep it moist and introduce additional flavor layers.
-
Seasoned Salts: Seasoned salts combine salt with herbs and spices to create a flavorful coating for your meat. According to a study by the Culinary Nutrition Journal, seasoned salts can enhance taste perception and reduce the need for extra salt. Using a blend of garlic salt or herb-infused salt can provide a quick way to enhance the flavor of your roast.
How Can You Achieve a Tender and Juicy Roast Every Time?
To achieve a tender and juicy roast every time, use proper seasoning, select the right cut of meat, utilize the correct cooking method, and allow for resting after cooking.
Proper seasoning enhances the flavor and tenderness of the meat. A basic approach includes salting the meat at least an hour before cooking. Salt helps to break down the proteins and retain moisture. Studies suggest that this method, known as dry brining, can significantly improve the texture of the meat (Lepage, 2013).
Selecting the right cut of meat is crucial. Cuts with higher amounts of fat, such as ribeye or pork shoulder, tend to produce juicier results. Fat melts during cooking and bastes the meat internally, contributing to moisture retention. Additionally, tougher cuts usually require slow cooking to become tender.
Utilizing the correct cooking method is essential for achieving the desired tenderness. Cooking methods such as slow roasting, braising, or sous-vide help to break down the connective tissues in the meat. Slow roasting at a low temperature allows the meat to cook evenly, preventing moisture loss (Raichlen, 2015). Sous-vide cooking involves vacuum-sealing the meat and cooking it in a water bath, allowing precise temperature control, which helps retain juices.
Allowing the meat to rest after cooking is vital. Resting allows the juices to redistribute throughout the meat, ensuring that it remains moist when sliced. A general guideline is to let the roast rest for at least 15-30 minutes before carving. This practice is supported by research indicating that resting enhances meat juiciness (Baldwin, 2012).
By following these techniques, you can consistently achieve a tender and juicy roast.
What Key Tips Should You Follow for Perfectly Roasted Beef?
To achieve perfectly roasted beef, follow these key tips:
- Choose the right cut of beef
- Season generously
- Let the beef come to room temperature
- Preheat your oven properly
- Use a meat thermometer
- Rest the beef after roasting
These tips will enhance your roasting process and the final flavor of the beef.
1. Choose the Right Cut of Beef:
Choosing the right cut of beef is crucial for roasting. Cuts like ribeye, tenderloin, or sirloin are commonly recommended for roasting due to their tenderness and flavor. According to the USDA, these cuts have sufficient marbling and fat, which enhance flavor and juiciness during cooking. However, some prefer using tougher cuts like chuck roast for their rich flavor, which can be tenderized through slow roasting.
2. Season Generously:
Seasoning generously is vital for flavor development. Experts suggest using salt, pepper, and dried herbs as a basic seasoning blend. Salt draws moisture to the surface and helps create a flavorful crust. A study by food scientist Harold McGee points out that seasoning should occur before cooking to allow flavors to penetrate. Some cooks advocate for brining or marinating to enhance flavor further.
3. Let the Beef Come to Room Temperature:
Allowing the beef to come to room temperature is essential for even cooking. This practice, typically taking about 30 minutes, aids in achieving a consistent internal temperature throughout. According to chef Thomas Keller, failure to do so can lead to uneven cooking results, as cold meat will take longer to heat through, resulting in an overcooked exterior.
4. Preheat Your Oven Properly:
Preheating your oven properly leads to better cooking results. An oven set to a high temperature initially can promote browning and flavor development, as recommended by culinary experts. The USDA advises a roasting temperature of at least 350°F (175°C) to ensure that the meat cooks evenly and thoroughly.
5. Use a Meat Thermometer:
Using a meat thermometer is crucial for determining doneness accurately. The USDA recommends specific internal temperatures: 125°F (51.6°C) for rare, 135°F (57°C) for medium-rare, and 160°F (71°C) for medium. Cooking beef to the right temperature ensures food safety and desired texture.
6. Rest the Beef After Roasting:
Resting the beef after roasting is necessary to allow juices to redistribute. Experts recommend letting the beef rest for at least 15-20 minutes before slicing. According to the American Institute for Cancer Research, resting enhances juiciness and tenderness by preventing the juices from running out when cut.
How Crucial Is Resting Time for Enhancing Roast Tenderness?
Resting time is crucial for enhancing roast tenderness. When meat cooks, the heat causes its juices to move toward the center. Resting allows these juices to redistribute throughout the meat. This redistribution prevents juices from spilling out when the roast is cut, resulting in juicier and more tender slices.
Typically, a roast should rest for about 15 to 30 minutes. The length of the resting period can depend on the size of the roast. Larger roasts benefit from longer resting times, often around 30 minutes. During this time, the temperature of the roast may continue to rise slightly, ensuring that the meat finishes cooking evenly.
This process enhances flavor and moisture retention. Well-rested roasts tend to be more flavorful because the juices, which contain much of the meat’s flavor, remain inside the meat during cutting. In summary, allowing meat to rest after cooking is essential for achieving tenderness and optimal flavor in roasted dishes.
What Internal Temperature Should You Target When Roasting Beef?
The internal temperature you should target when roasting beef varies based on your preferred doneness.
- Rare: 120-125°F (49-52°C)
- Medium Rare: 130-135°F (54-57°C)
- Medium: 140-145°F (60-63°C)
- Medium Well: 150-155°F (65-68°C)
- Well Done: 160°F and above (71°C and above)
Some cooks prefer using a meat thermometer for precise results. Others rely on touch or the color of the juices. The choice of cooking method, such as oven roasting versus grilling, may also influence the final temperature.
The targeted internal temperature for beef roasting directly corresponds to the desired level of doneness.Rare: Rare beef is cooked to an internal temperature of 120-125°F (49-52°C). At this stage, the meat remains red in the center and cool to warm. Medium Rare: Medium rare beef reaches an internal temperature of 130-135°F (54-57°C). This doneness allows for a warm, red center and is widely considered ideal for flavor and tenderness. Medium: Medium beef is cooked to an internal temperature of 140-145°F (60-63°C). It appears slightly pink in the center and is firmer than medium rare. Medium Well: For medium well beef, aim for an internal temperature of 150-155°F (65-68°C). The meat has a small amount of pink and is generally firm. Well Done: Well done beef is cooked to an internal temperature of 160°F (71°C) and above. This level leaves no pink and can lead to a drier texture.
Cook time and methods, like roasting, affect final temperature. Use a meat thermometer to ensure accuracy. The USDA recommends allowing the meat to rest post-cooking, during which time the temperature can rise slightly, known as “carryover cooking.”
What Common Mistakes Should You Avoid When Roasting Beef?
Avoid common mistakes when roasting beef to ensure a successful and flavorful dish.
- Using the wrong cut of beef
- Skipping the seasoning
- Not allowing meat to rest
- Roasting at the wrong temperature
- Overcrowding the roasting pan
- Relying solely on cooking times without checking doneness
- Neglecting the importance of a meat thermometer
When roasting beef, understanding these common mistakes can improve your results significantly.
-
Using the Wrong Cut of Beef: Using the wrong cut of beef can negatively impact flavor and tenderness. Different cuts have distinct textures and fat content, affecting the final dish. For instance, cuts like ribeye or tenderloin are ideal for roasting due to their tenderness and rich flavor. In contrast, tougher cuts like chuck need slower cooking methods to become tender.
-
Skipping the Seasoning: Seasoning is crucial for enhancing the beef’s natural flavors. A simple rub of salt and pepper can significantly improve taste. Moreover, marinating the beef can infuse additional flavors. According to the USDA, seasoned meat has a better overall flavor profile than unseasoned meat.
-
Not Allowing Meat to Rest: Allowing roasted beef to rest is essential. During cooking, juices move toward the surface. Resting redistributes the juices within the meat, resulting in juicier slices. The recommended resting time is about 15-20 minutes for roasts. A study from the Journal of Food Science in 2014 emphasizes that resting improves moisture retention.
-
Roasting at the Wrong Temperature: Using an incorrect temperature can result in undercooked or overcooked beef. The ideal roasting temperature for most cuts is approximately 325°F to 375°F. Cooking at high temperatures can lead to a charred exterior with a rare interior, while low temperatures may dry out the meat.
-
Overcrowding the Roasting Pan: Overcrowding can lead to uneven cooking. When too much meat is in the pan, it traps moisture and steam, affecting browning and caramelization. Ensure enough space for air circulation around the beef to promote even cooking.
-
Relying Solely on Cooking Times Without Checking Doneness: Cooking times vary due to factors like the size of the cut and oven performance. Using a meat thermometer is critical for accuracy. For medium-rare beef, the internal temperature should reach 135°F. This ensures the meat is cooked to the proper doneness while avoiding overcooking.
-
Neglecting the Importance of a Meat Thermometer: A meat thermometer is vital for achieving the desired doneness. Relying on visual cues can be misleading. This tool provides an accurate reading of the meat’s internal temperature, ensuring a perfectly cooked roast. The National Cattlemen’s Beef Association recommends using a thermometer for best results.
How Can You Prevent Your Roast from Turning Out Dry?
To prevent your roast from turning out dry, choose the right cut, season liberally, cook at a low temperature, monitor internal temperature, and allow it to rest before slicing.
Selecting the right cut: Different cuts of meat have varying levels of fat and connective tissue. Cuts like chuck roast or brisket contain more fat, which helps retain moisture during cooking. According to the USDA, meats with higher fat content tend to remain juicier when cooked.
Seasoning: Generously seasoning your roast with salt before cooking can help retain moisture. Salt interacts with the meat, creating a brining effect that draws in moisture. A study published by Meat Science (Troy et al., 2013) indicated that properly seasoned meat can retain more juices during the cooking process.
Low-temperature cooking: Cooking your roast at a lower temperature allows for more even cooking and prevents the outside from drying out before the inside is cooked. Optimal roasting temperatures range from 225°F to 275°F (107°C to 135°C). Research from the Journal of Food Quality (Smith et al., 2016) highlights that cooking at lower temperatures improves moisture retention significantly.
Monitoring internal temperature: Use a meat thermometer to check the internal temperature. Most roasts should reach about 145°F (63°C) for medium-rare. Overcooking leads to moisture loss. According to the USDA, removing the roast from the oven at the right temperature ensures it remains juicy.
Resting the roast: Allow your roast to rest after cooking for at least 15-30 minutes. This resting period lets the juices redistribute throughout the meat, preventing them from leaking out when sliced. A study in the Food Science Journal (Baldwin, 2015) confirmed that resting meat can enhance its juiciness.
Employing these methods can help ensure a moist and flavorful roast.
Related Post: