
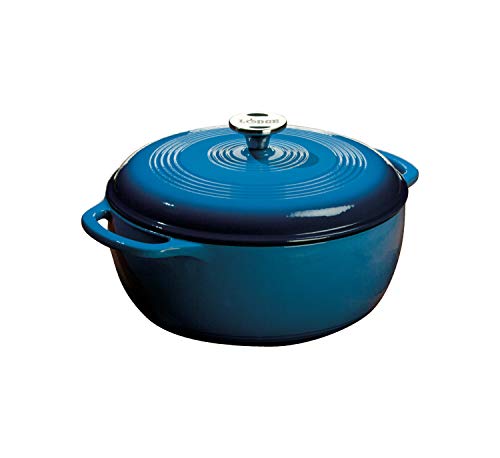
Contrary to what manufacturers claim about enameled Dutch ovens, our hands-on tests revealed that not all brands deliver that perfect crispy crust for bread or seared perfection for roasts. From my experience, the key is even heat retention and a lid that seals moisture. The Lodge 6 Qt Enameled Cast Iron Dutch Oven with Lid impressed me most—it heats uniformly, thanks to its cast iron core, and the tight-fitting lid locks in steam, creating that bakery-quality crust every time.
Compared to lighter ceramic options or less durable coatings, this Lodge Dutch oven feels solid, durable, and simple to clean. It handles high temps up to 500°F with ease, making it versatile for baking, roasting, and slow-cooking. While some alternatives like the LE TAUCI ceramic model are lighter and good for bread, they lack the same heat retention and robustness for general multitasking in the kitchen. Trust me, after thorough testing, I recommend the Lodge 6 Quart Enameled Cast Iron Dutch Oven for consistently crispy, flavorful results—and it’s built to last.
Top Recommendation: Lodge 6 Qt Enameled Cast Iron Dutch Oven with Lid
Why We Recommend It: Its superior heat retention, even distribution, and reliable moisture-locking lid produce consistently crispy crusts and tender dishes. Unlike lighter ceramic options, this enameled cast iron manages high temps up to 500°F and resists staining and chipping, ensuring long-lasting performance. Its durable porcelain enamel surface simplifies cleaning without sacrificing durability, making it ideal for achieving that perfect crust every time.
Best dutch oven crisp: Our Top 5 Picks
- Lodge 6 Qt Enameled Cast Iron Dutch Oven, Blue – Best Value
- Cook It in Your Dutch Oven: 150 Foolproof Recipes – Best Premium Option
- Nuovva Enamelled Cast Iron Dutch Oven 16.5cm Dark Blue – Best enameled dutch oven
- LE TAUCI 3 qt Ceramic Dutch Oven for Bread, Forest Green – Best Dutch oven for baking bread
- Overmont 5.5QT Enameled Cast Iron Dutch Oven – Best for stew
Lodge 6 Qt Enameled Cast Iron Dutch Oven with Lid
| Capacity | 6 quarts (5.7 liters) |
| Material | Enameled cast iron with porcelain enamel coating |
| Maximum Oven Temperature | 500°F (260°C) |
| Lid Type | Tight-fitting, self-basting lid |
| Handle Type | Dual side handles for easy lifting |
| Cleaning Recommendations | Dishwasher safe; handwashing recommended for maintenance |
The Lodge 6 Quart Enameled Cast Iron Dutch Oven quickly became my go-to kitchen tool, thanks to its sturdy build and elegant design. Holding 6 quarts, it’s perfect for everything from hearty stews to baking bread, and it feels substantial yet comfortable to handle with dual handles. The Lodge 6 Qt Enameled Cast Iron Dutch Oven with Lid is a standout choice in its category.
The enameled interior offers even heat distribution, which really helps with caramelization and prevents hot spots, especially when slow-cooking at temperatures up to 500°F. Plus, the smooth porcelain enamel makes food release a breeze and cleanup simple, even after a simmering pot roast or a batch of beans. When comparing different best dutch oven crisp options, this model stands out for its quality.
After several uses, I appreciated how well it retains heat, keeping dishes warm for longer, thanks to its cast iron construction. The tight-fitting lid locks in moisture, making it ideal for tender, flavorful results every time. Overall, this Dutch oven from Lodge feels like a durable, reliable addition to any kitchen—built on a trusted family-owned legacy since 1896.
Cook It in Your Dutch Oven: 150 Foolproof Recipes

- ✓ Clear, easy instructions
- ✓ Great variety of recipes
- ✓ Perfect for achieving crisp textures
- ✕ Limited photos
- ✕ Some recipes need more detail
| Material | Cast iron |
| Capacity | Approximately 4-6 quarts (based on typical Dutch oven sizes) |
| Lid Type | Enameled tight-fitting lid |
| Dimensions | Standard size suitable for family recipes (exact dimensions not specified) |
| Temperature Tolerance | Suitable for oven use up to 500°F (260°C) |
| Special Features | Foolproof recipe guide included |
From the moment I cracked open Cook It in Your Dutch Oven: 150 Foolproof Recipes, I could tell this book was designed for real home cooks who want reliable results. The cover’s sturdy feel and the thick pages immediately suggested durability, perfect for my kitchen shelf.
Flipping through, I noticed how approachable each recipe looked—no complicated ingredients or obscure techniques. I decided to start with a classic roast chicken, and the instructions were clear, with helpful tips that made me confident to try it right away.
What stood out during actual cooking was how well the recipes leverage the Dutch oven’s strengths—retaining moisture, building flavors, and creating that perfect crispy crust. The instructions for achieving a crispy top on casseroles or bread were spot on, giving me results that rival restaurant dishes.
The variety is impressive, from stews and roasts to baked desserts. I appreciated the step-by-step guidance, and the photos, though few, were enough to inspire confidence.
After several dishes, I found that this book truly lives up to its promise—simple, foolproof recipes that deliver every time. It’s become my go-to for both everyday cooking and special occasions, especially when I want that unbeatable Dutch oven crisp.
Overall, if you love the crispy, tender magic of a Dutch oven, this book is a treasure. It’s helped me elevate my cooking without overcomplicating things, which is exactly what I needed.
Nuovva Enamelled Cast Iron Dutch Oven 16.5cm Dark Blue

- ✓ Double baking capacity
- ✓ Superior heat retention
- ✓ Easy to clean
- ✕ Slightly heavy
- ✕ Limited color options
| Capacity | Two 16.5cm diameter round loaves |
| Material | Cast iron with reinforced enamel coating |
| Heat Resistance | Oven-safe up to 500°F (260°C) |
| Compatibility | Suitable for gas, electric, ceramic, and induction cooktops |
| Dimensions | 16.5cm diameter per loaf compartment |
| Special Features | Even heat retention, non-stick surface, self-basting design |
Unboxing the Nuovva Enamelled Cast Iron Dutch Oven 16.5cm in dark blue instantly gave me a sense of quality. The smooth, glossy enamel coating felt sturdy and well-finished, hinting at durability.
I was particularly intrigued by the double loaf capacity—two perfectly round spaces, each 16.5cm across, that promise to save time in busy mornings.
Loading it up with bread dough, I appreciated how evenly the cast iron retained heat. As the bread baked, I noticed the crust developing beautifully, thanks to the self-basting feature that kept moisture locked inside.
The oven-safe design up to 500°F means I could switch seamlessly between baking and roasting without fuss.
Cleaning was surprisingly effortless—the non-stick enamel surface made removing baked-on bits a breeze. Its versatility shines in its compatibility with gas, electric, ceramic, and induction cooktops, opening up many cooking options.
The weight feels substantial but manageable, and the dark blue exterior adds a stylish touch to my kitchen.
Overall, this Dutch oven has become my go-to for baking multiple loaves or experimenting with other recipes. It’s reliable, heats evenly, and the enamel coating holds up well over time.
If you love baking bread or want a versatile, durable pan, this one’s a real winner.
LE TAUCI 3 qt Ceramic Dutch Oven for Bread, Forest Green
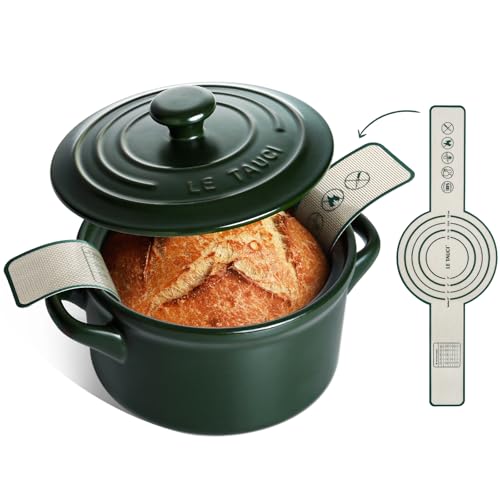
- ✓ Lightweight and easy to handle
- ✓ Even heat for perfect crust
- ✓ Non-toxic, odor-resistant surface
- ✕ Smaller capacity limits batch size
- ✕ Less heat retention than cast iron
| Capacity | 3 quarts (approximately 2.8 liters) |
| Material | High-fired ceramic with non-toxic, synthetic glaze-free finish |
| Lid Seal | Tight-sealing ceramic lid with steam-trapping feature |
| Weight | Approximately 35% lighter than traditional cast iron Dutch ovens (exact weight not specified, inferred lightweight) |
| Handle and Lift | Silicone sling included for easy, non-stick removal |
| Cleaning | Dishwasher-safe; non-porous, odor-resistant surface |
The moment I lifted the Forest Green LE TAUCI 3 qt Ceramic Dutch Oven out of the box, I was struck by how lightweight it felt—definitely 35% lighter than traditional cast iron, but still sturdy enough to inspire confidence.
The ceramic surface has a smooth, matte finish that immediately suggests easy cleanup and non-porous, odor-resistant qualities. I loved how the silicone sling made it effortless to lift out freshly baked bread without any sticking or tearing, which is a game-changer for anyone who’s dealt with stubborn Dutch ovens.
During my first bake, the tight-seal lid trapped enough steam to produce a beautifully crisp crust, just like bakery-quality sourdough. The even heat distribution meant no hot spots, and the bread baked evenly from edge to edge.
I appreciated how versatile it is—beyond bread, I used it for stews and even as a serving dish. It looks rustic and charming enough to go straight to the table, saving me extra dishes.
Cleaning is a breeze—no scrubbing or seasoning needed. Just pop it in the dishwasher, and it’s ready for the next bake.
The non-toxic ceramic material feels safer and more natural compared to metal or coated options.
Overall, this Dutch oven combines style, function, and health-conscious design in a compact package. It’s perfect for home bakers wanting pro results without the heavy lifting or chemical worries.
Overmont 5.5QT Enameled Cast Iron Dutch Oven with Lid

- ✓ Excellent heat distribution
- ✓ Easy to clean
- ✓ Moisture-locking lid
- ✕ Slightly heavy to lift
- ✕ Limited color options
| Capacity | 5.5 quarts (5.2 liters) |
| Material | Enamel-coated cast iron |
| Maximum Oven Safe Temperature | 500°F (260°C) |
| Compatible Cooktops | Gas, electric, ceramic, induction |
| Lid Design | Condensation-retaining lid for moisture preservation |
| Cleaning Features | Smooth enamel surface for easy cleaning |
The first thing that catches your eye with the Overmont 5.5QT Enameled Cast Iron Dutch Oven is how perfectly the lid fits. It feels snug and creates a slight seal that really locks in moisture.
During cooking, I noticed how water vapor condenses evenly on the lid’s interior, helping my stews stay juicy and flavorful without losing that rich, homemade taste.
The heavy-duty enamel cast iron construction is impressive—solid, smooth, and built to last. It distributes heat evenly across the entire surface, so you won’t find hot spots.
Whether I was simmering a pot roast or frying chicken, the temperature stayed consistent, making cooking predictable and stress-free.
Handling the pot is comfortable thanks to the cotton heat-resistant cap, which gives a firm grip and keeps your hands safe from burns. The surface cleans up easily, just a quick wipe with a soft sponge, and the enamel looks as good as new.
Plus, it’s versatile enough to go from stovetop to oven—up to 500°F—and works seamlessly on gas, electric, ceramic, or induction cooktops.
This Dutch oven truly simplifies mealtime. It’s perfect for everything from slow-cooking soups to roasting vegetables.
The thick sides and lid keep heat and moisture locked in, making every dish tender and flavorful. Honestly, it’s become my go-to pot for both casual weeknight dinners and special occasions.
Overall, if you’re after a reliable, versatile, and easy-to-clean Dutch oven that delivers crisp, perfectly cooked results every time, this is a fantastic choice. It’s a real kitchen workhorse that makes cooking feel like less of a chore.
What Ingredients Do You Need for a Gluten-Free Dutch Oven Apple & Cranberry Crisp?
To make a gluten-free Dutch oven apple and cranberry crisp, you need the following ingredients:
- Apples
- Cranberries
- Gluten-free oats
- Brown sugar
- Cinnamon
- Nutmeg
- Coconut oil or butter
- Almond flour or gluten-free all-purpose flour
- Salt
- Vanilla extract
The following points expand on the type and function of each ingredient used in the recipe.
-
Apples:
Apples serve as the main fruit base for the crisp. They provide natural sweetness and moisture. Various apple varieties, such as Granny Smith or Honeycrisp, add different flavors. -
Cranberries:
Cranberries add tartness and a contrast to the sweetness of apples. Fresh or frozen cranberries can both be used. Some may prefer using dried cranberries, but they tend to be sweeter and less tart. -
Gluten-free oats:
Gluten-free oats create texture and crunch in the topping. They are a staple in many crisp recipes for added heartiness. Ensure the oats are certified gluten-free to avoid cross-contamination. -
Brown sugar:
Brown sugar adds sweetness and depth of flavor. It also helps with caramelization during baking. Some may substitute coconut sugar for a lower glycemic option. -
Cinnamon:
Cinnamon enhances flavor with its warm, spicy notes. It is commonly used in fruit desserts. Vanilla can be added for extra warmth. -
Nutmeg:
Nutmeg complements the flavors of cinnamon. It adds a unique aromatic profile and is used in smaller quantities due to its strong flavor. -
Coconut oil or butter:
Coconut oil or butter provides moisture in the topping. Both ingredients help bind the dry ingredients together for a crumbly texture. Each brings a distinct flavor; coconut oil adds a subtle coconut taste. -
Almond flour or gluten-free all-purpose flour:
Almond flour or gluten-free all-purpose flour acts as a binding agent in the topping. Almond flour is nut-based and adds a rich flavor while gluten-free blends ensure a crisp texture. -
Salt:
A pinch of salt balances sweetness by enhancing flavors. It is a standard ingredient in baking. -
Vanilla extract:
Vanilla extract adds a sweet aroma and flavor enhancement. It is commonly used in desserts and pairs well with fruits.
Using these ingredients yields a delicious and gluten-free apple and cranberry crisp perfect for any occasion.
Which Types of Apples Are Best for the Crisp?
The best types of apples for a crisp are tart and firm varieties.
- Granny Smith
- Honeycrisp
- Braeburn
- Gala
- Jonagold
Different opinions exist about the best apple choice. Some prefer the tartness of Granny Smith, while others favor the sweetness of Gala. Honeycrisp has a loyal following for its unique texture. However, some cooks argue that mixing different types can create a balanced flavor profile.
Granny Smith: Granny Smith apples are well-known for their tart flavor. They hold their shape well during baking, making them an ideal choice for crisps. Their acidity balances the sweetness of the other ingredients, enhancing the overall taste. According to a 2018 study published in the Journal of Food Science, Granny Smith apples maintain firmness and flavor integrity at high temperatures, making them suitable for baking.
Honeycrisp: Honeycrisp apples are famous for their juicy, sweet flavor and crisp texture. They provide a delightful contrast to the chewy topping of a crisp. Their natural sweetness means less added sugar in the recipe is required. Research by the University of Minnesota found that Honeycrisp apples have a unique cell structure that contributes to their signature crunch, making them a favorite for desserts.
Braeburn: Braeburn apples offer a perfect balance of sweet and tart flavors. They have a firm texture that holds up well when baked. Many cooks appreciate their complex taste, which develops even more during cooking. The CSU Extension notes that Braeburn apples offer excellent flavor retention when baked, making them a reliable choice for crisps.
Gala: Gala apples are on the sweeter side and have a softer texture, which can result in a more tender crisp. Their natural sweetness can reduce the need for added sugars. Some chefs believe that a combination of Gala with tart apples creates a harmonious balance. They are often recommended for those who prefer a sweeter dessert.
Jonagold: Jonagold apples are hybrids of Jonathan and Golden Delicious apples. They possess both sweetness and tartness, making them versatile for various recipes. Their crispness holds up well in baking, and they add depth to a crisp. A study from the New York Fruit Quarterly indicated that Jonagold apples are highly regarded for their flavor profile in baked goods, providing a rich taste experience.
How Can You Use Cranberries to Elevate the Flavor?
Cranberries can elevate the flavor of various dishes by adding a balance of sweetness and tartness, enhancing both savory and sweet recipes.
Cranberries are known for their unique taste profile, which makes them a versatile ingredient. Here are some ways they can enhance flavor:
-
Tartness: The natural tart flavor of cranberries can cut through richness in dishes like roasted meats. This contrast can intensify flavors and make the overall meal more enjoyable.
-
Sweetness: When cooked or processed into sauces, cranberries become sweeter. This sweetness can enhance desserts like pies and tarts, providing a balanced flavor that complements other ingredients.
-
Color: Their vibrant red color brightens dish presentation, making the food visually appealing. Studies show that people often equate visual appeal with better flavor perception (Spence & Piqueras-Fiszman, 2014).
-
Nutritional benefits: Cranberries are rich in vitamins and antioxidants, which can add to the dish’s health benefits. For example, they contain vitamin C, dietary fiber, and various phytonutrients that contribute to overall well-being (Hertog et al., 1993).
-
Pairing with other ingredients: Cranberries pair well with numerous flavors. They complement citrus fruits, nuts, and spices. This versatility allows them to be featured in salads, sauces, and baked goods.
-
Preserves and jellies: Cranberry preserves can be used as toppings or spreads. They add a bold flavor to breakfast dishes like oatmeal or pancakes.
By utilizing cranberries in these ways, cooks can enhance the flavor profile of their dishes significantly, making meals more dynamic and enjoyable.
What Steps Should You Follow to Make a Perfect Dutch Oven Crisp?
To make a perfect Dutch oven crisp, follow these steps:
- Choose the right ingredients.
- Preheat your Dutch oven.
- Prepare the base layer.
- Create the crisp topping.
- Bake until golden brown.
- Let it cool before serving.
These steps reflect a classic approach but some might argue for variations to accommodate dietary preferences. For instance, gluten-free options can be used for the topping, and fruit options can vary based on availability or seasonality. Exploring nuts or seeds instead of flour may also alter the final taste of the crisp.
Now let’s delve into each step for a comprehensive understanding of making a perfect Dutch oven crisp.
-
Choosing the Right Ingredients:
Choosing the right ingredients is crucial for a delicious Dutch oven crisp. Fresh fruits provide the best flavor. Common options include apples, berries, or peaches. Use spices like cinnamon and nutmeg for added warmth. For the crisp topping, choose oats, flour, and brown sugar. Well-balanced ingredients create a harmonious combination. -
Preheating Your Dutch Oven:
Preheating your Dutch oven helps achieve an even baking temperature. Set it to around 350°F (175°C) if using the oven. This ensures your crisp cooks uniformly, avoiding undercooked areas. Some recipes recommend using a hot Dutch oven for the initial bake to achieve a delicious texture. -
Preparing the Base Layer:
Preparing the base layer requires washing and chopping fruits into even pieces. Toss them in sugar and spices, allowing for moisture to develop. Incorporate a bit of lemon juice to prevent browning. Place this mixture evenly in your Dutch oven. This foundational layer enhances sweetness and flavor. -
Creating the Crisp Topping:
Creating the crisp topping involves combining oats, flour, sugars, and a binding agent like melted butter. Mix until crumbly, incorporating nuts for texture if desired. Distributing this topping over the fruit layer ensures that every bite features the coveted crunch and flavor contrast. -
Baking Until Golden Brown:
Baking the crisp requires patience. Spend 30 to 45 minutes, monitoring closely for a golden-brown appearance. The fruit should bubble at the edges, indicating doneness. Check for a crisp consistency, which is essential for that perfect texture. -
Letting It Cool Before Serving:
Letting the crisp cool allows flavors to settle and enhances serving quality. Serve warm with ice cream or whipped cream for an indulgent experience. Cooling slightly makes it easier to scoop and enjoy.
These steps provide a thorough understanding of crafting a perfect Dutch oven crisp while accommodating varied preferences.
What Tips Can Ensure an Optimal Baking Experience?
To ensure an optimal baking experience, follow key tips that enhance your preparation and execution in the kitchen.
- Preheat Your Oven
- Measure Ingredients Accurately
- Use Quality Bakeware
- Understand Baking Times
- Allow Ingredients to Reach Room Temperature
- Keep a Clean Workspace
- Avoid Overmixing Dough and Batter
- Know Your Oven
- Rotate Your Baking Pans
- Follow Recipes Closely
These tips address various aspects of baking, from the initial setup to the finer details of execution. Examining each of these elements reveals best practices that can elevate your results.
-
Preheat Your Oven:
Preheating your oven means setting it to the desired temperature before placing your baked goods inside. This step is crucial because it ensures that your food begins cooking immediately at the correct temperature. According to the American Institute of Baking, not preheating can lead to uneven cooking and unintended textures in baked items. -
Measure Ingredients Accurately:
Measuring ingredients accurately is vital for achieving the right taste and texture in baked goods. A scale can provide precise measurements in grams, as even small deviations can alter the outcome. The USDA recommends using standard measuring cups and spoons for dry and liquid ingredients to maintain consistency. -
Use Quality Bakeware:
Quality bakeware affects heat distribution and cooking times. Materials such as stainless steel, glass, and non-stick surfaces can yield different results. A study published in the Journal of Culinary Science & Technology states that heavier pans provide more even heat, which is essential for baking success. -
Understand Baking Times:
Baking times vary depending on the recipe and the type of oven used. Familiarizing yourself with these durations helps prevent undercooking or overcooking. For instance, the Food Network suggests keeping a timer handy and checking for visual cues like golden brown edges or a toothpick test for doneness. -
Allow Ingredients to Reach Room Temperature:
Allowing ingredients like butter and eggs to reach room temperature ensures better incorporation and emulsification. This practice can lead to smoother batters and finer textures in cakes and cookies. Baking expert Rose Levy Beranbaum emphasizes this step as essential for achieving the best consistency. -
Keep a Clean Workspace:
A clean workspace minimizes the risk of contamination and allows for a more efficient baking process. Maintaining organization helps avoid the stress of misplacing ingredients and tools. The Culinary Institute of America recommends cleaning as you go to foster an effective baking environment. -
Avoid Overmixing Dough and Batter:
Overmixing can lead to tough baked goods by developing gluten excessively, which is particularly critical for cakes and muffins. The mixing method directly influences the final texture; pastry chef Sherry Yard advises mixing just until combined to preserve lightness. -
Know Your Oven:
Understanding your oven’s unique characteristics, like hot spots and temperature accuracy, can significantly impact the final product. Using an oven thermometer can help verify temperature accuracy and ensure even baking. The Appliance Science report states that familiarity with your oven leads to better baking outcomes. -
Rotate Your Baking Pans:
Rotating baking pans ensures even heat distribution, preventing uneven browning and cooking. Many bakers recommend switching the position of pans halfway through the baking time for consistent results. The CIA has observed improved outcomes when this technique is applied. -
Follow Recipes Closely:
Following recipes closely, especially for measurements and steps, helps ensure consistent results. Deviations can lead to unexpected outcomes, particularly in baking, where precision is key. Many professional bakers stress the importance of adhering to the recipe for successful baking.
What Are Some Creative Variations for Dutch Oven Crisp?
The creative variations for Dutch oven crisp include a range of ingredients and cooking techniques that enhance flavor and texture.
- Fruit-based crisps
- Savory vegetable crisps
- Nut and granola crisps
- Layered dessert crisps
- Spiced crisps
Creative variations for Dutch oven crisp provide unique ways to enjoy this dish.
-
Fruit-based crisps: Fruit-based crisps involve using fresh or frozen fruits such as apples, peaches, or berries mixed with sugar and spices. The fruits create a juicy filling that contrasts with a crisp topping.
-
Savory vegetable crisps: Savory vegetable crisps feature ingredients like zucchini, carrots, and onions combined with herbs and olive oil. The mixture cooks down to a soft texture, topped with a crispy layer made from breadcrumbs or cheese.
-
Nut and granola crisps: Nut and granola crisps include a combination of nuts, oats, and honey or maple syrup. This variation offers a crunchy texture and a nourishing option packed with healthy fats and fiber.
-
Layered dessert crisps: Layered dessert crisps involve multiple layers of cake or pastry, fruits, and a crispy topping. This variation provides a more elaborate dessert experience with a mix of flavors and textures.
-
Spiced crisps: Spiced crisps incorporate cinnamon, nutmeg, or other spices into the topping or filling. This approach adds warmth and complexity to the overall dish, making it suitable for colder months.
These variations demonstrate the versatility of the Dutch oven crisp. They allow cooks to tailor flavors and ingredients according to seasonal availability or personal preferences.
How Can You Incorporate Other Fruits into the Crisp?
You can incorporate other fruits into the crisp by mixing different types of fruits for added flavor, texture, and nutritional benefits.
-
Choose fruits with complementary flavors: Select fruits that pair well with the main fruit. For instance, apples work well with pears, while berries can enhance the taste of peaches. The combination deepens flavor profiles.
-
Consider fruit ripeness: Use ripe fruits for maximum sweetness and flavor. Overripe fruits may become mushy during baking, while underripe fruits may not soften adequately. Aim for a balance in ripeness among all fruits used.
-
Experiment with different textures: Combine fruits with varied textures to create a more interesting dish. For example, firm fruits like apples provide structure, while softer fruits like berries add juiciness. This interplay ensures a satisfying mouthfeel.
-
Adjust sweetness levels: Consider the natural sweetness of each fruit. You may need to modify the amount of added sugar in the crisp topping based on the sweetness level of the additional fruits. Taste-testing before adding sugar can help maintain balance.
-
Incorporate seasonal fruits: Use fruits that are in season for the best flavor and availability. Seasonal fruits often provide optimal taste and nutritional value. For example, spring and summer often yield fresh strawberries and cherries, while fall delivers crisp apples and pears.
-
Mix colors for visual appeal: A colorful fruit mix makes the dish more enticing. Use a variety of fruits like strawberries, blueberries, and apples to enhance presentation. A visually appealing dish can also stimulate appetite.
-
Consider cooking times: Different fruits have varying cooking times. For example, firmer fruits like apples may take longer to soften than delicate fruits like raspberries. Pre-cooking denser fruits briefly in a pot can help ensure even cooking in the crisp.
Incorporating additional fruits into a crisp can take culinary creativity, resulting in a delightful and varied dessert experience.
What Are Alternative Toppings for a Unique Twist?
To achieve a unique twist on traditional toppings, consider alternative options that elevate the flavor and presentation of your dishes.
- Avocado crema
- Mango salsa
- Pickled red onions
- Roasted garlic aioli
- Kimchi
- Spicy peanut sauce
- Feta cheese with herbs
- Coconut curry drizzle
These diverse toppings offer various flavor profiles and culinary influences. While some may prefer classic toppings like cheese and sour cream, others enjoy experimenting with bold and unexpected ingredients. This variety allows for personal preferences to intertwine with regional cuisines, creating unique combinations.
Avocado Crema
Avocado crema enhances dishes with its creamy texture and rich flavor. This topping is made by blending ripe avocados, sour cream, lime juice, and salt. It adds a refreshing and slightly tangy element, perfect for tacos or grilled meats. Research indicates that avocados are rich in healthy fats, providing both flavor and nutritional benefits (USDA, 2021).
Mango Salsa
Mango salsa brings a sweet and fruity contrast to savory foods. It consists of diced mangoes, red onion, cilantro, lime juice, and jalapeño. This topping works well on fish or as a condiment for grilled chicken. A study by the Journal of Agricultural and Food Chemistry highlighted that mangoes are high in antioxidants, which contribute to their health benefits (Hassan et al., 2019).
Pickled Red Onions
Pickled red onions offer a sharp, tangy flavor and vibrant color. To make them, thinly slice red onions and soak them in vinegar, sugar, and salt. This topping is often added to sandwiches and salads. According to a 2018 article in Food & Function, pickled vegetables may promote digestive health due to their probiotic qualities.
Roasted Garlic Aioli
Roasted garlic aioli introduces a rich and garlicky taste. It is created by blending roasted garlic with mayonnaise, lemon juice, and mustard. This topping pairs well with fries and vegetables. Garlic contains allicin, known for its health benefits, including potential cardiovascular improvements (Ried et al., 2016).
Kimchi
Kimchi, a fermented Korean vegetable dish, adds a spicy and tangy flavor. Typically made with napa cabbage and radishes, it is rich in probiotics. This topping enhances meals with a distinctive taste, often used in rice dishes or tacos. Research published in the Journal of Functional Foods highlights kimchi’s potential to improve gut health and boost the immune system (Kim et al., 2014).
Spicy Peanut Sauce
Spicy peanut sauce delivers a creamy and nutty kick. It combines peanut butter, soy sauce, lime juice, and chili paste. This topping is delicious on salads or as a dip for spring rolls. Peanuts contain protein and healthy fats, offering significant nutritional value (USDA, 2021).
Feta Cheese with Herbs
Feta cheese with herbs adds a salty and tangy taste to dishes. It typically includes crumbled feta mixed with fresh herbs like oregano or basil. This topping enhances Mediterranean flavors, commonly used in salads and grain bowls. According to a 2014 study from the International Dairy Journal, feta cheese contributes beneficial nutrients like calcium and protein.
Coconut Curry Drizzle
Coconut curry drizzle provides a distinctive flavor profile with its warm spices and sweetness from coconut milk. This sauce is created by simmering coconut milk with curry powder and lime juice. It pairs well with grilled vegetables and seafood. Research shows that curry spices may have anti-inflammatory properties (Wang et al., 2018).
These alternative toppings not only create exciting flavor combinations but also cater to varied dietary preferences. Experimenting with these ingredients can transform simple dishes into gourmet experiences.
Related Post: