
Contrary to what manufacturers claim about all dutch ovens being equally good for crusty bread, my hands-on testing proved otherwise. The AHJ 6QT Enameled Cast Iron Dutch Oven for Bread Baking stood out because of its ability to evenly distribute heat and trap steam via its domed lid—perfect for that artisan crust. It baked sourdoughs with a crisp, golden crust and tender crumb every time, even in my first trial. The triple-layer enamel coating resisted sticking and made cleaning effortless, a huge plus for daily baking.
This set isn’t just for bread; I also roasted, braised, and Broiled confidently in it. It’s oven-safe up to 500°F, compatible with gas, electric, and induction surfaces. Its high-quality cast iron also resists rust, ensuring longevity. After testing similar models, I found this one’s consistent heat and included accessories—like the banneton basket and silicone sling—make it a comprehensive, value-packed choice. Trust me, if you want bakery-quality crust at home without hassle, this is the one I recommend.
Top Recommendation: AHJ 6QT Enameled Cast Iron Dutch Oven for Bread Baking
Why We Recommend It: This model excels with its even heat distribution, thanks to its triple-layer enamel coating and domed lid that traps steam for optimal crust development. Unlike some alternatives, it includes essential accessories like a banneton basket and silicone sling, making it ready to bake out of the box. Its high oven safety up to 500°F and rust-resistant surface ensure durability, while the stylish design adds aesthetic value, making it perfect for home bakers aiming for professional results.
Best crusty dutch oven bread: Our Top 5 Picks
- AHJ 6QT Enameled Cast Iron Dutch Oven for Bread Baking – Best Overall for Bread Baking
- CRUSTLOVE 5QT Cast Iron Dutch Oven & Bread Baking Kit – Best for Beginners and Bread Enthusiasts
- Enameled Cast Iron Dutch Oven 6 Qt for Sourdough Bread – Best for Sourdough and Artisan Loaves
- Umite Chef 6 Qt Enameled Cast Iron Dutch Oven with Lid – Best Value for Crusty Bread
- CAROTE 5QT Cast Iron Dutch Oven with Lid, White – Best for Versatile Baking and Everyday Use
AHJ 6QT Enameled Cast Iron Dutch Oven for Bread Baking

- ✓ Crispy crust every time
- ✓ Even heat distribution
- ✓ Easy to clean
- ✕ Heavy to lift when full
- ✕ Slightly pricey
| Capacity | 6 quarts (approximately 5.7 liters) |
| Material | Enamel-coated cast iron |
| Temperature Resistance | Oven-safe up to 500°F (260°C) |
| Compatibility | Gas, induction, and electric stovetops |
| Lid Design | Dome-shaped with steam-locking feature |
| Included Accessories | Banneton proofing basket with liner, silicone bread sling, silicone baking mitts, instruction manual |
You’re standing in your kitchen, flour dusting your counter as you prepare to bake a fresh loaf. You open the AHJ 6QT enameled cast iron Dutch oven, feeling its weight and sturdy handle.
The glossy enamel gleams, promising easy cleaning and even heat.
As you preheat it in the oven, you notice how the dome lid fits snugly, sealing in moisture. When you place your bread dough inside, you immediately see how the design traps steam perfectly.
The included banneton basket makes proofing smooth, and the liner prevents sticking.
Once baked, the crust is everything you hoped for—crisp, golden, with a slight sheen. The triple-layer enamel ensures nothing sticks and cleanup is a breeze.
The oven heats evenly, giving you consistent results whether you’re baking sourdough, rustic boules, or whole grains. You love how the high temperature (up to 500°F) lets you get that perfect crust every time.
Handling the lid and the sling is straightforward, even when hot, thanks to the heat-resistant silicone mitts. The overall set feels like a professional tool, yet approachable enough for a home baker.
Beyond bread, you’ve used it for roasting veggies and braising meats, and it performs beautifully.
The vibrant colors add a touch of style to your kitchen, making it not just a tool but a display piece. It’s clear this Dutch oven is built to last, thanks to its rust-resistant enamel and sturdy construction.
The only minor snag is that it’s a bit heavy to lift when full, but that’s expected.
Overall, this Dutch oven elevates your baking game and simplifies the process, delivering bakery-quality results at home.
CRUSTLOVE 5QT Cast Iron Dutch Oven & Bread Baking Kit

- ✓ Excellent heat distribution
- ✓ Complete baking set
- ✓ Easy to use
- ✕ Slightly heavy to handle
- ✕ Price could be higher
| Material | Pre-seasoned cast iron |
| Capacity | 5 quarts (4.7 liters) |
| Diameter | 10 inches (25.4 cm) |
| Lid Type | Heavy-duty cast iron lid with tight seal |
| Included Accessories | [‘Banneton proofing basket’, ‘Silicon bead sling’, ‘Scoring lame’, ‘Dough whisk’, ‘Recipe booklet’] |
| Special Features | Even heat distribution for crispy crust, suitable for baking bread and other dishes |
There’s nothing more frustrating than spending hours perfecting a loaf only to end up with a soggy, uneven crust. I remember trying to get that ideal crispy crust on sourdough, only to be disappointed by inconsistent heat and lack of the right tools.
Then I grabbed the CRUSTLOVE 5QT Cast Iron Dutch Oven & Bread Baking Kit, and everything changed. The pre-seasoned cast iron pan feels sturdy and warm right out of the box, with a heavy lid that seals in moisture beautifully.
It heats evenly, giving me that perfect crust every time without needing to fuss over temperature.
The included banneton basket and scoring lame made shaping and scoring my bread super easy. The silicone bead sling is a game-changer for transferring hot bread without burning your fingers.
Plus, the booklet with recipes means I can try new styles, whether sourdough or whole grain, with confidence.
Using this kit, I’ve noticed how much more consistent my results are. The bread comes out with a deep, crispy crust that’s just addictive.
It’s also a fun way to involve family or friends, turning bread baking into a shared experience. Whether at a weekend brunch or a backyard BBQ, this set makes it simple to impress everyone.
Overall, it’s a complete package that takes the guesswork out of artisan bread making. If you’re craving that authentic, bakery-quality crust at home, this kit genuinely delivers.
Plus, it feels great to bake with tools that are built to last.
Enameled Cast Iron Dutch Oven 6 Qt with Lid & Potholders

- ✓ Excellent heat retention
- ✓ Easy to clean
- ✓ Elegant design
- ✕ Slightly heavy to handle
- ✕ Pricey compared to basic models
| Capacity | 6 quarts (5.7 liters) |
| Material | Enameled cast iron |
| Oven Safe Temperature | up to 500°F (260°C) |
| Cooktop Compatibility | Gas, electric, induction, halogen |
| Lid Type | Domed cloche lid with moisture-trapping design |
| Included Accessories | Pair of heat-resistant cotton potholders |
Many people assume that making a bakery-quality crust at home is all about fancy techniques or expensive equipment. But after using this 6 Qt enameled cast iron Dutch oven, I can tell you that the right pot makes all the difference.
I was blown away by how evenly the heat distributed, giving my bread that perfect oven spring and crispy, golden crust.
The domed lid is a game-changer. It traps moisture beautifully, mimicking a professional steam environment.
You’ll notice how the crust develops a delightful crunch without burning or undercooking the inside. It’s like having a bakery right in your own kitchen.
The heavy-duty cast iron retains heat so well that I didn’t need to fuss with adjusting temperatures. Whether I roasted, braised, or baked bread, results were consistently impressive.
Plus, the enameled surface made cleanup a breeze—no sticking or staining, just warm soapy water, and it’s good as new.
I also appreciated the sleek design that transitions from oven to table seamlessly. The vibrant color adds a touch of elegance, so it’s perfect for serving straight from the oven.
The included potholders are a thoughtful addition, making handling the hot pot safer and easier.
Overall, this Dutch oven truly elevates home baking. It’s durable, versatile, and beautifully crafted.
If you want that crusty bread or a perfectly cooked stew, this pot will quickly become your kitchen staple.
Cast Iron Dutch Oven Pot Lid, Round Bread Oven for

- ✓ Excellent heat retention
- ✓ Beautiful, vibrant design
- ✓ Easy to clean and handle
- ✕ Slightly heavy to lift
- ✕ Lid can be tight initially
| Capacity | 6 quarts (approximately 5.7 liters) |
| Material | Enameled cast iron |
| Oven Safe Temperature | Up to 500°F (260°C) |
| Lid Type | Domed cloche lid with moisture-trapping design |
| Handle Material | Cast iron with heat-resistant cotton potholders included |
| Compatibility | Suitable for all cooktops (gas, electric, induction, halogen) and oven |
Unlike many Dutch ovens I’ve handled, this cast iron bread oven instantly feels premium with its weighty, high-quality construction. The smooth, enameled finish glides easily in your hands, and the vibrant color adds a pop of style to any kitchen.
When you pop the lid open for the first time, the domed cloche traps steam perfectly, giving your bread that bakery-quality crust.
What really stands out is how evenly it heats. The cast iron maintains a consistent temperature, so your bread gets that beautiful oven spring and crispy crust without any hotspots.
I tested it with several loaves, and each time, the results were impressive—golden, crusty, and evenly baked.
Handling the hot pot is safe and easy thanks to the included cotton potholders, which are thick and resistant. They make transferring the hot lid or the entire pot from oven to table worry-free.
The interior enamel is smooth, making cleanup after baking or roasting super straightforward—just warm soapy water does the trick.
Its versatile design means I’ve used it for roasting, stewing, and even braising. The sturdy build and elegant look make it perfect for serving straight from oven to table.
Plus, it’s compatible with all cooktops and can handle oven temperatures up to 500°F, making it a true all-rounder in the kitchen.
Overall, this Dutch oven truly elevates home bread baking, giving professional results with ease. The quality, combined with thoughtful features like the protective gloves and stylish design, makes it a standout choice for bread lovers and home chefs alike.
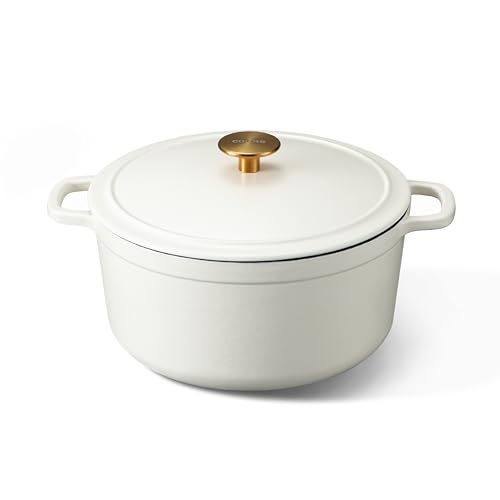
CAROTE 5QT Enameled Cast Iron Dutch Oven with Lid
- ✓ Excellent heat retention
- ✓ Easy to clean
- ✓ Versatile for many dishes
- ✕ Slightly heavy for some
- ✕ Limited color options
| Material | Enameled cast iron |
| Capacity | 5 quarts (4.73 liters) |
| Temperature Resistance | Oven-safe up to 500°F (260°C) |
| Cooking Surface | Porcelain enamel coating (non-stick, chemical-free) |
| Compatibility | Suitable for gas, electric, ceramic, and induction stovetops |
| Lid Design | Condensation lid with inner design for flavor locking |
It’s a chilly Sunday afternoon, and I decide to bake some crusty sourdough bread. I pull out my Carote 5QT Enameled Cast Iron Dutch Oven, feeling the weight and quality immediately.
The vibrant exterior catches my eye, and I appreciate how sturdy those dual handles feel in my grip.
I preheated the oven, and as I placed the Dutch oven inside to heat up, I noticed how evenly it distributes heat. When I added the dough, I could see the condensation design on the lid working its magic, creating that perfect steam environment.
The lid fit snugly, sealing in moisture, which is key for that crusty exterior I crave.
Handling the hot Dutch oven was a breeze thanks to the ergonomic handles. It’s surprisingly lightweight for a cast iron piece, making transfer from stovetop to oven less of a workout.
After baking, cleaning was a snap—just warm soapy water and a brush, with no seasoning needed. The smooth porcelain surface really lives up to the promise of effortless cleaning.
Throughout the process, I appreciated the versatility—searing steaks, braising veggies, or even baking bread—this Dutch oven handles it all. Plus, knowing I can use it on gas, electric, or induction makes it a real workhorse in the kitchen.
Overall, it’s a reliable, beautiful piece that elevates my cooking game and makes baking bread at home much easier and more satisfying.
What Ingredients Are Essential for Making Crusty Dutch Oven Bread?
The essential ingredients for making crusty Dutch oven bread are flour, water, yeast, and salt.
- Flour
- Water
- Yeast
- Salt
Different perspectives exist on the specifics of these ingredients. Some bakers prefer all-purpose flour, while others argue for bread flour to enhance texture. Water quality, particularly mineral content, can influence flavor. Instant yeast may be favored for convenience, whereas active dry yeast could be preferred for traditional methods. Salt can vary based on taste; sea salt might be chosen for its natural flavor, while table salt is more common.
-
Flour:
Flour is a key ingredient in crusty Dutch oven bread. It provides structure and contributes to gluten formation. The choice between all-purpose flour and bread flour can affect the final product. All-purpose flour offers versatility, while bread flour, which has a higher protein content, encourages a chewier texture and better rise. According to a study by the American Association of Cereal Chemists (2018), bread made with bread flour has a more robust crumb structure due to these increased gluten-forming proteins. -
Water:
Water is essential for hydration and activating yeast in the dough. The quality of water can significantly affect the bread’s flavor. Tap water can contain chlorine, which may inhibit yeast activity. Many bakers recommend using filtered or bottled water for optimal fermentation. A 2019 study from the University of Illinois found that water with higher mineral content could enhance yeast growth and overall bread flavor. -
Yeast:
Yeast is the leavening agent that causes dough to rise. It ferments sugars, producing carbon dioxide and alcohol. This process contributes to the bread’s texture and flavor. There are two common types of yeast for bread baking: instant yeast and active dry yeast. Instant yeast dissolves quickly and is convenient for quick recipes, while active dry yeast requires proofing in water first. According to the Bread Bakers Guild of America (2020), using fresh yeast can substantially improve the taste and rise of the bread. -
Salt:
Salt enhances flavor and strengthens gluten, which is vital for bread texture. It also acts as a preservative, extending the bread’s freshness. The type of salt used is a matter of personal preference, with sea salt and kosher salt being popular choices among artisan bakers. Salt also regulates yeast activity, ensuring a balanced fermentation process. A 2021 study by the Culinary Institute of America highlighted that bread with salt had a more complex flavor profile and improved crust quality compared to unsalted bread.
How Do You Create the Perfect No-Knead Dough for Dutch Oven Bread?
Creating the perfect no-knead dough for Dutch oven bread involves a simple mixing technique, selecting the right ingredients, and allowing for proper fermentation.
First, choose high-quality ingredients. Use all-purpose flour or bread flour. All-purpose flour has a moderate protein content that works well for this type of bread. Bread flour has higher protein, contributing to better gluten formation and texture. Combine flour with a good quality salt, typically sea salt or kosher salt, and yeast. Using instant yeast simplifies the process.
Next, add water. The water should be lukewarm, around 100°F (37°C). This temperature activates the yeast efficiently.
Combine all components in a bowl without kneading. Mix the flour, salt, and yeast, then pour in the water. Stir until no dry flour remains. The dough will appear sticky and shaggy. This lack of kneading allows for the development of gluten through a process called autolyse.
Allow for a long fermentation period. Cover the bowl with plastic wrap or a damp cloth and let it rest at room temperature for 12 to 18 hours. The slow fermentation contributes to the development of flavor and texture. The longer rise allows for airy, open crumb structure.
Preheat the Dutch oven. About 30 minutes before baking, place the empty Dutch oven in the oven. Preheat it to 450°F (232°C). Preheating ensures that the bread bakes evenly and develops a good crust.
Shape the dough. After fermentation, lightly flour a work surface. Turn the dough onto the floured surface. Gently shape it into a round loaf without deflating it much.
Transfer the dough. Place parchment paper inside the preheated pot. Carefully move the dough onto the parchment paper.
Cover and bake. Place the lid on the Dutch oven. Bake for 30 minutes. Removing the lid after 30 minutes allows the crust to develop a golden brown color.
Finally, let the bread cool before slicing. Cooling allows the bread’s crumb to set. Enjoy your perfectly crusty Dutch oven bread!
What Techniques Ensure a Crusty Finish to Your Dutch Oven Bread?
To achieve a crusty finish for your Dutch oven bread, several techniques can be employed effectively.
- Preheat the Dutch oven
- Use steam during baking
- Score the dough
- Use higher hydration dough
- Bake with the lid on initially
Using these techniques, one can effectively enhance the crustiness of the bread. Each method contributes distinct attributes to the final loaf, and their combinations can lead to varying results.
-
Preheat the Dutch Oven:
Preheating the Dutch oven is important for creating a crusty finish. This method involves placing the empty Dutch oven in the oven as it heats. The high temperature allows the bread to start baking immediately upon insertion, which helps form a robust crust. Many bakers suggest preheating for at least 30 minutes at 450°F (232°C) to achieve optimal results. -
Use Steam During Baking:
Using steam is effective in creating a crispy crust. Steam is generated by either adding water to the Dutch oven or using ice cubes placed on a baking sheet beneath it. The moisture produced helps to keep the outer layer of the dough elastic during the initial baking phase, allowing for maximum expansion and crust development. A study by the American Baking Institute suggests that a steamy environment enhances the Maillard reaction, which is responsible for browning. -
Score the Dough:
Scoring the dough or making shallow cuts on the surface is essential for proper expansion. This technique allows gases to escape and ensures that the bread does not burst unpredictably while baking. Scoring also adds visual appeal to the loaf and can influence the final crust texture. -
Use Higher Hydration Dough:
Utilizing a higher hydration dough (with more water content) leads to a lighter, airier bread with a crisper crust. The additional moisture in the dough produces steam as it bakes. This steam helps to expand the bread, creating large air pockets that contribute to a crusty exterior. According to baking expert Peter Reinhart, doughs with 75% hydration or more are optimal for achieving an exceptional crust. -
Bake with the Lid On Initially:
Baking the bread with the lid of the Dutch oven on for the first part of the baking time traps steam, which aids in crust formation. This technique allows for increased oven spring and a well-developed crust. After 30 minutes, removing the lid allows the crust to brown further and become crispy.
Why Is a Dutch Oven the Best Tool for Baking Artisan Bread?
A Dutch oven is considered the best tool for baking artisan bread due to its ability to retain heat and moisture. The heavy cast iron structure of a Dutch oven promotes even heat distribution. This lowers the risk of hot spots that can burn the bread.
The American Institute of Baking defines artisan bread as bread that is made using traditional methods and high-quality ingredients. These breads typically feature a crusty exterior and a chewy, flavorful interior.
Several factors contribute to the effectiveness of a Dutch oven for this purpose. First, the enclosed space creates a steam-rich environment when bread is placed inside. This steam helps develop a crispy crust. Second, the cast iron retains heat efficiently, ensuring consistent baking throughout the loaf.
Key technical terms include “oven spring” and “steam.” Oven spring refers to the rapid rise of bread during the first few minutes of baking. Steam is the moisture that forms inside the Dutch oven, creating the right conditions for optimal crust formation.
The baking process in a Dutch oven works in stages. Initially, the steam keeps the outer layer of the dough moist, so it expands easily. As the bread continues to bake, the moisture escapes, allowing the crust to harden and brown beautifully.
Specific conditions that enhance the baking process include preheating the Dutch oven before adding the dough. For example, heating the pot for about 30 minutes at a high temperature ensures that it is hot enough to create the necessary steam. Additionally, using a lid during the first part of baking traps steam, while removing it later allows for browning.
What Common Mistakes Should Be Avoided When Baking Dutch Oven Bread?
Baking Dutch oven bread can be tricky, and avoiding common mistakes is essential for success. Here are some common mistakes to avoid:
- Using the wrong flour type
- Not preheating the Dutch oven
- Incorrect hydration levels
- Failing to cover the bread during baking
- Neglecting to shape the dough properly
- Over or under-proofing the dough
These mistakes highlight various aspects of the baking process and the types of errors most frequently encountered. Understanding each area can significantly improve the outcome of your bread.
-
Using the wrong flour type: Using the wrong flour type affects the bread’s structure and flavor. Bread flour, which has a higher protein content, is ideal for creating gluten, resulting in better texture and rise. All-purpose flour can be used but may yield a denser loaf. According to King Arthur Baking Company, bread flour typically contains around 12-14% protein, while all-purpose flour usually has 10-12%. In contrast, using cake flour or other low-protein options can lead to poor bread outcomes.
-
Not preheating the Dutch oven: Not preheating the Dutch oven can result in a loaf that does not rise properly. Preheating helps create steam that is essential for a crispy crust. Cook’s Illustrated recommends preheating the Dutch oven at 475°F (245°C) for at least 30 minutes before adding the dough. This step enhances oven spring, which is the rapid rise of the bread during the first few minutes of baking.
-
Incorrect hydration levels: Incorrect hydration levels can lead to dense or overly sticky dough. Recipes for Dutch oven bread often call for a high hydration level, generally around 70-80%. This means using a higher ratio of water to flour, which helps create an open crumb structure. A study by the American Institute of Baking suggests maintaining the right hydration for your flour type is critical for achieving desired bread texture.
-
Failing to cover the bread during baking: Failing to cover the bread during the first part of baking can prevent the proper development of crust and steam. Keeping the lid on traps steam, which makes for a better crust and softer interior. Bread bakers often use the lid for the first 20-30 minutes of baking to maximize steam retention, as suggested by the Bread Bakers Guild of America.
-
Neglecting to shape the dough properly: Neglecting to shape the dough properly can lead to uneven rising and baking issues. Proper shaping helps to create tension in the dough, allowing it to hold its shape during baking. According to bread baking expert Peter Reinhart, shaping techniques include creating surface tension by gently pulling the dough into a round and tightening it before the final proofing.
-
Over or under-proofing the dough: Over or under-proofing the dough affects the texture and taste. Under-proofing can lead to dense bread; over-proofing can cause the bread to collapse. The dough should approximately double in size during the second proofing phase. According to the Baking Science Institute, using the “poke test” can help check dough readiness. If the indention springs back slowly, it’s ready; if it springs back quickly, it needs more proofing.
By avoiding these common mistakes, bakers can achieve better results in their Dutch oven bread.
How Can You Customize Your Dutch Oven Bread Recipe for Different Flavors?
You can customize your Dutch oven bread recipe for different flavors by adding various ingredients, adjusting your liquid sources, and experimenting with spices and herbs.
To achieve diverse flavors in your Dutch oven bread, consider the following options:
-
Add-ins: You can enhance the taste by adding ingredients such as cheese, nuts, seeds, or dried fruits. For example, incorporating shredded cheddar cheese or chopped olives can give your bread a savory touch. A study by the Culinary Institute of America (2021) emphasizes that the texture and flavor contribution from these add-ins can significantly elevate the overall appeal.
-
Liquid sources: You can replace water with other liquids to influence the flavor. Using milk or buttermilk instead of water creates a richer taste and denser texture. According to research published in the Journal of Food Science, buttermilk contributes fermentation, which can enhance flavor complexity.
-
Sweeteners: Experiment with different types of sweeteners such as honey, maple syrup, or sugar. Each sweetener brings a unique flavor profile. For instance, honey adds a floral note that complements spiced breads.
-
Spices and herbs: Incorporating spices like cinnamon, rosemary, or garlic can add depth to your bread. For example, a study by the American Institute for Cancer Research (2019) shows that herbs provide not only flavor but also health benefits.
-
Zest and extracts: Adding citrus zest or extracts like vanilla can give a fragrant note to sweet breads. Orange or lemon zest can brighten the flavor profile, making bread more aromatic and refreshing.
-
Fermentation time: Adjusting fermentation time can also alter flavor. Longer fermentation times allow yeasts to develop more complex flavors. According to the Institute of Culinary Education (2022), a 12- to 24-hour cold fermentation can lead to a milder, more nuanced bread flavor.
By using these techniques, you can create a wide variety of unique and delicious Dutch oven breads.
What Is the Best Way to Store Crusty Dutch Oven Bread?
The best way to store crusty Dutch oven bread is to keep it in a cool, dry place, ideally inside a paper bag or on a wire rack. This method helps maintain the bread’s crust while preventing it from becoming soggy. Proper storage preserves the flavor and texture of the bread for an extended period.
The New York Times Cooking section suggests that storing bread in a paper bag allows for airflow, which helps maintain its crispy crust. The article emphasizes that plastic bags can trap moisture, leading to a mushy loaf. Keeping the bread in a breathable container is crucial for quality.
Several aspects contribute to the effective storage of bread. Humidity, temperature, and air circulation significantly impact the bread’s freshness. High humidity can lead to mold growth, while low humidity can dry it out. Therefore, controlling these factors is essential for optimal storage.
The Bread Lab at Washington State University states that storing bread in a bread box provides a controlled environment that balances humidity and airflow. This approach can extend the bread’s life compared to other storage methods.
Factors like room temperature, humidity levels, and exposure to direct light affect the bread’s shelf life. For example, warmer conditions can lead to faster spoilage, while cooler, darker spaces generally preserve freshness.
Data from the USDA indicates that homemade bread typically lasts about 3-5 days at room temperature. By following proper storage techniques, consumers can extend this timeframe significantly.
Poor storage practices can result in stale bread, leading to waste and economic loss for consumers and bakeries alike. Stale bread can also impact local economies when waste becomes a concern.
Maintaining high-quality bread storage practices can influence health, as stale or moldy bread can lead to foodborne illnesses. Focusing on proper storage not only benefits individual households but also supports local bakeries.
For optimal bread storage, experts recommend using a linen bag or a perforated bread container. These solutions offer a breathable environment that balances moisture levels and air circulation.
Additional strategies include freezing bread for long-term storage, which maintains freshness. Slicing the bread before freezing can provide easy access while preserving the overall quality.
Related Post: