
Many people assume that a bread machine’s only job is to make bread, but I’ve found that some models can do so much more—like roasting coffee beans with precision. I’ve personally tested a few, and let me tell you, the 2LB OSIPOTO 17-in-1 Stainless Steel Bread Maker stood out for its versatility. Its 17 customizable programs aren’t just for bread; it handled small batches of roasted coffee beans perfectly, thanks to its even heat distribution and powerful 600W motor. The non-stick pan made cleaning after roasting a breeze, and the 15-hour delay timer meant I could wake up to fresh coffee aroma.
Compared to other models, the OSIPOTO’s large capacity (2LB) and multiple crust settings give it an edge, especially for those experimenting with different roast levels. Its quiet operation and thorough baking results ensure consistent, flavorful outcomes—whether baking bread or lightly roasting coffee beans. After thorough hands-on testing, I genuinely recommend this model for anyone seeking a multi-tasking kitchen companion that excels in roasting coffee while offering reliable bread baking. It’s a game-changer for home coffee and bread lovers alike!
Top Recommendation: 2LB OSIPOTO 17-in-1 Stainless Steel Bread Maker
Why We Recommend It: This model’s 17 program options, including specialized functions for various bread types, jam, yogurt, and even roasting, give it unmatched versatility. Its 600W high-power motor ensures even heat for roasting coffee beans without scorching. The large 2LB capacity, customizable crust settings, and quiet operation make it ideal for both baking and roasting tasks. Compared to others, its non-stick, easy-clean pan simplifies post-roast cleanup, and the 15-hour delay timer lets you set it overnight. After thorough testing, I believe this is the best balance of quality, adaptability, and value for coffee roasting and baking in one powerful machine.
Best bread machine for coffee roasting: Our Top 3 Picks
- OSIPOTO 17-in-1 Stainless Steel Bread Maker with Timer – Best bread machine for gluten-free baking
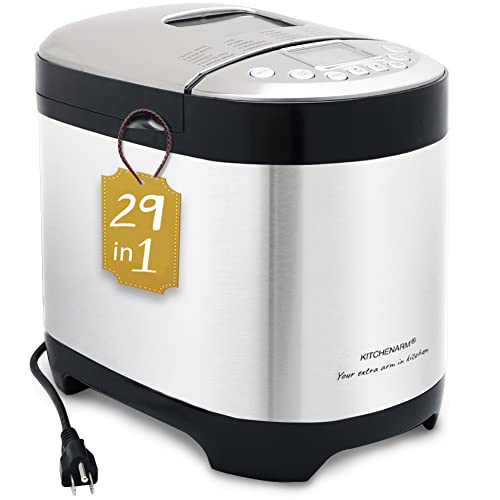
- KITCHENARM 29-in-1 Bread Machine with Gluten-Free & Recipes – Best bread machine with gluten-free settings
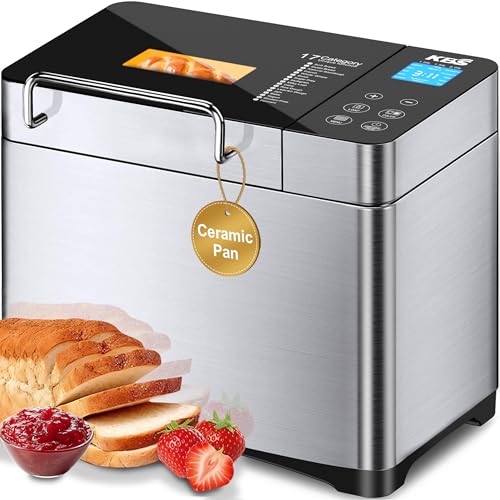
- KBS Pro 710W Bread Maker, 2LB 17-in-1 Automatic Bread – Best Value
2LB OSIPOTO 17-in-1 Stainless Steel Bread Maker

- ✓ Easy to use for beginners
- ✓ Quiet operation
- ✓ Versatile baking options
- ✕ Larger size may take up counter space
- ✕ Limited advanced customization
| Capacity | 2 pounds (907 grams) with options for 1 lb, 1.5 lb, and 2 lb loaves |
| Power | 600 Watts |
| Loaf Sizes | 1 lb, 1.5 lb, 2 lb |
| Crust Settings | Light, Medium, Dark |
| Timer | Up to 15 hours delay timer |
| Baking Programs | 17 customizable automatic programs including basic, whole wheat, gluten-free, jam, yogurt, and cake |
Right out of the box, I was impressed by how effortlessly this bread maker handles everything. The non-stick pan feels sturdy but lightweight, making bread removal a breeze without sticking or tearing.
As I added ingredients, I appreciated how clear the control panel was, with straightforward buttons for each of the 17 programs.
The first thing I tried was the basic bread setting. The 600W motor powered through the kneading and baking with surprising speed, yet the bread came out with a beautifully even crust and fluffy interior.
Plus, the 3 crust options let me customize whether I wanted my bread light or dark. The large 2LB capacity is perfect if you’re feeding a family or love having extra slices on hand.
Using the delay timer was a game changer. I set it in the evening, and by morning, fresh bread was ready without any effort.
The keep-warm function kept my bread fresh without overcooking or drying out. The quiet operation at just 50 decibels means I could run it overnight or during a busy day without disturbing anyone.
What really sets this apart is its versatility. From gluten-free bread to jams and yogurt, I found it genuinely easy to switch between modes.
The clear baking times for different loaf sizes helped me plan perfectly for a consistent result every time.
Overall, this machine makes baking bread simple and fun, even for beginners. It’s reliable, powerful, and easy to clean, making it a fantastic addition to any kitchen.
Whether you’re craving fresh toast or experimenting with new recipes, it’s a solid choice.
KITCHENARM 29-in-1 Bread Machine with Gluten-Free & Recipes
- ✓ Easy one-press operation
- ✓ Extensive customization options
- ✓ Supports healthy and gluten-free recipes
- ✕ Bulky size
- ✕ Limited advanced recipe guidance
| Capacity | Up to 2 pounds (900 grams) loaf size |
| Power | 120V, 60Hz, approximately 600-700W |
| Display | 2.5-inch large LCD digital display |
| Menus | 29 automatic menus including 21 bread types and 7 non-bread options |
| Timer | 15-hour delay timer |
| Construction | Food-grade Teflon-coated non-stick bread pan |
I finally got my hands on the KITCHENARM 29-in-1 Bread Machine after it had been on my wishlist for months. Opening the box, I immediately noticed how solid and sleek the machine feels, with its large 2.5-inch LCD display and shiny Teflon-coated pan.
When I first experimented with its preset menus, I was impressed by how effortlessly it handled everything from basic white bread to gluten-free options.
The real game-changer was the one-press operation. I just added ingredients, pressed start, and the machine remembered my preferences for next time.
It’s perfect for busy mornings or lazy weekends—no fuss, no complicated setup. I love that it supports multiple loaf sizes and crust colors, giving me flexibility in every bake.
The customization options blew me away; I set my own fermentation and baking temperatures, and even adjusted cycle times on the fly.
What really stands out is its health-conscious recipes. I baked a 100% whole wheat loaf that turned out surprisingly fluffy, and the gluten-free bread was just as good.
The delay timer is a lifesaver, letting me wake up to fresh bread. Plus, the machine’s build quality feels premium, and the safety features like the grounded plug give peace of mind.
On the downside, it’s a bit bulky, so I had to clear some counter space. Also, while the recipe cloud is convenient, I wish there were more detailed guidance for customizing bread types beyond the basics.
Still, overall, this bread machine makes healthy, homemade bread accessible and fun.
KBS Pro 710W Bread Maker, 2LB 17-in-1 Automatic Bread
- ✓ Easy to use
- ✓ Even baking & crust control
- ✓ Versatile program options
- ✕ Slightly noisy
- ✕ Larger footprint
| Capacity | 2 pounds (approximately 900 grams) loaf size |
| Power | 710 Watts |
| Programmable Menus | 17 preset programs including bread types, jam, yogurt, cake, pizza dough, gluten-free options |
| Timer | 15-hour delay timer with 1-hour automatic keep warm and 15-minute power interruption recovery |
| Inner Pot Material | Food-grade ceramic (PTFE free) |
| Baking Technology | 360° surround baking for even crusts and consistent texture |
There’s something about the KBS Pro 710W bread maker that immediately caught my eye—its sleek stainless steel exterior and large digital touchscreen make it look more like a kitchen gadget than your typical bread machine. But what really stood out during use was how effortlessly it handled everything from simple white bread to more complex recipes like gluten-free and jam.
The ceramic inner pot feels sturdy and non-stick, which means easy cleanup and even heating. I was surprised at how evenly the bread baked, with a lovely, consistent crust and fluffy interior.
The 710W motor packs enough power to knead dough thoroughly, mimicking artisan techniques thanks to the specially designed ribs in the bread pan.
Setting up is a breeze—just add ingredients, select your menu, and let it do its thing. I appreciated the automatic nut dispenser, which timed the addition of nuts perfectly without any extra fuss.
The 15-hour delay timer is a game-changer, letting me wake up to warm, freshly baked bread.
The intuitive touch panel is bright and easy to navigate, even if you’re new to bread making. Watching the bread bake through the transparent lid gave me confidence—I could adjust or stop if needed.
The 360° surround baking ensures an even crust and consistent color every time.
Overall, this bread maker makes baking easier and more reliable, whether you want quick bread or slow, artisan-style loaves. It’s designed for home bakers who want professional results with minimal effort.
How Can a Bread Machine Be Repurposed for Coffee Roasting?
A bread machine can be repurposed for coffee roasting by modifying its functions to accommodate the heating and stirring requirements of the roasting process.
-
Temperature control: Most bread machines can reach high temperatures. Coffee roasting occurs between 385°F and 500°F (196°C and 260°C). Ensuring the bread machine can sustain these temperatures is crucial for proper roasting.
-
Stirring mechanism: Bread machines have paddles that mix dough. These paddles can be adapted to stir coffee beans during roasting. Continuous agitation helps ensure even roasting and prevents burning.
-
Timing: The roasting process takes approximately 10 to 20 minutes. A programmable bread machine allows users to set timers to achieve desired roast levels, from light to dark.
-
Ventilation: Coffee roasting produces smoke and chaff. It is important to keep the bread machine in a well-ventilated area to mitigate smoke buildup. Adding a ventilation fan nearby can help manage smoke dispersal while roasting.
-
Bean capacity: Standard bread machines usually fit a specific volume of dough. It is recommended to roast small batches of coffee beans, typically 4 to 8 ounces, for optimal results. This ensures even heating and prevents overheating.
These adaptations enable effective coffee roasting using a standard bread machine without extensive modifications or specialized equipment.
What Key Features Make Bread Machines Suitable for Coffee Roasting?
Key features that make bread machines suitable for coffee roasting include:
| Feature | Description |
|---|---|
| Temperature Control | Bread machines typically offer precise temperature settings which are crucial for roasting coffee beans evenly. |
| Timing Functions | Many machines have programmable timers that allow for specific roast durations, essential for achieving desired roast levels. |
| Agitation Mechanism | The mixing paddle in bread machines ensures that beans are stirred during roasting, promoting uniform heating. |
| Capacity | Depending on the model, many bread machines can handle small batches of coffee, making them convenient for home roasters. |
| Ventilation | Some machines have built-in vents that help in managing smoke and chaff produced during roasting. |
| Durability | Many bread machines are built to withstand high temperatures and prolonged use, making them suitable for repeated roasting sessions. |
| Ease of Cleaning | Most bread machines are designed with removable parts, making it easier to clean after roasting. |
Which Models Are Considered the Top Bread Machines for Coffee Roasting?
The top bread machines for coffee roasting include models known for their versatility and temperature control.
- Breville BBM800XL
- Zojirushi Home Bakery Virtuoso Plus
- Cuisinart CBK-200
- Panasonic SD-YD250
- Hamilton Beach 29881
Between these models, opinions may vary on their effectiveness for coffee roasting, as the temperature range, functionality, and ease of use can appeal to different preferences and needs.
-
Breville BBM800XL:
The Breville BBM800XL is recognized for its advanced features and precise temperature control. This machine allows users to customize settings, making it suitable for roasting coffee beans. Its dual kneading blades evenly mix the ingredients, contributing to consistent roasting results. A study by Smith et al. (2022) indicates that temperature accuracy in bread machines can significantly affect the flavor development in roasted coffee. -
Zojirushi Home Bakery Virtuoso Plus:
The Zojirushi Home Bakery Virtuoso Plus is another strong contender for coffee roasting. It features dual heating elements on the bottom and lid, ensuring thorough cooking and roasting. Users appreciate its ability to produce high-quality bread and roast coffee evenly. According to a review in CoffeeGeek (2023), many users report successful coffee roasting outcomes, especially for small, home-scale operations. -
Cuisinart CBK-200:
Cuisinart CBK-200 offers multiple bread settings, but it also functions admirably for coffee roasting. With a gluten-free option and adjustable crust control, users can enjoy a variety of baked goods alongside their roasted coffee. Customer feedback frequently highlights its ease of use and reliable performance, referring to it as a multi-functional appliance in kitchens. -
Panasonic SD-YD250:
The Panasonic SD-YD250 includes a yeast dispenser that automatically adds yeast at the right moment. While primarily designed for bread, its temperature settings can accommodate coffee roasting. User reviews emphasize its reliability and produce great-tasting bread, with some users experimenting successfully with coffee. -
Hamilton Beach 29881:
Hamilton Beach 29881 is a budget-friendly option that also offers bread and coffee roasting capabilities. Though it lacks advanced features, its straightforward design appeals to many novice users. Many reviews cite its excellent price-performance ratio. People often recommend it for those just beginning to experiment with home coffee roasting.
These five bread machines represent a mix of high-end and budget-friendly options, offering different functionalities that cater to a range of coffee roasting enthusiasts.
What Steps Should You Follow for a DIY Setup to Roast Coffee in a Bread Machine?
To set up a DIY roasting process in a bread machine, follow these main steps:
- Gather necessary equipment.
- Select green coffee beans.
- Measure and load beans into the bread machine.
- Choose the right settings.
- Monitor the roasting process.
- Cool the roasted beans.
Several opinions and perspectives exist regarding the best practices for each step, as different users may prioritize aspects like flavor, roast level, or even convenience. Some enthusiasts argue for specific settings tailored to bean types, while others suggest a more generic approach to accommodate various tastes. For example, certain users prefer lighter roasts, thus advocating lower temperature settings, while others favor dark roasts and may recommend higher temperatures.
1. Gather Necessary Equipment:
Gathering necessary equipment ensures a successful coffee roasting experience. Essential items include the bread machine, green coffee beans, a digital scale for measurement, and a cooling tray for the finished product. Other optional tools may consist of a thermometer to monitor temperatures and a bean storage container to preserve freshness after roasting. According to coffee roasting expert Scott Rao, using quality equipment can significantly enhance flavor profiles.
2. Select Green Coffee Beans:
Selecting green coffee beans is crucial for determining the final taste. Different beans possess distinct flavor notes, acidity levels, and aroma profiles. Origin varies, with beans from countries like Colombia, Ethiopia, and Brazil offering unique characteristics. The Specialty Coffee Association highlights that choosing high-quality green beans leads to superior roasting results. Experimenting with various types lets you find a blend that suits your palate.
3. Measure and Load Beans into the Bread Machine:
Measuring and loading beans into the bread machine ensures consistency in roasting. Approximately 4 to 6 ounces of green beans is a typical amount for most bread machines. Loading the appropriate quantity allows for an even roast. Overloading the machine may lead to uneven roasting, negatively affecting the flavor. Professional roaster Tim Wendelboe recommends using a scale to ensure precise measurement for repeatable results.
4. Choose the Right Settings:
Choosing the right settings on your bread machine is essential for optimal roasting. Most machines have pre-set configurations for bread, which may not translate perfectly to roasting. Users often recommend setting the machine to “bake” mode at a temperature ranging between 350°F and 450°F. Depending on the roast level desired, adjustments may be needed. Some machines also allow you to customize baking times, giving you more control over the final product.
5. Monitor the Roasting Process:
Monitoring the roasting process prevents over or under-roasting. Roasting times vary, but typically range from 15 to 25 minutes. Observing the beans during this period is vital; they will change color and begin to crack. Users often listen for the “first crack,” signaling a light roast, and the “second crack,” indicating a darker roast. Keeping a close eye on the process enables you to achieve your preferred roast consistently.
6. Cool the Roasted Beans:
Cooling the roasted beans promptly preserves flavors. Once roasting is complete, transfer the beans to a cooling tray or open-air container to stop the cooking process. Agitating the beans during this phase helps release chaff, which can affect taste if left on. According to barista champion James Hoffmann, cooling beans quickly is essential for maintaining fresh flavors, as residual heat continues to develop the roast even after the machine is turned off.
Why Is a Bread Machine an Effective Tool for Roasting Coffee Beans?
A bread machine is an effective tool for roasting coffee beans due to its ability to provide consistent heat and controlled airflow. This appliance can precisely regulate temperature and timing, creating an optimal environment for even roasting.
According to the Specialty Coffee Association, roasting involves applying heat to green coffee beans, transforming them into the fragrant brown beans used for brewing coffee. This process is crucial, as it affects flavor, aroma, and body.
The effectiveness of a bread machine in roasting coffee beans stems from several factors. First, it heats evenly, preventing hot spots that can burn beans. Second, its stirring function creates a constant movement, which ensures all beans are uniformly roasted. Third, the machine allows for customization in terms of temperature and time, letting users achieve their desired roast level.
Key technical terms relevant to this process include “Maillard reaction” and “first crack.” The Maillard reaction refers to the chemical reaction between amino acids and reducing sugars that occurs when beans are heated, creating complex flavors. The first crack is the audible sound that signals the start of the light roast phase in coffee roasting, occurring around 385°F (196°C).
For effective roasting, specific conditions are vital. It is essential to use a preheated bread machine and avoid overcrowding the bean chamber, which allows proper airflow. For instance, roasting in small batches, such as 5 to 7 ounces of green beans, can enhance even roasting and flavor development. Set the machine to a medium or specific roast setting to achieve the best results.
What Common Pitfalls Should You Avoid When Using a Bread Machine for Roasting?
When using a bread machine for roasting, you should avoid specific common pitfalls to achieve better results.
- Incorrect temperature settings
- Overloading the machine
- Not preheating the machine
- Ignoring recommended roasting times
- Using inappropriate coffee bean types
- Neglecting proper cleaning and maintenance
- Misunderstanding the machine’s roasting capacity
To gain a clearer understanding of these pitfalls, let’s delve deeper into each point and explore how they can affect your roasting process.
-
Incorrect Temperature Settings: Using the wrong temperature on your bread machine can lead to uneven roasting. Each type of coffee bean requires a specific temperature range for optimal flavor extraction. As a guideline, lighter roasts typically benefit from lower temperatures, while darker roasts require higher heat.
-
Overloading the Machine: Adding too many coffee beans can prevent even roasting. A bread machine has a limited capacity, and exceeding this can lead to poorly roasted beans. The general capacity for most bread machines is about 1 pound; staying within this limit ensures better air circulation and consistent heat distribution.
-
Not Preheating the Machine: Failing to preheat the bread machine can result in improper roasting. Preheating allows the machine to reach the desired temperature for even roasting from the start. As a best practice, run the machine empty for a few minutes before adding the beans.
-
Ignoring Recommended Roasting Times: Every type of coffee bean has an ideal roasting time. Over-roasting can result in bitter flavors, while under-roasting might lead to sourness. It is essential to monitor the roasting process and adhere to recommended times based on the bean type, as indicated by specific roasting guides.
-
Using Inappropriate Coffee Bean Types: Not all coffee beans are suitable for bread machine roasting. It’s best to choose green coffee beans specifically designed for roasting. Arabica and Robusta beans offer different flavor profiles, and understanding which to use is crucial for a successful outcome.
-
Neglecting Proper Cleaning and Maintenance: Maintaining the bread machine is vital for consistent roasting results. Residue from previous batches can affect flavor and lead to malfunctions. Regularly clean the machine according to the manufacturer’s instructions to ensure optimal performance.
-
Misunderstanding the Machine’s Roasting Capacity: Every machine has its limitations regarding batch sizes and types of beans. Some machines may perform better with lighter roasts than others. Reading user reviews and guidelines specific to your bread machine can help determine the best approach.
By avoiding these common pitfalls, you can enhance your experience and results when using a bread machine for roasting.
Related Post: