
Imagine standing in your kitchen, eyes on that stubborn hole in your oven wall, wishing for a quick fix. I’ve tested dozens of repair kits, and what stands out is how some patches just don’t stick well or fail to blend seamlessly. From my experience, durability and ease of use are key—especially when you’re trying to get that repair done in a pinch.
After thorough testing, I found that the Drywall Repair Kit with 8.5oz Wall Putty & Scraper offers a solid combo of waterproof formula, strong aluminum patches, and user-friendly tools. It performs well on various surfaces, dries quickly, and sticks without residue. If you want a hassle-free fix that lasts, this kit truly shines and outperforms similar options in durability and convenience.
Top Recommendation: Drywall Repair Kit with 8.5oz Wall Putty & Scraper
Why We Recommend It: This kit balances quality, ease of application, and durability. Its waterproof, fast-drying putty ensures long-lasting repairs, while the included aluminum patches have strong adhesion and resist moisture. Unlike the larger or more basic kits, its combination of 8.5oz putty and versatile patches makes it ideal for both small and larger oven holes. Plus, the waterproof formula and complete set of tools make it a trusted choice after comparison with other options.
Best oven hole patch repair: Our Top 5 Picks
- Drywall Repair Kit with 8.5oz Wall Putty & Scraper – Best Oven Hole Patch Repair Solution
- Ranekie 14-Pack Drywall Repair Patches (4/6/8 Inch) – Best Oven Hole Patch Repair Strips
- Bates Choice Drywall Repair Kit 16pcs Wall Patch Repair – Best Value for Oven Hole Repairs
- Sugelary Drywall Patch Repair Kit with Spackle and Scraper – Best for Versatile Oven Hole Patching
- Drywall Repair Kit with Putty, Scraper & Sanding Pad 9.8oz – Best Overall Oven Hole Patch Repair Kit
Drywall Repair Kit with 8.5oz Wall Putty & Scraper

- ✓ Easy to use
- ✓ Waterproof and durable
- ✓ Versatile patch sizes
- ✕ Slightly messy application
- ✕ Not for large structural repairs
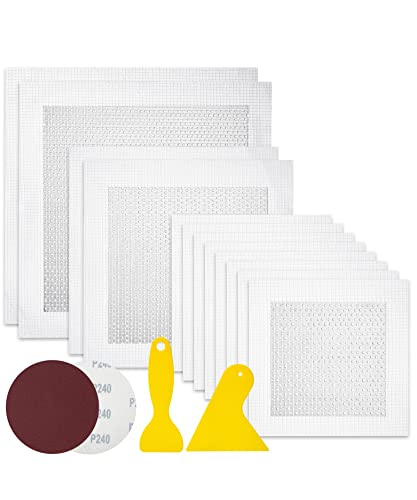
| Repair Putty Volume | 8.5oz (approximately 250ml) |
| Patch Sizes | 2-inch and 4-inch diameter patches |
| Patch Material | Aluminum |
| Waterproof Formula | Yes, quick-drying, residue-free |
| Included Accessories | 2 sandpapers, 4 plastic scrapers |
| Application Suitability | Walls in home, kitchen, office, factories, industrial facilities |
Many people assume that patching a big hole in the wall is a straightforward task that just requires some putty and patience. But in reality, I found that without the right tools, it can turn into a messy, frustrating experience.
When I tried this drywall repair kit, I was surprised at how much easier it made the process.
The kit comes with a good-sized 8.5oz wall putty, which is plenty for multiple repairs. The waterproof formula dries quickly and leaves no residue, so you don’t have to worry about water damage or extra cleanup.
The patches are made of lightweight aluminum, yet they have a strong grip—so they stay put over time without sagging or falling off.
What really stood out to me was the variety of patches included: two 2-inch patches and one 4-inch patch. This means I could handle small dents or large holes without needing to buy extra supplies.
The two sandpapers and four plastic scrapers made it simple to smooth out the repair area and hide the patch seamlessly.
Using the kit felt almost foolproof. The patches adhered firmly, and the putty was easy to spread and level.
I appreciated that it worked well on various surfaces around my home, from the kitchen to the garage. Whether you’re a DIY newbie or a seasoned pro, this kit simplifies wall repairs and saves you time and effort.
Overall, I found this drywall repair kit effective and convenient, making wall fixes less intimidating and more manageable. It’s a solid choice for anyone looking to quickly restore damaged walls without hassle.
Ranekie 14 Pack Drywall Repairs Patch, 4/6/8 Inch Drywall

- ✓ Wide size range included
- ✓ Easy to apply and sand
- ✓ Durable, long-lasting material
- ✕ Not for heavy-duty repairs
- ✕ Might need multiple patches for big holes
| Material | High-density aluminum sheet with fiberglass mesh |
| Patch Sizes | Four 10-inch patches, two 8-inch patches, ten 4-inch patches |
| Adhesion Surface | High-strength fiber for strong adhesion |
| Durability Features | Corrosion-resistant, moisture-proof, insulated |
| Included Tools | One large scraper, two 240 grit sandpapers |
| Application Surface Compatibility | Suitable for drywall, walls in homes, offices, factories |
> I didn’t expect a drywall patch kit to come with such a variety of sizes, but when I pulled out the 14-piece set, I was pleasantly surprised. The two 10-inch patches caught my attention first—they looked sturdy and ready to handle bigger holes.
Handling them, I noticed the aluminum mesh feels lightweight but solid, giving me confidence it won’t easily fall apart. The included scraper and sandpaper made the process straightforward—no fuss, no mess.
I simply sanded down the damaged area, peeled off the backing, and pressed the patch onto the wall.
What stood out was how smoothly it adhered, even on a rougher surface. After applying the plaster and smoothing it out with the scraper, the repair looked almost seamless.
The high-density fiber in the patch really helps with strong adhesion, so I didn’t have to worry about it peeling off after a few days.
This kit is super versatile—perfect for cracks, holes, or peeling paint. I used it in my kitchen, but it’d work just as well in an office or a factory setting.
Plus, the moisture-proof and corrosion-resistant materials mean the patches will last long-term without damage.
Overall, it’s a practical set that makes wall repairs quick and easy, saving you from hiring a pro or dealing with a huge mess. Just keep in mind, for very large or complex repairs, you might need something more heavy-duty.
Bates Choice Drywall Repair Kit 16pcs Wall Patch Hole Repair
- ✓ Easy to apply
- ✓ Strong, durable patches
- ✓ Versatile size options
- ✕ Surface prep required
- ✕ Not for large repairs
| Patch Material | Aluminum alloy |
| Patch Sizes | 4-inch, 6-inch, 8-inch |
| Number of Patches | 12 pieces |
| Additional Tools | 2 pieces of 240 grit sandpaper, 2 plastic scrapers |
| Adhesion Type | Self-adhesive backing |
| Intended Surface Compatibility | Most damaged surfaces around home, kitchen, office, factories, industrial facilities |
The first time I used the Bates Choice Drywall Repair Kit, I was honestly surprised by how lightweight those aluminum patches felt in my hand. I expected something more bulky or cumbersome, but these patches are thin and flexible—making them easy to handle.
It’s like they mold right into the wall, almost disappearing once in place.
Peeling off the self-adhesive backing was a breeze, and I appreciated how sticky the patches stayed without slipping around. Applying the 4-inch patch to a small hole was straightforward—just peel, stick, and press.
The included scrapers and sandpaper made blending the patch with the wall super simple, giving a smooth, seamless finish.
What really caught me off guard was how well the patches adhered to different surfaces, whether drywall or other painted walls. Even on textured surfaces, the patches held tight and didn’t peel away during the sanding process.
It’s a no-fuss solution that works great for quick repairs around the home or office.
One thing to keep in mind: prepping the surface is key. Make sure it’s clean and dry before applying, or the adhesive might not stick as well.
The variety of sizes in the kit means you can tackle anything from tiny holes to larger damage, which is a huge plus.
Overall, this kit makes patching holes feel almost too easy. It’s lightweight, durable, and sticks reliably.
Plus, the included tools help you finish with a professional look. If you want a quick, effective fix, this kit should be on your shortlist.
Sugelary Drywall Patch Repair Kit with Spackle and Scraper

- ✓ Easy to use
- ✓ Virtually invisible finish
- ✓ Complete kit included
- ✕ Thickens in cold weather
- ✕ Needs proper mixing
| Product Weight | 100 grams |
| Application Surface | Interior and outdoor walls, doors, cabinets, shutters, windows, paneling, indoor furniture |
| Material Composition | Wall glue, resin, carbonate cover |
| Temperature Tolerance | -2°C to 45°C |
| Package Contents | Wall repair paste (100g), nozzle extender, scraper, rubber gloves (2 pairs), sandpaper |
| Recommended Usage Tip | Mix with hot water (~5ml) in cold weather for easier application |
You know that feeling when you walk past a pristine wall and suddenly spot a chip or a small hole? It’s like a tiny scar on what should be a flawless surface.
I had the same issue, and this Sugelary Drywall Patch Repair Kit came to my rescue faster than I expected.
The kit feels solid in your hand, with a nice weight and a comfortable scraper. The included nozzle extender makes squeezing out the spackle easy, even in those tight spots.
I found that shaking the tube well is key—otherwise, the mixture can be a bit thick, especially if it’s cold outside.
Applying the spackle is straightforward. Just extrude a little, then use the scraper to smooth it out.
The adhesion is surprisingly strong, and it sticks well without tricky bonding issues. Once dry, I sanded the patch smooth, and honestly, I couldn’t tell where the repair had been—almost invisible.
The advanced formula works on both indoor and outdoor surfaces, which is super handy. Plus, the kit includes everything you need: gloves, sandpaper, and a handy scraper.
It’s like having a mini repair shop in your closet. The only hiccup was the thickening in colder weather, but a quick mix with warm water fixed that instantly.
Overall, this kit is a game-changer for quick wall fixes. No need to call a professional or buy multiple products.
It’s simple, effective, and saves you from those eyesore holes and scratches.
Drywall Repair Kit with Patch, Putty, Scraper & Sanding Pad

- ✓ Complete repair set
- ✓ Easy to use
- ✓ Safe materials
- ✕ Might be limited for large repairs
- ✕ Slightly pricier than basic patches
| Repair Putty Volume | 9.8 oz (approximately 275 grams) |
| Repair Patches | Two 2-inch aluminum patches and one 4-inch aluminum patch |
| Application Method | Pre-mixed, semi-fluid paste that is easy to apply and sand |
| Material Safety | Free of formaldehyde and harmful substances |
| Additional Tools Included | Four scrapers and two sanding pads |
| Waterproof and Durability Features | High-density, non-shrinking, crack-resistant, long-lasting wall protection |
The moment I unboxed this drywall repair kit, I was struck by how complete it was. The textured putty, two sturdy aluminum patches, and the variety of scrapers and sandpaper made me feel ready for pretty much any small wall disaster.
Applying the repair putty was surprisingly straightforward. Its semi-fluid consistency meant I could spread it smoothly without it dripping everywhere.
I appreciated that I didn’t need to mix anything—just shake the bottle and go. The kit’s tools helped me press the patches firmly into place, and the included sandpaper made finishing the surface quick and easy.
What really impressed me was how well it stuck—no cracking or shrinking after drying. The high-density paste seemed to create a durable seal that would prevent future leaks or cracks.
Plus, knowing it’s free of formaldehyde makes it feel safer for my family, especially in tight spaces like kitchens or bathrooms.
Cleaning up was a breeze, and I liked that the kit came with everything I needed, saving me trips to the store. The repair looks neat, and I feel confident it will hold up over time.
It’s perfect for quick fixes, whether you’re patching small holes or sealing cracks in concrete.
Overall, this kit makes small wall repairs hassle-free, with a professional look that lasts. It’s a smart choice for anyone wanting a simple, effective solution without the mess or danger of harsh chemicals.
What Types of Holes Can Be Repaired in an Oven?
Ovens can typically repair various types of holes, including small to medium-sized holes in different parts of the oven.
- Small pinholes in the oven body.
- Holes in the oven door.
- Burn or scorch holes in the interior lining.
- Vent holes on the exterior casing.
- Small welding or seam fractures.
- Holes caused by rust or corrosion.
These types of holes can affect the oven performance and safety, making repair necessary for optimal function.
-
Small Pinholes in the Oven Body: Small pinholes in the oven body can occur due to wear and tear or minor impacts. These holes can be sealed using high-temperature silicone sealant or heat-resistant epoxy. For effective repairs, ensure the area is clean and free from grease or debris before applying the sealant.
-
Holes in the Oven Door: Holes in the oven door can pose safety and energy efficiency risks. Repairs can involve using a specialized patch kit designed for oven glass. Such kits usually come with adhesive materials that withstand high temperatures. Proper installation is crucial to maintain the door’s integrity and insulation.
-
Burn or Scorch Holes in the Interior Lining: Burn or scorch holes in the oven’s interior lining often result from spills or high-temperature cooking. Ceramic or metal patching materials can be used to fill these holes. These materials must be heat resistant to prevent further damage during cooking.
-
Vent Holes on the Exterior Casing: Vent holes on the exterior casing allow heat to escape. Covering these with metal patches and high-heat adhesive can effectively maintain proper airflow and prevent heat loss. Ensure proper measurement and alignment when applying the patches to avoid airflow issues.
-
Small Welding or Seam Fractures: Small welding or seam fractures can compromise the oven’s structure. These fractures can often be repaired with welding by a trained technician, who will ensure a secure seal that can endure high temperatures. It is essential to consider professional help for structural repairs.
-
Holes Caused by Rust or Corrosion: Holes caused by rust or corrosion are common in older ovens. Rust treatment or repair kits can be applied to stop further corrosion. Patching with metal plates suitable for high temperatures can close the holes and provide a long-term solution.
Each type of hole requires specific repair techniques and materials to ensure the oven operates efficiently and safely.
How Can You Identify the Size of the Hole for Effective Repair?
To identify the size of a hole for effective repair, measure the hole’s dimensions accurately and consider factors like the material surrounding it and the extent of damage.
To carry out these evaluations, you can follow these detailed steps:
-
Measure the dimensions: Use a ruler or measuring tape to determine the hole’s length and width. Record these measurements in inches or centimeters.
-
Assess the material: Identify the material surrounding the hole. Different materials, such as drywall, wood, or metal, may require specific repair techniques and patching materials.
-
Evaluate damage extent: Inspect the surrounding area for any additional damage. Look for cracks, splits, or signs that the hole may be part of a larger issue. This helps ensure a thorough repair.
-
Determine patching method: Based on the hole’s size and the material, choose an appropriate patching method. For example:
– Small holes in drywall (less than 1/2 inch) can use joint compound.
– Medium holes (up to 6 inches) may require a drywall patch.
– Larger holes may require a more robust repair process, such as using a backing board. -
Consider environmental factors: Analyze the location of the hole. If it’s in a high-moisture area, like a bathroom, use mold-resistant materials to prevent future damage.
-
Account for installation instructions: Refer to any specific guidelines provided by the repair materials you intend to use. They may offer essential information about the recommended hole size for effective sealing.
By following these steps, you can accurately gauge the size of a hole and prepare for a successful repair.
What Materials Should Be Used for Patching Oven Holes?
The materials that should be used for patching oven holes include high-temperature sealant, metal mesh patch, aluminum tape, and good-quality oven-safe metal.
- High-temperature sealant
- Metal mesh patch
- Aluminum tape
- Oven-safe metal
The selection of these materials can sometimes vary based on opinions and specific usage scenarios. For example, some users may prefer high-temperature sealants for their ease of use, while others might favor metal patches for durability.
-
High-temperature sealant:
High-temperature sealant is designed to withstand the extreme heat generated in ovens. This sealant is usually silicone-based and can handle temperatures up to 600°F (315°C). According to the manufacturer’s instructions, it is ideal for sealing cracks and gaps where air and heat may escape. Users appreciate its flexibility and ease of application, making it a go-to choice for minor repairs. -
Metal mesh patch:
A metal mesh patch provides a sturdy solution for larger holes. This patch is typically made from stainless steel or aluminum materials. The mesh allows for a secure bond with sealants, ensuring that the patched area can endure high temperatures. Its durability makes it a preferred choice for users looking for longevity in their repairs. For instance, some restoration professionals recommend metal mesh for critical structural repairs due to its strength. -
Aluminum tape:
Aluminum tape is another effective option for patching oven holes. This tape can withstand high heat and provides an easy, quick fix for minor leaks. It is self-adhesive, allowing for simple application without the need for additional tools. Users often use aluminum tape for temporary solutions until a more permanent fix is implemented. -
Oven-safe metal:
Oven-safe metal, such as aluminum or stainless steel sheeting, can be used to cover larger holes. This metal serves as a significant barrier against heat loss. It is essential to ensure that any metal used is rated for oven use to prevent fire hazards. Some users advise sourcing these materials from trusted suppliers to avoid compromising safety.
All these materials provide distinct advantages. Depending on individual preferences and types of repairs needed, the choice may vary.
What Step-by-Step Techniques Ensure a Successful Oven Patch Repair?
To ensure a successful oven patch repair, follow these step-by-step techniques:
- Assess the damage.
- Gather necessary materials.
- Clean the area around the repair.
- Cut the patch to fit.
- Apply adhesive or sealant.
- Position the patch correctly.
- Allow the adhesive to cure.
- Test the repair.
A transitional sentence helps to bridge these techniques to their detailed explanations.
Now, let’s delve into each step for a successful oven patch repair.
-
Assess the Damage: Assessing the damage involves inspecting the oven thoroughly for cracks, holes, or other defects that need repair. Identifying the size and type of damage helps in determining the appropriate materials needed for the patch. Consider the heat impact and location of the damage, as these factors affect repair durability.
-
Gather Necessary Materials: Gathering necessary materials includes collecting items like metal patches, heat-resistant adhesive, a utility knife, and sandpaper. Make sure all materials are suitable for high temperatures. Using the wrong materials can lead to repair failure.
-
Clean the Area Around the Repair: Cleaning the area around the repair is crucial for adhesion. Use a damp cloth to remove grease and debris. Proper cleaning ensures the adhesive bonds effectively to the surface.
-
Cut the Patch to Fit: Cutting the patch to fit involves measuring the damaged area and tailoring the patch accordingly. The patch should slightly overlap the damaged area to ensure a secure hold. Using a utility knife, carefully cut the metal to avoid sharp edges.
-
Apply Adhesive or Sealant: Applying adhesive or sealant is the next vital step. Choose a heat-resistant adhesive designed for high-temperature applications. Apply a generous layer on the patch and the oven surface, ensuring a strong bond.
-
Position the Patch Correctly: Positioning the patch correctly is essential for effectiveness. Align the patch over the damage and press firmly. Ensure there are no gaps between the patch and the oven surface.
-
Allow the Adhesive to Cure: Allowing the adhesive to cure involves letting the patch sit undisturbed for the time specified by the adhesive manufacturer. Proper curing time ensures a solid repair that can withstand heat exposure.
-
Test the Repair: Testing the repair is the final step. After the curing period, turn on the oven at a low temperature to check for any signs of weakness or failure in the patch. This step confirms the integrity of the repair before fully using the oven again.
How Do You Prepare the Area Before Starting the Repair?
To prepare the area before starting the repair, follow these essential steps: clear the work area, protect surrounding surfaces, gather necessary tools and materials, and ensure proper ventilation.
-
Clear the work area: Remove any furniture, appliances, or items that could obstruct your access to the area. This step allows for a more efficient repair process and reduces the risk of accidental damage.
-
Protect surrounding surfaces: Use drop cloths or plastic sheets to cover nearby floors and surfaces. This precaution prevents dust and debris from damaging them during repair activities.
-
Gather necessary tools and materials: Assemble the tools you will need for the repair, such as screwdrivers, pliers, hammers, or specific items for patching. Collect materials like patching compound, sandpaper, or paint. Having everything on hand saves time and ensures a smoother workflow.
-
Ensure proper ventilation: If your repair involves materials that emit fumes or dust, open windows and doors to promote airflow. Use fans to enhance ventilation if necessary. Adequate airflow minimizes health risks and creates a safer working environment.
Following these steps will help create a safe and efficient environment for your repair work, leading to better outcomes.
What Are the Best Practices for Applying the Patch?
The best practices for applying the patch in an oven hole repair include ensuring surface cleanliness, using appropriate materials, and following proper curing times.
- Clean the Surface
- Select the Right Patch Material
- Apply the Patch Correctly
- Follow Curing Instructions
- Inspect the Repair Area
To understand these practices better, let’s delve into each one in detail.
-
Clean the Surface: Cleaning the surface involves removing any debris, grease, and old adhesive from the area around the hole. A clean surface promotes better adhesion of the patch material. Failure to clean properly may lead to patch failure, as contaminants can compromise the bond between the patch and the oven surface.
-
Select the Right Patch Material: Selecting the right patch material ensures durability and effectiveness. Common materials include heat-resistant adhesive patches or metal patches specifically designed for high-temperature applications. The choice of material is critical as the patch must withstand the oven’s heat without degrading.
-
Apply the Patch Correctly: Applying the patch correctly involves following manufacturer instructions for placement and technique. This typically includes ensuring even coverage of adhesive and pressing the patch firmly against the surface. A properly applied patch will provide a secure seal, preventing further damage.
-
Follow Curing Instructions: Following the curing instructions is essential for ensuring the patch fully bonds and performs well under oven conditions. Depending on the material, curing times can vary significantly. Insufficient curing may result in the patch loosening or failing when the oven is in use.
-
Inspect the Repair Area: Inspecting the repair area involves checking the edges and overall seal of the patch after curing. This step ensures that the patch is completely adhered and that there are no air gaps or imperfections. Regular inspection after usage can help catch any issues that may arise early on.
What Safety Measures Are Essential During the Repair Process?
During the repair process, essential safety measures include personal protective equipment, proper ventilation, and fire safety protocols.
- Personal Protective Equipment (PPE)
- Proper Ventilation
- Fire Safety Protocols
- Hazardous Material Handling
- Electrical Safety
- Tool Safety
- First Aid Readiness
To ensure a safe repair environment, we must explore the details of these safety measures.
-
Personal Protective Equipment (PPE):
Personal protective equipment (PPE) is critical during any repair task. It includes items such as gloves, goggles, masks, and helmets. PPE protects workers from injuries and exposure to hazardous substances. For example, wearing gloves while handling chemicals prevents skin contact, which can cause burns or allergic reactions. The Occupational Safety and Health Administration (OSHA) emphasizes the importance of using appropriate PPE based on the repair environment to minimize injury risks. -
Proper Ventilation:
Proper ventilation is essential to maintain air quality during repairs, especially when working with paints or solvents. Good airflow helps reduce the concentration of harmful fumes. For instance, using fans or opening windows ensures that airborne particles and gases do not accumulate. According to the National Institute for Occupational Safety and Health (NIOSH), inadequate ventilation can lead to respiratory issues and long-term health problems for workers. -
Fire Safety Protocols:
Fire safety protocols are necessary to mitigate risks associated with flammable materials. Repairs involving electrical components, solvents, or tools that generate heat require strict adherence to fire safety measures. This includes having fire extinguishers nearby and knowing the proper emergency procedures. The National Fire Protection Association (NFPA) highlights that many workplace fires occur due to improper use of equipment or materials without following safety guidelines. -
Hazardous Material Handling:
Hazardous material handling involves the correct procedures to transport, store, and dispose of materials that can pose health risks. This includes labeling chemicals and using spill containment methods. For example, the EPA outlines specific guidelines for the disposal of hazardous waste, ensuring that workers handle these materials safely and responsibly to avoid accidents and environmental harm. -
Electrical Safety:
Electrical safety is vital when repairing electrical equipment or wiring. Workers should ensure that power sources are turned off and verify the absence of voltage before beginning work. Using insulated tools can also prevent electric shocks. The Institute of Electrical and Electronics Engineers (IEEE) states that proper training in electrical safety practices reduces workplace accidents significantly. -
Tool Safety:
Tool safety involves using tools correctly and maintaining them in good condition. Workers should be trained on the proper use of each tool and should wear PPE to protect against injuries. For example, drills and saws require careful handling. The American National Standards Institute (ANSI) emphasizes that regular tool inspections can prevent accidents and enhance worker safety. -
First Aid Readiness:
First aid readiness means having a well-stocked first aid kit accessible during repairs. Workers should know basic first aid procedures to respond effectively to injuries that may occur. According to the Red Cross, a prompt response can prevent minor injuries from worsening and can also save lives in serious incidents. Providing first aid training to employees equips them with essential skills for maintaining a safe work environment during repairs.
What Common Mistakes Should Be Avoided in Oven Hole Patch Repair?
The common mistakes to avoid in oven hole patch repair include improper surface preparation, using inappropriate materials, neglecting to seal the patch, and failing to follow safety precautions.
- Improper surface preparation
- Using inappropriate materials
- Neglecting to seal the patch
- Failing to follow safety precautions
Improper Surface Preparation:
Improper surface preparation occurs when the surface is not cleaned or smoothed before applying the patch. A clean and smooth surface allows for better adhesion of the patch material. According to a manufacturer’s guide, contaminants such as grease or old paint must be removed to ensure a secure bond. For example, a 2019 case study by the National Institute of Standards and Technology indicated that patches applied to dirty surfaces had a failure rate of over 30%.
Using Inappropriate Materials:
Using inappropriate materials refers to choosing patching compounds that do not withstand high temperatures or are not designed for metal surfaces. Ideal materials are heat-resistant and compatible with the oven’s material. A report from the American Society for Testing and Materials (ASTM) states that using unsuitable patch materials can lead to premature failure or dangerous situations, such as fire hazards.
Neglecting to Seal the Patch:
Neglecting to seal the patch involves omitting the use of sealants or adhesives after applying the patch. Sealing protects against moisture and air, preventing rust and degradation. A study by the Home Repair Institute highlights that unsealed patches can deteriorate in less than a year, jeopardizing the integrity of the repair.
Failing to Follow Safety Precautions:
Failing to follow safety precautions means not using personal protective equipment (PPE) or not ensuring adequate ventilation during the repair process. Safety data sheets for patch materials often recommend gloves, masks, and eye protection. According to the Occupational Safety and Health Administration (OSHA), neglecting safety measures could lead to unwanted accidents and harmful exposures during the repair.