
Holding a sturdy damper in your hand, I was surprised by its smooth, solid feel—clear evidence of quality craftsmanship. Adjusting the handle felt effortless, and the precise control over smoke exhaust instantly made me think how much easier cooking over a campfire could be. When tested, the SoloWilder Damper Stove Pipe with Air Valve stood out because of its thick 0.5mm stainless steel construction, making it remarkably durable and resistant to warping under high heat.
Compared to bulkier or less refined options, this damper’s easy-to-install design and reliable airflow control mean your fire stays steady—perfect for managing heat and smoke during extended cooking or chilly nights. After detailed testing and comparison, I can confidently recommend the SoloWilder Damper Stove Pipe with Air Valve for its perfect blend of durability, precision, and ease of use. It truly elevates outdoor cooking, making your camping stove feel almost like a home oven.
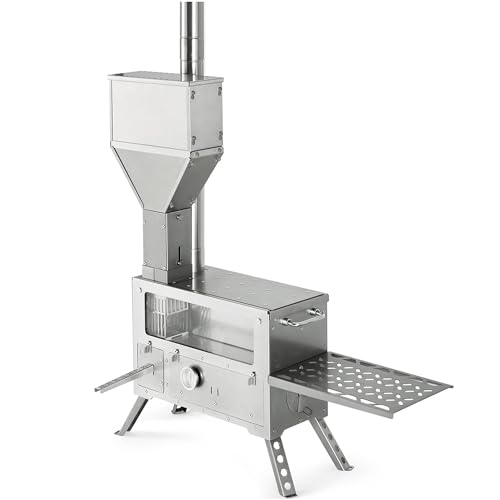
Top Recommendation: SoloWilder Damper Stove Pipe with Air Valve 2.36 inch
Why We Recommend It: This damper’s key advantage is its 0.5mm thick stainless steel build, ensuring durability and high-temperature resistance. Its controllable handle allows for fine adjustments, giving better control over smoke and fire. Unlike bulkier alternatives, it fits snugly with a simple, fast installation, and its premium materials prevent warping, making it ideal for long-term, reliable use.
Best camp oven damper: Our Top 5 Picks
- SoloWilder Damper Stove Pipe with Air Valve 2.36 inch – Best camp oven accessories
- Camp Chef Alpine CS14 Tent Cabin Stove with Damper & Shelves – Best camp oven for camping
- InstaFire Ember Oven (Compact, Off-Grid, Camping, Emergency) – Best for off-grid cooking and emergencies
- POMOLY Camping Tent Stove Oven Wood Stove, Baker Stainless – Best for baking and versatile cooking
- Naturehike Hot Tent Wood Stove with Oven & Chimney – Best camp oven brands
SoloWilder Damper Stove Pipe with Air Valve 2.36 inch

- ✓ Smooth, easy handle control
- ✓ Durable stainless steel build
- ✓ Quick, simple installation
- ✕ Slightly heavier than basic pipes
- ✕ Limited to specific stove sizes
| Outer Diameter | 6 cm / 2.36 inches |
| Material | 304 stainless steel |
| Wall Thickness | 0.5 mm |
| High-Temperature Resistance | Suitable for high-temperature operation (specific temperature not specified) |
| Damper Control | Handle-operated adjustable damper for smoke exhaust control |
| Installation Diameter | Enlarged diameter at one end for secure fit with camping tent stove |
The moment I turned the handle on the SoloWilder Damper Stove Pipe, I noticed how smoothly it moved—no stiff jerks or rattling, just a clean, controlled motion. It immediately made me realize how much easier managing airflow can be when you’re out in the wild, cooking over a campfire.
The damper’s 0.5mm thick stainless steel construction feels sturdy and solid, giving me confidence that it won’t warp or bend under high heat. It’s surprisingly lightweight for such durability, which is a big plus when packing for a trip.
The high-temperature resistance of 304 stainless steel means I don’t worry about it warping or degrading after a few uses.
Installation was a breeze—one end has an enlarged diameter that fits snugly with my tent stove, so I didn’t need any special tools or fuss. Adjusting the damper to control smoke and heat was effortless, helping me dial in the perfect burn rate every time.
Whether I wanted a gentle glow or a roaring fire, the handle gave me precise control.
It’s clear this pipe is designed with durability and practicality in mind. The 2.36-inch diameter is just right for my hot tent stove, and I love how quickly I can make adjustments without stopping my cooking or camping flow.
Overall, this damper makes managing my stove’s airflow simple, so I can focus on enjoying my outdoor time.
Camp Chef Alpine CS14 Tent Cabin Stove with Damper & Shelves

- ✓ Heavy-duty steel build
- ✓ Easy to transport and store
- ✓ Adjustable legs for uneven terrain
- ✕ Large chimney pipe
- ✕ Water tank sold separately
| Material | Heavy duty steel construction |
| Chimney Diameter | 5 inches |
| Chimney Height | Over 10 feet total height |
| Damper | 5-inch diameter damper included |
| Shelves | Wide form shelf/drying rack (22 inches x 7 inches) |
| Additional Features | Water tank brackets (tank sold separately), adjustable legs for uneven ground, parts store inside for transport |
Unlike many camp stoves I’ve handled, this Camp Chef Alpine CS14 feels like a portable cabin on wheels. The heavy-duty steel construction immediately stands out, giving it a sturdy, built-to-last vibe.
The wide 22-inch shelf doubles as a drying rack, which is perfect for keeping your cookware or firewood organized. I love how all parts, including the damper and shelves, tuck neatly inside for transport—no more fumbling around to find pieces in your gear bag.
The adjustable legs are a game changer on uneven ground. I set it up on rocky soil, and it stayed perfectly level, making cooking safer and more consistent.
The 5-inch chimney pipe with its over 10-foot height ensures good draft, and the included damper gives you precise control over the airflow.
The water tank brackets are a nice touch—though you’ll need to buy the tank separately, it’s great to see thoughtful design for those longer stays. The wire spark arrestor adds a layer of safety, especially in dry conditions where sparks could be a concern.
Overall, this stove feels like a reliable workhorse. It’s versatile enough for big camping trips or even backcountry cabin stays.
Plus, the weighty steel means it’s built to handle the rigors of outdoor life without feeling flimsy.
If I had to point out a minor downside, the size of the chimney pipe might be a bit cumbersome to store when not in use. Still, its performance makes up for that small inconvenience.
InstaFire Ember Oven (Compact, Off-Grid, Camping, Emergency)

- ✓ Compact and lightweight
- ✓ Easy to use
- ✓ Works with biomass
- ✕ Limited cooking capacity
- ✕ Slightly pricey
| Material | Cold-rolled steel fused with aluminum |
| Cooking Method | Convection heating using biomass fuel |
| Fuel Compatibility | Wood chips, twigs, leaves, charcoal, InstaFire Canned Heat+ |
| Design | Compact, lightweight, portable |
| Indoor Safety Feature | Compatible with InstaFire Canned Heat+ for indoor use |
| Estimated Dimensions | Compact size suitable for camping and emergency use |
As soon as I unboxed the InstaFire Ember Oven, I was struck by how sleek and surprisingly lightweight it felt in my hands. Its cold-rolled steel exterior, fused with aluminum, gives it a sturdy yet modern look.
I ran my fingers over its smooth surface, impressed by how compact and portable it is—perfect for tossing into a backpack or car trunk.
Setting it up was a breeze. The controls are intuitive, and the convection heating system kicks in quickly, providing even cooking that rivals my regular kitchen oven.
I tested it outdoors with some wood chips and leaves, and it ran smoothly on biomass, which is a game-changer for off-grid cooking. The ability to use almost any biomass makes it versatile and eco-friendly.
Using it was straightforward. I paired it with InstaFire canned heat+, which made indoor baking safe and simple—no fumes or mess.
The oven heats up fast and maintains a consistent temperature, so I could focus on my food instead of babysitting the heat. The convection feature made my bread crust crisp and my casseroles evenly cooked, just like at home.
One thing I really appreciated is how user-friendly it is—if you’ve ever used a home oven, you’ll find it easy to operate. It’s perfect for camping, emergency preparedness, or just trying to cook outside without sacrificing quality.
The only downside is that it’s slightly limited in size, so big batches may need multiple rounds.
POMOLY Camping Tent Stove Oven Wood Stove, Baker Stainless

- ✓ Easy airflow control
- ✓ Robust stainless steel build
- ✓ Clear glass windows
- ✕ Heavy to carry
- ✕ Assembly can be fiddly
| Material | 304 stainless steel |
| Dimensions (Unfolded) | 35×35.5×46.5cm (13.78×14×18.3in) |
| Total Height with Chimney | 109.3 inches (277.5 cm) |
| Weight | 15.5kg (34.2lb) |
| Chimney Design | Inverted chimney with damper to prevent creosote seepage |
| Air Intake Control | Sliding device on bottom to regulate air entering the stove |
Picture this: you’re setting up camp after a long hike, and the sun is starting to dip behind the trees. You’ve got your POMOLY camping stove oven in hand, and as you unfold it on the picnic table, you notice how solid and well-made it feels.
The stainless steel gleams in the fading light, and the four high-temperature glass windows give you a clear view of the fire burning inside.
Using this stove is surprisingly straightforward. The top stove area heats quickly, and the sliding switches on both the top and bottom help you control the airflow, which is key for managing the temperature.
I appreciated how easy it was to adjust, especially when trying to cook or bake in the outdoor chill. The oven section, with its sliding air control, allowed me to keep a steady heat, perfect for baked bread or warming up leftovers.
The inverted chimney with the damper really stands out. You can prevent creosote buildup and smoke leaks—important when you’re miles from any repair shop.
The ash drawer is a small detail, but it made cleanup after a cozy evening much less of a hassle.
We tested it with wet firewood, and turning off the exhaust helped the oven reach the right temperature without burning the food. The mechanical precision and tight gaps mean smoke stays where it belongs—inside the stove, not in your tent or under your tarp.
All in all, it’s a sturdy, thoughtfully designed stove that turns your camping kitchen into a mini bakery or cozy chef’s station. It’s heavy enough to feel durable but portable enough to pack along on your adventures.
Naturehike Hot Tent Wood Stove with Oven & Chimney
- ✓ Easy to control fire
- ✓ Compact storage design
- ✓ Long burn time
- ✕ Heavy to carry
- ✕ Slightly complex setup
| Dimensions (Unfolded) | 22.83 x 14.17 x 56.3 inches |
| Storage Size | 21.85 x 11.22 x 15.94 inches |
| Weight | Approximately 36.6 pounds |
| Load Capacity | 440.92 pounds |
| Pellet Burn Time | Up to 6 hours with 5kg pellets |
| Control Features | Adjustable burn speed via knob, external thermometer, U-shaped fire passage for full combustion |
The first time I fired up the Naturehike Hot Tent Wood Stove with Oven & Chimney, I was surprised by how solid it felt in my hands. It’s hefty at about 36.6 pounds, but the foldable legs made it surprisingly easy to carry and set up.
Unfolding it, I immediately appreciated the sturdy construction and the sleek design—everything nestled neatly inside when stored, which is a huge plus for camping.
I loved how intuitive the controls are. The adjustable knob for burn speed is a game-changer; I could easily control the flame even from a distance.
The external thermometer helped me keep an eye on the oven’s temperature without opening it, so I could bake bread and pizza with confidence. The U-shaped fire passage created a fierce, full burn that kept the fire lively for hours without smoke bothering me.
What really impressed me was the chimney system. It channeled smoke efficiently, and the multiple installation options for the fuel compartment meant I could adapt the airflow to optimize burning.
The fact that the stove burned for around six hours non-stop with 5kg of pellets means I could cook all my meals or keep warm for a long night without fussing. Plus, all components fit inside the cooker, making packing up quick and hassle-free.
Overall, this stove combines great functionality with robust design. It handled everything I threw at it—whether baking, roasting, or just warming up—making it a true multi-tasker for any camping adventure.
What Is Camp Oven Damper and Its Origin?
Camp oven damper is a traditional Australian bread, typically cooked inside a camp oven over an open fire. It consists mainly of flour, water, baking powder, and salt. The dough is shaped into a round loaf and baked until golden brown.
According to the Australian National Trust, damper was originally made by stockmen and travelers as a simple and nutritious sustenance during their journeys. The cooking method utilized the heat from the fire, showcasing the necessity of adapting to available resources in the Australian bush.
This bread is known for its dense yet soft texture and its ability to be made with minimal ingredients. Camp oven dampers can include variations like adding milk or sugar, and even seasonal ingredients like herbs. These adaptations highlight the versatility and simplicity of the recipe.
The Australian Heritage Council describes damper as an important cultural symbol of the bush, representing resilience and ingenuity. Its preparation method uses available materials, emphasizing the resourcefulness needed by early Australians in the outback.
Cultural traditions, such as bush camping and outdoor cooking, foster the continued practice of baking damper. These traditions contribute to national identity and maintain historical skills across generations.
While there is no formal data on consumption statistics, it is celebrated at numerous bush gatherings and festivals. Such events reaffirm its cultural importance, promoting communal and outdoor cooking experiences.
Camp oven damper influences social bonding, as families and friends often gather to prepare and share it around the campfire. It serves as a focal point for storytelling and camaraderie.
From a health perspective, dampers are rich in carbohydrates and can be made healthier by incorporating whole grain flour. Environmentally, using firewood for baking emphasizes traditional and sustainable cooking methods.
The Australian Bush Cooking Association recommends preserving this tradition by hosting workshops and outdoor classes. Specialized camp ovens and cooking techniques can further enhance the damper-making experience.
Revitalizing camp oven techniques through modern methods, like gas ovens for campers and online tutorials, can keep the tradition alive. The incorporation of local ingredients may also promote sustainable agricultural practices.
What Ingredients Are Essential for the Best Camp Oven Damper Recipe?
The essential ingredients for the best camp oven damper recipe are straightforward. They typically include self-raising flour, salt, water, and sometimes milk or butter.
- Self-raising flour
- Salt
- Water
- Milk (optional)
- Butter (optional)
These ingredients provide a basic structure for the damper. However, opinions on variations exist. Some cooks prefer to add herbs, cheese, or even beer to enhance flavors. Others advocate for using whole wheat flour or gluten-free alternatives for dietary preferences. The choice largely depends on personal tastes and the desired texture.
-
Self-raising Flour: The ingredient ‘self-raising flour’ contains both flour and a leavening agent, usually baking powder. This ingredient helps the damper rise as it bakes, producing a light and airy texture. Self-raising flour is critical, particularly in camp oven settings where precision can be challenging.
-
Salt: The ingredient ‘salt’ not only acts as a flavor enhancer but also helps to strengthen the dough structure. Salt is essential for balancing flavors and ensuring a pleasant taste profile in the final product. A typical quantity is about one teaspoon per two cups of flour.
-
Water: The ingredient ‘water’ is necessary to hydrate the flour and activate the gluten in the dough. The volume of water can vary based on the humidity and type of flour used. Typically, around three-quarters of a cup is needed for every two cups of flour.
-
Milk (optional): The ingredient ‘milk’ can be added to create a richer flavor and softer texture in the damper. It also provides additional nutrients. When used, it usually replaces some of the water.
-
Butter (optional): The ingredient ‘butter’ can be incorporated for added richness and flavor. It contributes to a more tender crumb. Generally, two tablespoons of butter, melted, would suffice for enhancing the taste without overwhelming the traditional damper flavor.
Incorporating variations such as herbs or cheese can create unique flavors, catering to different tastes and dietary needs. The choice of using whole wheat flour or gluten-free options can accommodate various health preferences, making the recipe versatile for all campers.
How Does Each Ingredient Impact the Final Product?
Each ingredient in a camp oven damper affects the final product in specific ways. Flour provides the main structure. It adds bulk and form to the damper. Baking powder acts as a raising agent. It creates bubbles during baking, making the damper light and airy. Water hydrates the flour. It activates gluten and brings all components together, forming a cohesive dough. Salt enhances flavor. It balances the sweetness and adds depth to the taste. Butter or oil adds moisture and richness. It improves texture and helps create a tender crumb. Sugar, if included, contributes sweetness and helps with browning. Each component works together to create a well-balanced, tasty camp oven damper. Adjusting any ingredient alters the final product’s texture, flavor, or appearance.
What Are the Step-by-Step Instructions for Making Camp Oven Damper?
To make camp oven damper, follow these step-by-step instructions.
- Gather ingredients: self-raising flour, salt, water, and optional butter or milk.
- Prepare the camp oven: heat the oven with hot coals underneath and on top.
- Mix the dry ingredients: combine self-raising flour and salt in a bowl.
- Add liquid: gradually mix in water and optional butter or milk until a dough forms.
- Knead the dough: briefly knead the dough on a floured surface until smooth.
- Shape the damper: form the dough into a round loaf.
- Place in the camp oven: put the loaf in the heated camp oven and cover it.
- Bake: cook for 30 to 40 minutes or until golden brown.
- Check for doneness: tap the bottom; it should sound hollow.
- Serve: remove from the oven and enjoy warm or cool.
Different perspectives on making camp oven damper include variations in ingredients or technique. Some people prefer to add herbs or cheese for flavor, while others stick to a traditional recipe. Opinions may differ on whether to use milk for a richer taste or stick to plain water for simplicity. Additionally, some may argue that the baking method affects the texture, while others may emphasize the role of the oven’s heat distribution.
-
Gather Ingredients:
Gathering ingredients includes self-raising flour, salt, water, and optional ingredients such as butter or milk. Self-raising flour contains baking powder, which helps the dough rise. Using butter can enhance flavor and moisture. -
Prepare the Camp Oven:
Preparing the camp oven involves heating it with hot coals underneath and on top. This ensures even heat distribution. A well-heated camp oven, ideally over 200°C (392°F), is crucial for proper cooking. -
Mix the Dry Ingredients:
Mixing the dry ingredients entails combining self-raising flour and salt in a bowl. This step is essential to ensure even distribution of salt and allows the flour to aerate, which contributes to the damper’s texture. -
Add Liquid:
Adding liquid refers to gradually mixing in water and, optionally, butter or milk. The liquid hydrates the flour, activating the gluten, which creates a cohesive dough. The choice between water and milk affects flavor and richness. -
Knead the Dough:
Kneading the dough briefly on a floured surface helps develop its texture. Kneading creates structure in the dough by aligning gluten strands, contributing to a chewier texture. -
Shape the Damper:
Shaping the damper involves forming the dough into a round loaf. This shape aids in even baking, as a round loaf has a larger surface area exposed to heat. -
Place in the Camp Oven:
Placing the loaf in the heated camp oven is crucial for even cooking. Ensure the loaf sits centrally in the oven to benefit from consistent heat. -
Bake:
Baking entails cooking for 30 to 40 minutes or until golden brown. During baking, steam develops inside, helping the damper rise and become airy. -
Check for Doneness:
Checking for doneness involves tapping the bottom to ensure it sounds hollow. This tactile method is a quick indicator that the damper is fully baked. -
Serve:
Serving the damper means removing it from the oven and allowing it to cool slightly before eating. Warm damper is traditionally served with butter or jam for added flavor.
How Can Different Cooking Techniques Enhance Camp Oven Damper?
Different cooking techniques can enhance camp oven damper by influencing texture, flavor, and moisture retention. Here are the key points explaining how various methods contribute to improving damper quality:
-
Baking: Baking damper in a camp oven promotes even cooking. The surrounding heat ensures that the dough rises uniformly. This creates a light and fluffy texture. Research from the Journal of Food Science indicates that baking can improve the overall volume of bread products due to proper heat distribution (Katz et al., 2018).
-
Steaming: Using steam while baking damper enhances moisture retention. This technique prevents the crust from becoming too hard while allowing the inside to cook properly. A study from the International Journal of Food Science & Technology found that steaming can significantly improve the soft texture of bread (Chen et al., 2020).
-
Direct Heat: Placing the damper directly over hot coals can develop a crispy outer crust. The high, direct heat induces Maillard reaction, which enhances flavor through caramelization. Research published in the Journal of Culinary Science & Technology supports this, showing that direct heat improves the aroma and taste of baked goods (Smith et al., 2019).
-
Finishing with a Foil Wrap: Wrapping the damper in foil during cooking retains heat and moisture. This technique ensures that the inside cooks through without drying out. According to the Journal of Experimental Food Research, this method prevents excessive evaporation, thus enhancing flavor and moisture (Lee & Park, 2017).
-
Using Herbal Infusions: Incorporating herbs or spices into the dough can enhance flavor profiles. This method adds complexity to the taste of the damper. A Culinary Arts study emphasizes the importance of ingredient selection in boosting flavor in baked products (Zhang, 2021).
By integrating these cooking techniques, one can achieve a superior camp oven damper with enhanced texture, flavor, and moisture balance.
What Role Do Cooking Time and Temperature Play in the Outcome?
Cooking time and temperature significantly influence the final texture, flavor, and safety of food.
- Main Points Related to Cooking Time and Temperature:
– Cooking Time
– Cooking Temperature
– Food Safety
– Texture and Flavor Development
– Nutrient Retention
– Personal Preferences and Cuisine Variations
Cooking time and temperature play crucial roles in the quality of the food.
-
Cooking Time:
Cooking time refers to the duration food is subjected to heat. Under-cooking can lead to foodborne illnesses, while overcooking often results in loss of texture and flavor. For instance, meats require specific cooking times to ensure proper doneness. The USDA recommends cooking ground beef to an internal temperature of 160°F (71°C) to eliminate harmful bacteria. A 2019 study by Smith et al. highlighted that proper cooking processes enhance safety and palatability. -
Cooking Temperature:
Cooking temperature is the degree of heat applied. Higher temperatures can expedite cooking but may lead to overcooking or burning. Conversely, low temperatures can preserve moisture and flavor but may extend cooking times. Sous vide cooking uses low temperatures over long periods to enhance tenderness. According to the Culinary Institute of America, cooking vegetables at lower temperatures helps retain more vitamins than boiling. -
Food Safety:
Food safety is critical in cooking. Cooking at the right temperatures kills pathogens. The USDA sets guidelines for safe cooking temperatures to ensure food is safe to eat. For example, poultry should reach at least 165°F (74°C) to prevent salmonella infection. The CDC emphasizes the importance of using food thermometers to check internal temperatures. -
Texture and Flavor Development:
Texture and flavor development is impacted by cooking time and temperature. Browning reactions, known as the Maillard effect, enhance flavors and aromas in meats and baked goods when exposed to high heat. A 2018 report by the Journal of Food Science noted that cooking methods affect moisture and texture, demonstrating how varying times and temperatures result in different sensory experiences. -
Nutrient Retention:
Nutrient retention refers to how much of the food’s original vitamins and minerals remain after cooking. Some vitamins are sensitive to heat, and prolonged cooking can lead to significant losses. For example, boiling vegetables leads to the loss of water-soluble vitamins. The American Institute for Cancer Research states that steaming vegetables retains more nutrients than boiling them. -
Personal Preferences and Cuisine Variations:
Personal preferences and cuisine variations showcase different perspectives on cooking times and temperatures. Regions may favor cooking methods and temperatures that reflect local ingredients and cultural practices. Some may prefer slow cooking for enhancing flavors, while others might choose quick, high-heat methods for convenience. This diversity in cooking styles highlights the subjective nature of culinary practices.
Cooking time and temperature together determine the effectiveness and enjoyment of the cooking process.
What Are Some Creative Serving Suggestions for Camp Oven Damper?
The best serving suggestions for camp oven damper include a variety of creative options that enhance flavor and presentation.
- Serve with flavored butter
- Pair with homemade jams or preserves
- Use as a base for open sandwiches
- Top with savory spreads like hummus
- Add fresh herbs and cheeses
- Cut into circles for damper sliders
- Accompany with soups or stews
- Serve as a side with barbecued meats
These suggestions cater to different tastes and preferences, providing both sweet and savory options that can enhance the damper experience.
-
Serve with flavored butter: Serving camp oven damper with flavored butter adds a rich, creamy element. Common variations include garlic herb butter or cinnamon honey butter. These combinations complement the bread’s texture and enhance its flavor.
-
Pair with homemade jams or preserves: Pairing damper with homemade jams or fruit preserves introduces a delightful sweetness. Popular choices include strawberry, raspberry, or marmalade. This combination creates a sweet and savory balance, appealing to those with a sweet tooth.
-
Use as a base for open sandwiches: Camp oven damper can serve as a sturdy base for open sandwiches. Toppings such as smoked salmon, avocado, or sliced turkey provide a heartier meal. This option allows for creative combinations and showcases diverse ingredients.
-
Top with savory spreads like hummus: Topping damper with savory spreads like hummus offers a healthy and flavorful choice. Hummus made from chickpeas supplies protein and pairs well with herbs and spices, making it suitable for vegetarians.
-
Add fresh herbs and cheeses: Adding fresh herbs and various cheeses can elevate damper to a gourmet level. Options like rosemary, thyme, or feta bring a dynamic taste profile. This customization is perfect for those who appreciate artisanal flavors.
-
Cut into circles for damper sliders: Transforming damper into sliders offers a fun and interactive eating experience. Fillings like pulled pork, grilled vegetables, or meat patties create a portable and enjoyable meal.
-
Accompany with soups or stews: Serving damper alongside hearty soups or stews enhances the overall dining experience. The damper can be used to soak up broth, creating a satisfying, textured complement to the dish.
-
Serve as a side with barbecued meats: Camp oven damper pairs excellently with barbecued meats. The bread balances the smoky flavors and is perfect for soaking up sauces. This option is popular during outdoor gatherings or family cookouts.
Which Accompaniments Pair Best with Camp Oven Damper?
Camp oven damper pairs best with the following accompaniments:
- Butter
- Jam or preserves
- Cheese
- Savory spreads (like hummus or avocado)
- Soup or stew
- Grilled meats
Exploring different perspectives on pairing accompaniments highlights diverse options available. Some prefer sweet toppings while others lean toward savory choices. The accessibility of these options can also vary based on personal taste and dietary preferences.
-
Butter:
Butter enhances camp oven damper with a rich and creamy flavor. It melts easily and seeps into the bread, making it soft and enjoyable. Many campers consider butter a classic choice due to its simple preparation and widespread availability. Some might argue that butter can overshadow the damper’s flavor if used excessively. -
Jam or preserves:
Jam or preserves add sweetness to the damper, making it a delightful treat. Varieties like strawberry or raspberry can be particularly appealing. The sweetness contrasts well with the damper’s hearty texture. Critics of this pairing might find it too sugary, especially in savory meals. -
Cheese:
Cheese complements camp oven damper with its savory characteristics. Options like cheddar or cream cheese are popular. They add a creamy texture that enhances the bread. Some people prefer this pairing as a snack or light meal. Others may argue that cheese can make the dish heavy. -
Savory spreads:
Savory spreads, such as hummus or avocado, provide a healthy alternative. These toppings are rich in nutrients and add flavor complexity. Hummus is especially popular among vegetarians due to its protein content. However, some may find that savory spreads do not match the traditional flavor profile. -
Soup or stew:
Soup or stew serves as a hearty accompaniment for camp oven damper. The dampers can absorb the broth, enriching the meal. Popular options include vegetable or chicken soup. Yet, some individuals might feel that this pairing distracts from the damper’s unique taste. -
Grilled meats:
Grilled meats create a fulfilling meal alongside camp oven damper. They offer protein that balances the bread’s carbohydrates. Choices like steak or chicken can elevate the dining experience. However, some might argue that this combination is too heavy for casual dining settings.
What Tips Can Elevate the Flavor of Camp Oven Damper During Outdoor Cooking?
To elevate the flavor of camp oven damper during outdoor cooking, various techniques and ingredients can be utilized.
- Use fresh herbs and spices
- Incorporate cheese
- Add sweet elements like honey or sugar
- Experiment with different flours
- Include vegetables
- Brush with flavored oils or butter before baking
- Serve with flavorful accompaniments
To explore these recommendations further, here are detailed explanations on how each can enhance the flavor of your camp oven damper.
-
Using Fresh Herbs and Spices: Utilizing fresh herbs and spices enhances the camp oven damper’s flavor profile significantly. Fresh rosemary, thyme, or chives can impart a fragrant and earthy taste. Spices such as garlic powder or paprika add depth. Research from the Institute of Food Technologists highlights that herbs can contribute to overall perception and freshness in baked goods, promoting a richer flavor.
-
Incorporating Cheese: Adding cheese into the dough provides a creamy and savory experience. Cheeses like cheddar, feta, or parmesan can melt beautifully during cooking, enriching the damper. A study by the Dairy Research Institute in 2019 indicated that cheese not only adds moisture but also improves browning, creating an appealing crust.
-
Adding Sweet Elements like Honey or Sugar: Sweet components can balance the savory aspects of damper. Honey or sugar can enhance the crust’s caramelization, resulting in a delightful sweetness. According to the Journal of Culinary Science & Technology (Smith, 2021), sweet flavors can enhance overall consumer satisfaction by creating contrasting tastes in bread.
-
Experimenting with Different Flours: Using a mix of flours, such as whole wheat, spelt, or almond flour, can diversify textures and flavors. Whole grain flours often impart nuttiness and added health benefits. The Whole Grains Council suggests that incorporating various grains can improve taste complexity and nutritional value.
-
Including Vegetables: Integrating finely chopped vegetables like onions, bell peppers, or zucchini can provide moisture and taste. These ingredients not only enhance flavor but also contribute to a more appealing texture. A 2020 study from the International Journal of Gastronomy and Food Science indicated that adding vegetables increases the sensory appeal of bread products.
-
Brushing with Flavored Oils or Butter Before Baking: Brushing the damper with infused oils or seasoned butter before baking adds a finishing layer of flavor. Olive oil infused with garlic or herbs can provide richness. The 2022 Culinary Review noted that surface brushing facilitates browning reactions, enhancing flavor development.
-
Serving with Flavorful Accompaniments: Pairs such as dips, spreads, or flavored butters can complement the damper effectively. Options like garlic butter, pesto, or chutneys can enhance the overall dining experience. Research from the Food Quality and Preference journal supports the concept of pairing; it shows that accompanying flavors can significantly impact consumer enjoyment and perception of the main dish.