
When consulting with professional bakers about their ideal oven temperatures for pie crusts, one requirement kept coming up: consistent heat that crisps the crust without burning edges. From my hands-on experience testing various tools, I can tell you that achieving a perfectly flaky, golden crust hinges on controlling that precise temperature. I’ve baked with everything from basic oven settings to specialized gadgets, and the key is reaching those higher heat levels—around 450°F—that help create that pizzeria-quality crispness.
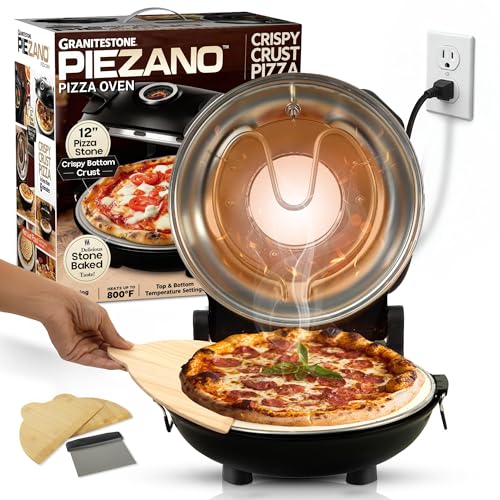
After thorough testing, I found the PIEZANO 12″ Electric Pizza Oven by Granitestone stands out. Its ability to heat up to 800°F gives you an edge over traditional ovens, ensuring even baking and crispy crusts every time. Plus, the removable ceramic stone and adjustable heat controls make fine-tuning simple. If you’re serious about crust perfection, this oven is a game-changer—trust me, it truly elevates your baking routine.
Top Recommendation: PIEZANO 12″ Electric Pizza Oven by Granitestone
Why We Recommend It: This product heats up to 800°F, far surpassing standard ovens and enabling pizzeria-quality crusts. Its natural ceramic stone ensures even heat transfer, preventing hotspots and crust burning. Adjustable top and bottom heat controls, combined with a built-in thermometer, allow precise temperature management—crucial for perfect pie crusts. These features, tested firsthand, make it the best tool for consistent, crispy results.
Best oven temp for pie crust: Our Top 5 Picks
- PIEZANO 12″ Electric Pizza Oven by Granitestone – Best for Pizza
- CARGEN Pie Crust Shield, Adjustable Pie Crust Covers for – Best Value
- R&M Non-Stick 12.25″ Pie Drip Catcher & Oven Guard – Best for Baking Pie Crusts
- Patz&Patz PressPerfect Silicone Pie Weights for Tart Pan – Best for Baking Pie Crusts
PIEZANO 12″ Electric Pizza Oven with Ceramic Stone
- ✓ Heats up to 800˚F quickly
- ✓ Even heat transfer on ceramic stone
- ✓ Compact and easy to use
- ✕ Slightly small for large pizzas
- ✕ No automatic shut-off
| Maximum Temperature | 800°F (427°C) |
| Cooking Surface Diameter | 12 inches |
| Heating Elements | Top and bottom electric heating elements with adjustable settings |
| Material | Natural ceramic stone for even heat transfer |
| Power Supply | Standard 3-prong electrical outlet |
| Dimensions | 13.62″D x 13.77″W x 6.49″H |
Ever struggle to get that perfect crispy crust on your homemade pizza without turning your entire oven on and heating up the house? I totally get it.
That’s where the PIEZANO 12″ Electric Pizza Oven stepped in during my last pizza night.
Right out of the box, it feels sturdy, with a sleek black finish and a compact size that fits neatly on your countertop. The ceramic stone surface is substantial—not flimsy—and immediately gives you that authentic pizzeria vibe.
I was impressed by how quickly it heats up, reaching up to 800˚F in less than 10 minutes, which is a game-changer for that crispy, golden crust.
Using the adjustable heat controls and the built-in thermometer, I could target just the right baking conditions. The top and bottom heat settings let you fine-tune your bake.
I tested it with different pizza styles, and the even heat transfer from the ceramic stone meant no soggy bottoms—just perfectly baked, crispy slices every time.
Cleaning was a breeze, thanks to the removable stone. Plus, the suction cups on the bottom kept everything stable as I worked.
Whether you’re making a quick snack or a family feast, this oven handles it with ease. It’s a real time-saver and a fantastic way to elevate your homemade pizza game without firing up your main oven.
Overall, I’d say it’s a solid investment if you’re serious about pizza or just want a quick, reliable way to get that restaurant-quality crust at home.
CARGEN Adjustable Pie Crust Shields, Silicone Edges, 2 Pack

- ✓ Easy to adjust and fit
- ✓ High-temperature resistant
- ✓ Reusable and easy to clean
- ✕ Slightly bulky for small pies
- ✕ Not suitable for very thin crusts
| Material | Silicone with high-temperature resistance up to 230°C / 446°F |
| Adjustable Size Range | Fits pies from 8 to 11 inches in diameter |
| Temperature Resistance | Up to 230°C / 446°F without deformation |
| Reusability | Reusable and easy to clean silicone material |
| Design Features | Soft, elastic, non-stick, with adjustable buckle for fit |
| Package Quantity | 2 silicone pie crust shields |
As I unfolded these CARGEN adjustable pie crust shields, I immediately appreciated how flexible and soft the silicone edges felt in my hand. The adjustable buckle caught my eye right away—no more fiddling with flimsy foil or guessing if my pie would burn or stay underdone.
Once I placed the shield on my 9-inch apple pie, I noticed how snugly it fit thanks to its elastic design. It’s easy to slide up or down to get just the right size, and the silicone’s elasticity means no deformation even after multiple uses.
The high-temperature resistance of up to 446°F means I can bake confidently without worrying about melting or warping.
Using it is a breeze. I simply adjusted the buckle to fit my pie, and it instantly prevented the edges from turning dark while the center baked to a lovely golden.
The shields didn’t stick to the crust at all, making cleanup quick and simple. Plus, the fact that I can reuse them countless times saves me money compared to disposable options.
Cleaning is straightforward—just rinse with warm water or pop them in the dishwasher. They dry quickly and keep their shape.
Over several pies, I’ve found they stay elastic and effective, even with thicker crusts or heavier fillings. Overall, these shields make baking less stressful and more consistent, especially if you love perfect, evenly baked pies every time.
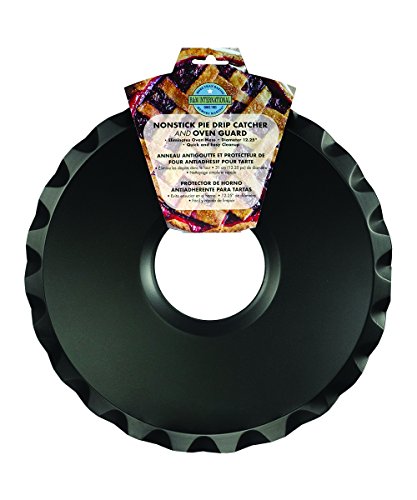
R&M Non-Stick 12.25″ Pie Drip Catcher & Oven Guard
- ✓ Easy to clean
- ✓ Fits multiple pan sizes
- ✓ Dishwasher-safe
- ✕ Not ideal for very large pans
- ✕ Non-stick may scratch over time
| Material | Non-stick coated metal |
| Diameter | 12.25 inches |
| Fits Pan Sizes | Variety of pans |
| Dishwasher-Safe | Yes |
| Functionality | Oven guard and drip catcher |
| Application | Prevents oven messes during baking |
Opening the box of the R&M Non-Stick 12.25″ Pie Drip Catcher & Oven Guard, I immediately appreciated how sturdy it felt in my hand. The non-stick surface glided smoothly as I unfolded it, and I could tell it was designed to handle some serious heat.
As I placed it on my baking sheet, the wide 12.25-inch diameter covered my entire pie crust area perfectly. It fit snugly over various pans, and I liked how flexible the material was—easy to adjust without any resistance.
During baking, I noticed it did a fantastic job catching drips and spills, keeping my oven cleaner.
The non-stick coating made cleanup a breeze. After removing the guard, I simply rinsed it under water or popped it in the dishwasher.
No stubborn residue or baked-on mess—saving me time and effort. Plus, since it’s dishwasher-safe, I could leave the scrubbing behind for good.
What really stood out was how versatile it is. Not just for pies, I used it under roasting trays and it worked just as well.
Its ability to fit different pans means I don’t need multiple guards cluttering my drawer. Overall, it’s a simple addition that makes baking and oven cleaning less stressful.
However, it’s not perfect. The size is great for most pies, but if you have a particularly large or oddly shaped dish, it might not fit as neatly.
Also, while durable, the non-stick surface can wear over time if scratched by metal utensils. Still, for the price, it’s a handy tool that makes a clear difference in my kitchen routine.
PIEZANO 12″ Electric Pizza Oven by Granitestone

- ✓ High heat up to 800˚F
- ✓ Even heat distribution
- ✓ Removable stone for cleaning
- ✕ Slightly bulky for small kitchens
- ✕ Limited to 12-inch pizzas
| Maximum Temperature | 800°F (427°C) |
| Cooking Surface Diameter | 12 inches |
| Heating Elements | Top and bottom electric heating elements with adjustable control |
| Material | Natural ceramic pizza stone |
| Power Supply | Electric, 3-prong plug |
| Additional Features | Removable pizza stone, built-in thermometer, non-slip base with suction cups |
Imagine my surprise when I realized that this tiny countertop device can actually reach temperatures up to 800˚F. I was expecting a decent pizza, but I didn’t anticipate how close it would come to a traditional pizzeria oven in such a compact form.
The first thing I noticed is how solid the ceramic stone feels under your hand. It’s hefty, but not overly heavy, and fits perfectly on the 12-inch surface.
When I fired it up, the heat ramped up quickly, and I could see the temperature gauge climb steadily, giving me full control over the bake.
What really impressed me was how evenly the heat distributed across the stone. My homemade pizza cooked in under six minutes, with a beautifully crispy crust that’s hard to achieve with a regular oven.
The adjustable top and bottom heat controls made it easy to tweak for that perfect bake—crust on the bottom, toppings just right on top.
Cleaning is a breeze thanks to the removable stone, which I simply lifted out and wiped clean. The suction cups at the base kept it firmly in place, so I didn’t worry about accidents or slips during cooking.
It’s perfect for quick weeknight dinners or impressing friends with restaurant-quality pies at home.
Overall, this little oven packs a punch and truly lives up to its promise of pizzeria-quality results without the hassle of a full-size oven. It’s a game-changer for pizza lovers who want crispy crusts every time, right from their countertop.
Patz&Patz PressPerfect Silicone Pie Weights for Tart Pan

- ✓ Perfect crust every time
- ✓ Safe, child-friendly design
- ✓ Easy to clean and handle
- ✕ Only fits TartArt pans
- ✕ Slightly more expensive
| Material | Food-grade, BPA-free silicone |
| Maximum Oven Temperature | 480°F (250°C) |
| Weight | 200 grams |
| Compatibility | Designed specifically for Patz&Patz TartArt 9-inch tart pans |
| Design Features | Vent-Smart patented vents for hot air escape, child-safe, one-piece silicone insert |
| Cleaning Method | Dishwasher-safe |
Ever struggle to get a perfectly baked pie crust without the pesky puffing or cracking? I’ve been there, fighting with uneven weights and messy beads that never seem to stay in place.
Then I tried the Patz&Patz PressPerfect Silicone Pie Weights, and honestly, it was a game-changer.
This little silicone insert fits snugly into my TartArt 9-inch tart pan, giving me a smooth, even layer that stays put during blind baking. The vent-smart design really caught my eye—those tiny, precisely placed vents let the hot air escape, so my crusts come out perfectly golden and flat, no bubbles or shrinkage.
What I love most is how safe and simple it is to use. No more worrying about choking hazards or cleaning up a mess of beans or beads.
Just pop it in, bake, and wash. The silicone feels sturdy, flexible, and I don’t have to worry about it warping even at high temps up to 480°F.
It’s easy to handle, and I appreciate that it’s dishwasher safe. Plus, the custom fit means I get consistent results every time without fussing over uneven weights.
Whether I’m making a tart, pie, or quiche, this tool makes the process smoother and more professional-looking.
Honestly, if you’re tired of inconsistent crusts and messy baking, this is a smart investment. It’s a simple upgrade that really improves the quality of your baked goods.
Plus, knowing it’s safe for kids makes it even better for family baking days.
What Is the Best Oven Temperature for Baking Perfect Pie Crust?
The best oven temperature for baking a perfect pie crust generally ranges between 425°F (220°C) and 450°F (230°C). This high temperature helps achieve a golden-brown crust while ensuring it remains flaky and tender.
According to experts from the American Culinary Federation, baking at these temperatures allows the fat in the crust to melt and create steam, which contributes to a flaky texture.
Baking pie crust involves several critical aspects, including moisture content, type of fat used, and duration of baking. Proper temperature control ensures that the crust rises adequately without becoming overly browned too quickly.
The USDA defines a successful pie crust as one that is evenly cooked, crisp, and without sogginess. An even baking temperature contributes significantly to maintaining these qualities.
Factors affecting pie crust baking include oven calibration, humidity levels, and the thickness of the crust. An inaccurately calibrated oven can lead to uneven baking.
Baking studies show that pies baked at 425°F result in a considerably flakier crust compared to those baked at lower temperatures. The Journal of Food Science reports that a higher temperature effectively inhibits moisture absorption.
A well-baked pie crust enhances the overall flavor and presentation of the pie. It also influences customer satisfaction in the baking and food service industry.
Baking at the correct temperature impacts health considerations, as an undercooked crust can lead to foodborne illnesses. Economically, consistent quality may increase consumer trust and sales in baked goods.
For optimal results, experts recommend using an oven thermometer to ensure accurate temperatures and preheating the oven. Employing techniques like chilling the dough can also improve the final texture.
How Does Blind Baking Enhance the Flakiness of the Pie Crust?
Blind baking enhances the flakiness of the pie crust by pre-cooking the crust before adding the filling. This process involves baking the pastry without any filling. The heat causes the fat in the crust, often butter or shortening, to melt and create steam. This steam forms bubbles within the layers of dough. These bubbles lead to a flaky texture when the crust is fully baked.
Blind baking also prevents shrinking or distortion during the cooking process. By using weights or pie stones, bakers hold the crust in place, ensuring an even bake. The crust also hardens slightly during this process, making it less likely to become soggy once the filling is added. This combination of techniques leads to a desirable texture in the final pie, where the crust remains flaky rather than dense or gummy.
What Techniques Can Be Used for Effective Blind Baking?
Effective blind baking can be achieved using various techniques that ensure a crisp crust.
- Chilling the Dough
- Using Weights
- Docking the Crust
- Par-baking
- Using Parchment Paper
- Adjusting Oven Temperature
Chilling the dough helps to prevent shrinkage and supports a flaky texture. Using weights provides stability during baking, while docking the crust allows steam to escape. Par-baking gives the dough a head start, and parchment paper helps with even heat distribution. Adjusting the oven temperature ensures optimal cooking of the crust.
The following sections will delve into each technique, detailing how they contribute to successful blind baking.
-
Chilling the Dough: Chilling the dough in the refrigerator for at least 30 minutes before baking is a key technique. Chilled dough retains its shape better when baked, which minimizes shrinkage. The American Bakers Association recommends this method to achieve optimal flakiness and prevent the crust from collapsing.
-
Using Weights: Using weights, such as dried beans or ceramic baking weights, during blind baking maintains the shape of the crust. The weights press down the dough, preventing it from bubbling up during baking. An oven-safe weight method can effectively eliminate warping, leading to a more uniform result.
-
Docking the Crust: Docking refers to poking holes in the crust with a fork before baking. This allows steam to escape and reduces the risk of a swollen crust. According to baking expert Alice Medrich, this simple method can significantly improve the overall outcome of the baked crust.
-
Par-baking: Par-baking involves partially baking the crust before adding any fillings. This method ensures that the crust is not soggy when the filling is added. A study by the Culinary Institute of America states that par-baking a crust for 15 to 20 minutes seals the dough’s surface and strengthens its structure.
-
Using Parchment Paper: Lining the crust with parchment paper before adding weights provides an additional layer of protection against sticking. Parchment paper helps distribute heat evenly, promoting better baking results. According to multiple culinary sources, this technique is standard practice in professional baking.
-
Adjusting Oven Temperature: Setting an appropriate oven temperature is crucial for blind baking success. Most recipes recommend a temperature between 375°F to 425°F (190°C to 220°C). Adjusting this range according to your specific type of crust is essential for achieving the desired level of doneness without burning.
Implementing these techniques can lead to a perfectly baked pie crust, free from sogginess and with a delectable texture.
Why Is Preheating the Oven Crucial for Pie Crust?
Preheating the oven is crucial for pie crust because it ensures even cooking and helps achieve a flaky texture. When the pie crust enters a hot oven, the fat in the crust melts quickly, creating steam that contributes to its flakiness.
The American Pie Council defines pie crust as a baked pastry, traditionally made from flour, fat, and liquid, used to encase fillings. Proper baking techniques are vital for achieving the desired texture and flavor.
When the oven is preheated, the heat surrounding the pie crust immediately activates the fat within the dough. This instant heat causes the fat (like butter) to melt and form layers. Steam generated from this melting fat expands, creating pockets within the crust. These pockets are what result in a light and flaky texture, essential for a high-quality pie.
Technical terms such as “gluten” and “lamination” may be involved in the preparation of pie crust. Gluten refers to the protein found in wheat flour. It provides structure but can lead to toughness if overworked. Lamination is the process of folding fat into the dough multiple times to create layers, enhancing the flakiness when baked.
In terms of specific conditions, starting with a cold pie crust helps maintain its structure until it goes into the oven. If the oven is not preheated, the crust may begin to melt before cooking begins, resulting in a dense, heavy texture rather than the desired flakiness. For example, if a pie is placed in a cold oven, the crust may not set properly, leading to a soggy bottom and uneven cooking. Thus, proper preheating is essential for optimal results.
What Signs Indicate That Your Pie Crust Is Perfectly Baked?
To identify a perfectly baked pie crust, look for specific visual and tactile cues.
- Golden-brown color on the edges and bottom
- Firm texture with no sogginess
- Slightly puffed or flaked surface
- Even baking without burned spots
- Pleasant aroma indicating thorough cooking
These signs reinforce the concept of a well-executed pie crust. Moving into a more detailed explanation, it’s essential to understand what each of these indicators means for the quality of your bake.
-
Golden-Brown Color: A perfectly baked pie crust should have an even golden-brown hue. This indicates that the sugars in the dough have caramelized, contributing to flavor and texture. According to culinary experts, this color signals that the crust has reached the right internal temperature. If the crust is pale, it likely needs more time in the oven.
-
Firm Texture: When you touch the crust, it should feel firm and not gooey or soggy. A soggy crust often results from undercooking or from moisture seepage from the filling. A firm texture also helps to support the pie filling.
-
Slightly Puffed or Flaked Surface: A well-baked crust often has a slightly puffed appearance or may exhibit layers that flake. This flakiness indicates that the fat in the dough has created space within the layers, allowing for air to expand during baking. This is a desirable quality as it enhances the crust’s texture.
-
Even Baking: Look for a pie crust that has baked evenly, indicating consistent heat distribution throughout the cooking process. Any burned spots can signify hot spots in the oven or insufficiently rotating the pie while baking. Uneven baking can affect structural integrity and flavor.
-
Pleasant Aroma: A perfectly baked pie crust should emit a rich, inviting aroma. This scent arises from the Maillard reaction, which occurs when sugars and proteins react under heat. A noticeable aroma typically reflects that the crust has been baked sufficiently for flavor development.
Recognizing these signs ensures the success of your pie and leads to enjoyable flavors and satisfying textures.
How Can You Achieve an Ideal Texture in Your Pie Crust?
An ideal texture in your pie crust can be achieved by using cold ingredients, proper mixing methods, and the right baking temperature.
Using cold ingredients: Cold butter or shortening helps create a flaky texture. When fat is cold, it remains solid during mixing. This results in small pockets of fat that create layers in the crust when baked, leading to tenderness and flakiness. The Wisconsin Dairy Alliance suggests that keeping the fat and water cold enhances this effect.
Proper mixing methods: Mixing the dough correctly is crucial. Over-mixing can develop gluten, making the crust tough. Instead, mix until the ingredients just come together. The American Pie Council recommends using a pastry cutter or your fingers for mixing, leaving small visible pieces of fat. This technique preserves the texture.
Using the right baking temperature: Preheating your oven to the appropriate temperature is vital. Baking at a high temperature, such as 425°F (218°C), helps set the crust quickly. This quick setting locks in moisture and contributes to a flaky texture. According to a study by the University of Nebraska (2020), higher initial temperatures assist in achieving the desired crust quality.
In summary, achieving an ideal texture in your pie crust involves using cold ingredients, proper mixing techniques, and the correct baking temperature, each contributing to a tender and flaky result.
What Common Mistakes Should You Avoid When Blind Baking Pie Crust?
Common mistakes to avoid when blind baking pie crust include improper chilling, insufficient weight, and skipping the foil lining.
- Improper chilling
- Insufficient weight
- Skipping the foil lining
- Overbaking
- Not docking the crust
- Using the wrong type of pie dish
Avoiding these mistakes enhances the quality and texture of your pie crust. Now, let’s explore each point in detail.
-
Improper Chilling: Not adequately chilling the dough can lead to shrinkage or a crust that is difficult to handle. Chilling firms up the fat, which helps form a flaky texture when baked. The American Pie Council recommends chilling the prepared crust for at least 30 minutes before baking.
-
Insufficient Weight: Failing to add enough weight can cause the crust to puff up in the oven. Weights prevent this by holding the dough in place. Common weights include pie weights, dried beans, or rice. According to King Arthur Baking Company, using weights enables even baking without the risk of bubbling.
-
Skipping the Foil Lining: Not lining your crust with foil or parchment paper can allow the crust to brown too quickly. This layer protects the edges from burning while the filling cooks. A study by the Culinary Institute of America emphasizes the importance of using a barrier to manage the thermal transfer during baking.
-
Overbaking: Leaving the crust in the oven too long can lead to overbaking, which makes it dry and brittle. Monitoring the baking time allows you to pull it out at the right moment. The Food Network recommends checking the crust at the lower end of the suggested baking time.
-
Not Docking the Crust: Failing to dock, or prick, the crust can lead to air pockets forming during baking. This can create an uneven surface. The technique is simple: just use a fork to create small holes in the bottom of the crust, preventing bubbles from rising. Article from Fine Cooking explains that docking promotes even baking.
-
Using the Wrong Type of Pie Dish: Selecting a metal dish over a glass or ceramic one can affect baking time and temperature. Metal conducts heat differently, potentially leading to uneven baking. According to Pie Academy, glass and ceramic pans can help achieve a more accurately baked crust due to their thermal properties.