
Imagine standing in your kitchen, meat sizzling in a cast iron Dutch oven, and knowing you’ve chosen the *best* cut to maximize flavor and tenderness. I’ve tested all sorts—beef chuck, pork shoulder, even chicken thighs—and found that certain cuts really shine when cooked low and slow in cast iron. The right meat makes all the difference in delivering juicy, evenly cooked results that won’t dry out or scorch.
From my experience, thicker cuts like chuck roast or bone-in ribs hold moisture better and develop richer flavors in these vessels. The key is selecting a cut with enough marbling to render down slowly, creating that perfect fall-apart texture. If you want a reliable, hearty meal that truly takes advantage of your Dutch oven’s heat retention and even cooking, I recommend focusing on cuts that benefit from slow, steady heat. Trust me, the right choice transforms your cooking from good to unforgettable!
Top Recommendation: Lodge 5 Quart Cast Iron Double Dutch Oven – Pre-Seasoned
Why We Recommend It: This product’s superior heat retention and versatility make it ideal for slow-cooking tougher cuts like chuck or brisket. Its double Dutch oven design allows even heat distribution and efficient moisture retention, essential for tender results. The pre-seasoned surface enhances non-stick properties and flavor development, outperforming more basic racks or trivets in maintaining consistent temperatures. It also functions as a skillet, adding extra value to your kitchen arsenal.
Best cut of meat for cast iron dutch oven: Our Top 5 Picks
- IPROUDER Cast Iron Trivet Set, 8-inch Dutch Oven Meat Rack – Best for Meat Preparation in Dutch Ovens
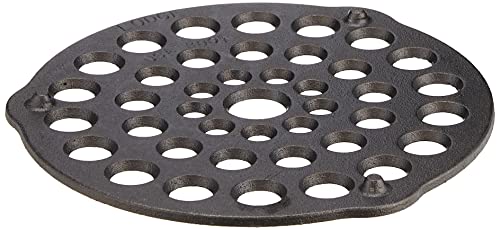
- Lodge L8DOT3 Cast Iron Meat Rack/Trivet 8-inch – Best for Meat Support in Cast Iron Dutch Ovens
- Lodge 5 Qt Cast Iron Double Dutch Oven with Skillet Lid – Best Overall Cast Iron Dutch Oven
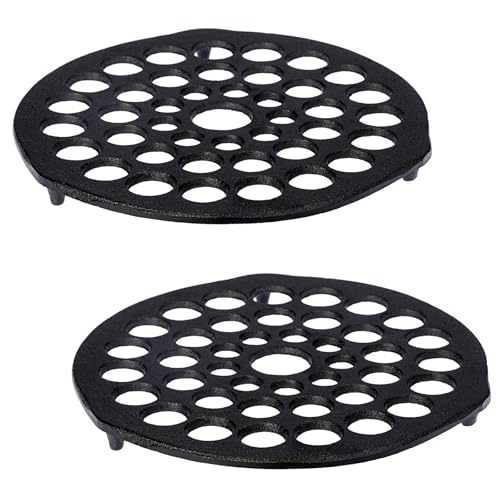
- OGANAZI Cast Iron Trivet 2 PCS Set, 8-Inch Heavy Duty Meat – Best Heavy Duty Meat Rack for Dutch Ovens
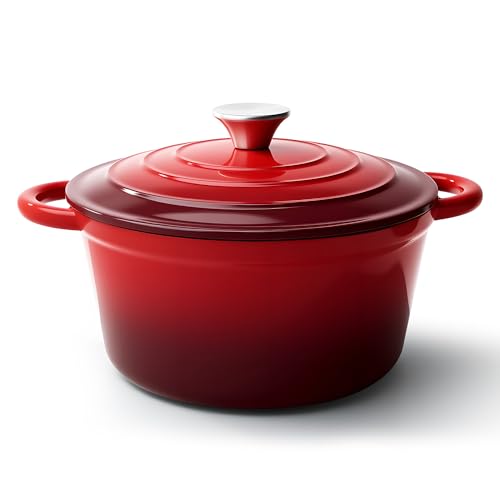
- 6 Qt Enameled Cast Iron Dutch Oven with Lid – Best Small Cast Iron Dutch Oven
IPROUDER Cast Iron Trivet Set, 8-inch Dutch Oven Meat Rack

- ✓ Excellent heat retention
- ✓ Versatile stacking options
- ✓ Easy to clean and care
- ✕ Slightly heavy to handle
- ✕ Limited to 4-quart or larger pans
| Material | Cast iron, seasoned with natural vegetable oil |
| Size | 8-inch diameter |
| Compatibility | Fits 4-quart or larger cast iron Dutch ovens |
| Heat Resistance | Suitable for use in embers and open flames |
| Design Features | Long feet for direct ember use; stackable for multi-level cooking; short feet for burner diffusion and surface protection |
| Cleaning & Care | Hand wash, dry thoroughly, rub with cooking oil |
As soon as I pulled the IPROUDER Cast Iron Trivet Set out of the box, I was struck by its solid weight and smooth, seasoned surface. The dark, matte finish feels sturdy and well-made, with just the right amount of grip for lifting hot dishes.
The 8-inch size fits perfectly inside my 4-quart Dutch oven, giving it a substantial presence without feeling bulky.
What really stands out is how versatile this set is. The long-foot grate can go directly into embers, making it ideal for outdoor cooking or campfire meals.
Stacking multiple grates provides plenty of space for roasting meats or baking bread without scorching. The short-foot grate doubles as a burner diffuser or a heat-resistant trivet, which is a clever touch for protecting countertops or stovetops.
Handling the product is a breeze. It’s easy to clean—just hand wash and rub with oil—and it maintains its seasoned surface beautifully.
I used it to elevate a roast in my Dutch oven, and the even heat distribution really shined through, preventing any burnt bits. Whether you’re using it indoors or outdoors, it adds a level of functionality I didn’t realize I needed.
Plus, the natural vegetable oil seasoning makes it feel almost non-stick, so food slides off effortlessly. The ability to stack and customize your setup means you can cook multiple things at once, saving time and hassle.
It’s durable enough to handle high heat, and I appreciate how it keeps my food elevated and safe from direct contact with the pan bottom.
Overall, this trivet set is a practical upgrade for any cast iron lover. It’s sturdy, versatile, and thoughtfully designed to improve your cooking experience.
I can see myself reaching for it often, whether for a hearty stew or a simple sourdough loaf.
Lodge L8DOT3 Cast Iron Meat Rack/Trivet 8-inch
- ✓ Durable cast iron build
- ✓ Even heat circulation
- ✓ Fits all Lodge Dutch ovens
- ✕ Slightly heavy
- ✕ Requires hand washing
| Material | Preseasoned cast iron |
| Diameter | 8 inches |
| Compatibility | Fits Lodge Dutch ovens 4 quarts or larger |
| Design Features | Raises foods off pan bottom to prevent scorching |
| Heat Retention | Excellent heat retention and even heating |
| Care Instructions | Hand wash, dry, rub with cooking oil |
Imagine you’re preparing a hearty pot roast in your favorite Lodge Dutch oven, and you realize the meat is sitting directly on the bottom, risking scorching or sticking. That’s when this 8-inch cast iron meat rack suddenly becomes your best friend.
It slides perfectly into the oven, elevating your food off the hot surface, and instantly makes the cooking process more reliable and even.
The first thing you’ll notice is how sturdy this rack feels. Made from preseasoned cast iron, it’s built to last and can handle whatever you throw at it.
Its compact 8-inch size fits snugly in all Lodge 4-quart or larger Dutch ovens, giving you plenty of versatility.
Using it is a breeze. Just place it in your pot, load your meat or pie on top, and you’re set.
The raised design allows heat to circulate evenly around your food, resulting in a perfectly cooked dish without hot spots. Plus, cleanup is simple—just hand wash, dry, and rub with a little oil to maintain the seasoning.
What I really like is how it helps prevent sticking and scorching, especially with thicker cuts of meat or delicate baked goods. It’s also great for roasting vegetables or even as a trivet for serving hot dishes.
The American-made quality is noticeable, and at just under $22, it feels like a smart investment for anyone serious about their cast iron cooking.
Overall, this rack transforms your Dutch oven into a more versatile, reliable cooking tool. It’s sturdy, easy to use, and makes a visible difference in your results.
Lodge 5 Quart Cast Iron Double Dutch Oven – Pre-Seasoned –

- ✓ Superior heat retention
- ✓ Versatile 2-in-1 design
- ✓ Safe, chemical-free surface
- ✕ Heavy to lift
- ✕ Slightly pricey
| Material | Cast iron, pre-seasoned and chemical-free |
| Capacity | 5 quarts |
| Cooking Surface Diameter | 10.25 inches (lid/skillet) |
| Heat Retention | Superior heat retention due to thick cast iron construction |
| Handle Design | Wide loop handles for safe lifting with oven mitts or outdoor use |
| Made In | USA |
The first thing that caught my eye when I unboxed this Lodge 5 Quart Cast Iron Double Dutch Oven was how solid it felt in my hands. The thick cast iron construction immediately gives off a sense of durability, and the weight is just right—not too heavy to handle, but substantial enough to feel premium.
As I started cooking, I noticed how evenly it heated across the surface, which is a huge plus for slow-cooked stews or searing meats. The lid doubles as a skillet, and I found myself flipping pancakes or sautéing vegetables with ease—saving space and adding versatility to my kitchen arsenal.
The pre-seasoned surface was smooth and non-stick right out of the box, which made cooking and cleanup straightforward. I appreciate that it’s free from PFAS, PFOA, and PTFE, making it a safer option for everyday use.
The wide loop handles on both the lid and base felt secure, even when I was lifting it with oven mitts, giving me confidence during outdoor grilling sessions.
Plus, the fact that it’s made in the USA by a family-owned business adds a warm, trustworthy vibe. Whether I was making a hearty chili or baking bread, this Dutch oven handled everything with ease and even improved in seasoning with each use.
It’s truly a versatile piece that feels like it’ll last for generations.
OGANAZI Cast Iron Trivet Set, 8-Inch Heavy Duty Meat Racks
- ✓ Heavy-duty cast iron quality
- ✓ Multi-functional use
- ✓ Easy to clean and maintain
- ✕ Slightly heavy to handle
- ✕ Limited size options
| Material | Heavy duty cast iron, seasoned with natural vegetable oil |
| Dimensions | 8.1 inches diameter x 0.7 inches height |
| Thickness | 0.2 inches |
| Temperature Resistance | Higher temperatures than stainless steel, suitable for oven use |
| Intended Use | Designed for 4-quart or larger cast iron Dutch ovens, suitable for roasting, raising meats, pies, sourdough bread |
| Care Instructions | Wipe clean with dry cloth, dry on low heat, apply thin layer of vegetable oil to prevent rust |
You’re in the middle of prepping a hearty stew in your cast iron Dutch oven, and as you lift the lid, you realize your pot’s bottom is a bit scorched from that last roast. That’s when you grab the OGANAZI Cast Iron Trivet Set, and suddenly, everything feels more organized and cleaner.
This set of heavy-duty trivets feels solid right out of the box. The cast iron is thick and well-seasoned, which means no worries about cracks or breaks when handling higher temperatures.
The 8-inch diameter is perfect for your 4-quart Dutch oven, giving enough clearance to lift or cool food without feeling cramped.
What I really love is how versatile these trivets are. Not only do they elevate your roasting or baking, but you can also use them as a table protector or cooling rack.
When you place hot bread or meat on it, you see the steam rise gently, and the food cools down evenly—no burnt spots or soggy bottoms.
The seasoned surface makes cleaning a breeze. A quick wipe after use, and a light coat of vegetable oil keeps rust at bay.
Plus, they’re lightweight enough to move around easily, yet hefty enough to stay put during cooking.
Overall, they add a nice touch of practicality to your kitchen. Whether in the oven or on the table, these trivets help you cook smarter—and look good doing it.
Just double-check your Dutch oven’s diameter before buying, and you’re all set for a better cooking experience.
6 Qt Enameled Cast Iron Dutch Oven with Lid
- ✓ Excellent heat retention
- ✓ Easy to clean
- ✓ Versatile cooking options
- ✕ Heavy to lift
- ✕ Enamel can chip if mishandled
| Capacity | 6 Quarts (approximately 5.7 liters) |
| Maximum Temperature Resistance | 500°F (260°C) |
| Material | Enameled cast iron with non-toxic porcelain enamel coating |
| Compatibility | Suitable for gas, electric, ceramic, and induction stoves |
| Cleaning Method | Dishwasher-safe; recommended hand wash with soft sponge or cloth |
| Design Features | Special circular shower design for optimal water vapor circulation and heat preservation |
As soon as I lifted the lid of this 6 Qt Enameled Cast Iron Dutch Oven, I was impressed by its thick, glossy enamel finish that feels both sturdy and smooth to the touch. It’s a real eye-catcher sitting on the stove, with a vibrant color that adds charm to any kitchen setup.
The special circular shower design really caught my attention during cooking. You can see how the water vapor circulates evenly inside, which helps lock in flavors and nutrients.
It’s perfect for slow braises or hearty stews, keeping everything moist and tender without losing its rich taste.
Handling the lid is a breeze thanks to the comfortable, wide knob that stays cool enough to touch. The pot itself is hefty but well-balanced, making it easy to move from stove to table.
I found that it heats evenly, even on lower heat, which means no hot spots or burnt bits.
Cleaning is surprisingly simple. The enameled surface resists stains, and a quick wash with warm soapy water easily restores its shine.
Since it’s dishwasher safe, I sometimes just toss it in, but I prefer handwashing to preserve the finish longer.
Versatility is a big plus. I used it on gas, electric, and even induction stoves without a hitch.
The high heat tolerance up to 500°F means I can sear meats directly in the pot before slow cooking, making it a true all-in-one kitchen hero.
Overall, this Dutch oven feels like a reliable workhorse that combines style and function. Whether you’re baking bread, roasting, or simmering, it handles all with ease and looks great doing it.
What Is the Best Cut of Meat for Stews in a Cast Iron Dutch Oven?
The best cut of meat for stews in a cast iron Dutch oven is typically tougher cuts that benefit from slow cooking. These cuts, like chuck roast, brisket, and shank, contain more connective tissue. The USDA defines chuck roast as a cut from the shoulder area of the cow, known for its rich flavor and tenderness after cooking.
The USDA Meat and Poultry Hotline states that traditional stews are best made with less expensive, tougher cuts of meat. These cuts break down during long cooking times, resulting in tender pieces that absorb flavors from the broth and vegetables.
Tough cuts of meat have high collagen content, which transforms into gelatin during slow cooking. This process enhances the stew’s richness. Cuts like shoulder, round, and flank are also suitable for similar reasons, as they can withstand heat without drying out.
According to the North American Meat Institute, utilizing less expensive cuts for stews can reduce kitchen costs while providing nutritious meals. For example, chuck roast contains more iron, zinc, and B vitamins than leaner cuts.
The use of tougher cuts supports sustainable practices in the meat industry, as they utilize parts of the animal often overlooked. This can have positive implications for reducing waste and promoting whole animal usage.
For best results, experts recommend searing the meat before stewing to enhance flavor, using fresh herbs and spices, and adjusting cooking times to ensure tenderness. Slow simmering for several hours allows flavors to meld, resulting in a hearty dish.
Why Are Tough Cuts Ideal for Stews?
Tough cuts are ideal for stews because they become tender and flavorful during the slow cooking process. These cuts often contain more connective tissue and fat, which break down and infuse the stew with rich flavors.
According to the USDA (United States Department of Agriculture), tough cuts are generally sourced from well-used muscles of the animal, which results in a higher content of collagen and fat.
The toughness of these cuts stems from their location on the animal and the amount of exercise the muscles experienced. Cuts like chuck, brisket, and shank are used for movements, leading to increased collagen. Collagen is a protein that provides structure and strength to the meat. During cooking, especially at low temperatures over an extended time, collagen converts into gelatin, enhancing the stew’s texture and flavor.
Technical terms such as “collagen” and “gelatin” are important. Collagen is a protein found in connective tissues, while gelatin is a substance derived from collagen after it has been heated, giving stews a rich mouthfeel.
The cooking process involves simmering tough cuts in liquid for several hours. This slow cooking allows the collagen to dissolve, resulting in a tender and flavorful product. For an effective stew, the cooking temperature should remain low, ideally between 180-200°F (82-93°C), to derive the best results from tough cuts.
Specific actions that enhance the quality of stews include searing the meat before adding it to the liquid. Searing caramelizes the surface, creating deeper flavors. Additionally, adding vegetables and herbs during cooking contributes to overall richness and complexity, ensuring a well-rounded dish.
Are There Specific Vegetables That Pair Well with Stew Meats?
Several vegetables complement various stew meats, enhancing the flavor and texture of the dish. Here is a list of vegetables commonly used with different types of stew meats:
| Stew Meat Type | Recommended Vegetables | Additional Notes |
|---|---|---|
| Beef | Carrots, Potatoes, Onions, Celery, Mushrooms | Try adding red wine for depth of flavor. |
| Pork | Potatoes, Carrots, Bell Peppers, Onions, Garlic | Mustard greens can add a nice bitterness. |
| Lamb | Carrots, Potatoes, Onions, Turnips, Peas | Mint pairs well with lamb dishes. |
| Chicken | Carrots, Potatoes, Celery, Onions, Peas | Consider adding herbs like thyme for aroma. |
| Turkey | Carrots, Celery, Onions, Potatoes, Green Beans | Add cranberries for a sweet contrast. |
What Is the Best Cut of Meat for Roasting in a Cast Iron Dutch Oven?
The best cut of meat for roasting in a cast iron Dutch oven is often a tougher cut, such as chuck roast or brisket. These cuts contain more connective tissue and fat, which become tender during slow cooking methods like braising or roasting.
The USDA provides guidelines on meat cuts, explaining that tougher cuts benefit from slow cooking techniques, promoting flavor and tenderness. According to the USDA, “the key to tender meat is to cook it slowly over low heat, allowing the connective tissues to break down.”
Tough cuts of meat have a rich flavor due to their fat content. They are ideal for searing, followed by slow roasting, allowing flavors to meld. The cast iron Dutch oven retains heat well, ensuring even cooking.
The Culinary Institute of America states that cuts like pork shoulder or lamb shank are also excellent for Dutch oven roasting. These meats absorb seasonings effectively and become flavorful when cooked slowly.
Factors such as cooking time and temperature influence the quality of the final dish. Using a low temperature allows collagen in the meat to convert into gelatin, making the meat tender.
According to the National Agricultural Statistics Service, around 5.5 billion pounds of beef were consumed in the U.S. in 2020, showcasing the popularity of these cuts among consumers.
Cooking tougher cuts can improve the overall dining experience because they offer deeper flavors. They are often more affordable than tender cuts, making them accessible.
Health impacts include the nutritional benefits of consuming high-protein, low-fat options when trimmed properly.
Socioeconomic factors include the affordability of these cuts, contributing positively to household budgets for families.
Recommended practices involve marinating and seasoning beforehand, using a proper combination of herbs and spices. Experts suggest resting the meat after cooking to enhance juiciness.
Techniques such as sous-vide cooking or pressure cooking can also help tenderize such cuts before finishing them in the Dutch oven. These methods focus on preserving moisture while enhancing flavors.
How Does the Size of the Roast Affect Cooking Time?
The size of the roast significantly affects cooking time. A larger roast requires more time to cook than a smaller one. The heat must penetrate the meat to reach the center. For example, a 3-pound roast cooks faster than a 6-pound roast.
Cooking times are typically calculated per pound. A general rule is about 20 minutes per pound for a roast at 350 degrees Fahrenheit. For a larger roast, you need to account for increased mass and density. This ensures the inner parts reach safe temperatures.
Thicker roasts take longer to cook evenly. They often require lower temperatures for longer times to avoid burning the outside. Smaller roasts cook quicker and may need less monitoring.
Ultimately, size directly correlates to cooking time. A careful assessment of weight and thickness helps in planning meal times accurately.
Which Seasonings Compliment Roasted Meats in a Dutch Oven?
The seasonings that complement roasted meats in a Dutch oven include herbs, spices, and flavor enhancers.
- Herbs (e.g., rosemary, thyme, oregano)
- Spices (e.g., paprika, cumin, black pepper)
- Flavor enhancers (e.g., garlic, onion, mustard)
- Marinades (e.g., vinegar-based, citrus-based)
- Salt and pepper for seasoning
Seasonings that complement roasted meats can vary depending on individual preferences and regional cuisines.
-
Herbs: Herbs are aromatic plants used to enhance flavors. Rosemary is a common herb that adds a pine-like flavor to meats. Thyme contributes a subtle earthiness, while oregano adds warmth. A study by the Journal of Food Science (2013) suggests that fresh herbs can enhance the sensory qualities of roasted meats.
-
Spices: Spices are dried seeds, fruits, roots, or bark used for flavoring. Paprika provides a mild sweetness and vibrant color to dishes. Cumin adds a nutty, warm flavor that pairs well with various meats. Black pepper is a basic yet essential spice that amplifies overall flavor. According to research published in the Journal of Culinary Science & Technology (2017), spices can also help reduce the need for added fats and oils.
-
Flavor Enhancers: Flavor enhancers include ingredients that can intensify the natural flavors of meats. Garlic offers a robust flavor that complements almost any roast, while onion provides sweetness and depth. Mustard can introduce a tangy kick to marinades. A 2016 study in the Journal of Agricultural and Food Chemistry highlights the ability of garlic to enhance the savory notes in meat dishes.
-
Marinades: Marinades are mixtures used to soak meats before cooking. Vinegar-based marinades provide acidity, which tenderizes meats while adding flavor. Citrus-based marinades introduce brightness and freshness. The Journal of Food Protection (2014) indicates that marinating meat before roasting can enhance its juiciness and flavor profile.
-
Salt and Pepper: Salt and pepper are fundamental seasonings used to enhance flavor. Salt increases the overall taste of the dish by drawing out moisture and amplifying other flavors. Freshly cracked black pepper adds a subtle heat and complexity. The American Institute of Food Safety emphasizes the importance of seasoning for elevating simplicity in meat preparations.
What Is the Best Cut of Meat for Cooking Steaks in a Cast Iron Dutch Oven?
The best cut of meat for cooking steaks in a cast iron Dutch oven is often considered to be ribeye. Ribeye is known for its marbling, tenderness, and rich flavor, making it an ideal choice for searing and slow cooking.
According to the American Cattlemen’s Association, ribeye steaks come from the rib section of the animal and are prized for their juicy texture and beefy taste. This cut contains intramuscular fat, which enhances the flavor during cooking.
Ribeye steaks benefit from high cooking temperatures, which develop a flavorful crust. A cast iron Dutch oven retains heat evenly, allowing for ideal searing and braising. Other good options include sirloin and tenderloin, though these cuts may lack the same flavor intensity as ribeye.
The USDA suggests that when cooked properly, ribeye steaks contain about 25 grams of protein and are a source of essential nutrients like iron and vitamin B12. The popularity of ribeye steaks has increased due to consumer preferences for flavor-driven cuts.
Choosing cuts like ribeye affects livestock farming and the beef industry. Demand for premium cuts influences pricing and supply chains, particularly as consumers seek quality meats.
Ribeye can have significant health implications. While it provides protein, it is also higher in saturated fat, impacting cardiovascular health. Balancing consumption with leaner protein sources is advisable.
Practices like sourcing sustainable beef and supporting local farms can mitigate negative impacts. Online platforms and farmers’ markets provide avenues for consumers to purchase ethically sourced meats.
Utilizing cooking techniques like roasting or grilling can enhance the healthfulness of steak dishes, according to culinary experts. Cooking methods that incorporate vegetables and whole grains can lead to more balanced meals.
How Should I Prepare Steaks for Cooking in a Dutch Oven?
To prepare steaks for cooking in a Dutch oven, start by choosing the right cut of meat. Common choices include ribeye, sirloin, and tenderloin. These cuts are preferred for their tenderness and flavor. Season the steaks with salt and pepper at least 30 minutes before cooking. This allows the salt to penetrate the meat, enhancing flavor and juiciness.
Next, sear the steaks in the Dutch oven over medium-high heat. Use a small amount of oil, such as vegetable or canola oil, to prevent sticking. Sear each side for about 3-4 minutes until a brown crust forms. This step locks in juices and adds rich flavor.
After searing, add aromatics like garlic, onions, or herbs for additional flavor. For example, adding fresh thyme or rosemary complements the beef well. If applicable, deglaze the pot using a splash of red wine or broth, scraping the bottom to release flavorful brown bits.
Consider the cooking method. You can braise the steaks with liquid to keep them tender. Add around one cup of broth or wine and cover the Dutch oven. Let it cook on low heat for about 1-2 hours, or until tender. The internal temperature should reach 145°F (62.8°C) for medium-rare doneness.
It is important to let the steaks rest for a few minutes after cooking. This allows the juices to redistribute, making the meat more flavorful and moist. Factors such as the thickness of the steak and personal preference for doneness may influence cooking times. Thicker cuts require longer cooking times.
Lastly, ensure the Dutch oven is suitable for stove-top and oven use. Some materials may not withstand high temperatures, which could affect cooking results.
When preparing steaks in a Dutch oven, remember the key steps: choosing the right cut, seasoning, searing, adding aromatics, selecting a cooking method, and allowing for resting time. These factors contribute significantly to the final taste and texture of the steak.
What Doneness Levels Should I Aim for When Cooking Steaks?
The doneness levels to aim for when cooking steaks include rare, medium rare, medium, medium well, and well done.
- Rare
- Medium Rare
- Medium
- Medium Well
- Well Done
Different people prefer different doneness levels based on personal taste and health considerations. Some chefs argue for medium rare as the ideal for flavor and tenderness. Conversely, others prefer well-done steaks for safety reasons, particularly when cooking for children or those with weakened immune systems.
The following sections provide detailed explanations for each doneness level.
-
Rare:
Rare steak is cooked to an internal temperature of approximately 125°F (52°C). This results in a deep red center that is warm but not fully cooked. Many steak enthusiasts prefer rare because it retains maximum juiciness and tenderness. The texture remains soft, and the flavor is rich. The National Cattlemen’s Beef Association highlights that cooking below 130°F can lead to food safety risks. Despite this, some chefs favor rare for its gourmet appeal. -
Medium Rare:
Medium rare steak has an internal temperature of about 135°F (57°C). This doneness level is widely regarded as the sweet spot for flavor and juiciness. The center is pink and hot, providing a balance of tenderness while retaining moisture. Many culinary experts recommend medium rare as the optimal doneness for high-quality cuts. According to a survey by the American Meat Institute, 60% of steak lovers prefer this level for its rich flavor and texture. -
Medium:
Medium steak is cooked to around 145°F (63°C). It features a warm pink center and more firmness compared to medium rare. The meat becomes less juicy, but it still retains flavor. This level appeals to those who enjoy steak but want a slightly less pink interior. The USDA advises this doneness for safety, especially in certain cooked products. Many home cooks choose medium as a compromise between taste and doneness. -
Medium Well:
Medium well steak reaches an internal temperature of about 150°F (66°C). It has only a slight pink hue in the center and delivers a firmer texture. Some diners consider medium well a safer option, though it may sacrifice some juiciness and flavor. Many chefs avoid this doneness for premium cuts as it can detract from the natural flavors. Despite this, it remains popular among those who dislike the sight of pink in their meat. -
Well Done:
Well done steak is cooked to an internal temperature of 160°F (71°C) or higher. This steak is completely brown throughout, with little to no moisture left. While some consumers prefer well done, it can lead to a tougher texture and less flavorful meat. Cindy Hudson, a culinary expert, notes that cooking steak well done often masks the inherent flavor of high-quality cuts. For some, the higher internal temperature is a requirement for safety, especially when serving to vulnerable populations.
How Do Cooking Techniques Impact the Flavor of Meat in a Cast Iron Dutch Oven?
Cooking techniques significantly impact the flavor of meat in a cast iron Dutch oven by influencing how ingredients interact, how flavors develop, and how moisture is retained during cooking.
-
Searing: Searing meat in a hot Dutch oven creates a Maillard reaction. This reaction occurs when proteins and sugars in the meat react to heat, forming a rich crust and enhancing flavors. Research by Corsaro and Mancini (2015) indicates that searing increases the meat’s savory profile through flavor compounds.
-
Braising: Braising involves cooking meat slowly in a bit of liquid. The low and slow cooking method allows collagen in the meat to break down, making it tender and flavorful. A study in the Journal of Culinary Science & Technology notes that this method enriches the meat with the flavors of the braising liquid and aromatics used in the process (Hawkes, 2019).
-
Moisture retention: The heavy cast iron construction retains heat well. This feature allows meats to cook evenly and retain moisture, which prevents drying. It enhances flavor as the meat stews in its juices and any added seasonings, deepening the overall taste experience.
-
Flavor infusion: Cooking with herbs and spices in a Dutch oven allows for better flavor integration. The closed environment traps steam and aromas, helping to infuse the meat with herbal and spice notes. According to a study by McCarthy et al. (2021), the containment of aromas significantly enhances flavor profiles.
-
Temperature control: A Dutch oven’s ability to maintain steady temperatures makes it ideal for consistent cooking. This reliability enables precise control over doneness, which directly affects flavor. According to research in the International Journal of Gastronomy and Food Science, proper temperature control ensures the breakdown of connective tissues, optimizing flavor and tenderness (Smith, 2020).
These cooking techniques collectively elevate the flavor and texture of meats prepared in cast iron Dutch ovens, creating a more enjoyable and flavorful dish.
What Cooking Methods Work Best with Different Cuts of Meat?
Different cooking methods suit various cuts of meat. Tender cuts, like filet mignon, respond well to quick, dry heat methods, while tougher cuts, like brisket, require moist cooking methods for best results.
-
Tender Cuts:
– Grilling
– Searing
– Broiling -
Medium Cuts:
– Roasting
– Sautéing
– Braising -
Tough Cuts:
– Stewing
– Slow cooking
– Braising
Understanding these methods will help you choose the best cooking technique for your specific meat cuts.
-
Tender Cuts:
Tender cuts of meat, such as filet mignon and ribeye, thrive under high-temperature cooking methods like grilling and broiling. These cuts are typically well-marbled, which contributes to their tenderness and flavor. When cooked quickly over high heat, they retain their juiciness. For instance, marinating a tender cut prior to grilling can enhance its flavor profile. A 2017 study from the Meat Science journal indicated that cooking tender cuts at high temperatures maximizes flavor by promoting the Maillard reaction, which creates a desirable crust. -
Medium Cuts:
Medium cuts, like sirloin or pork loin, benefit from methods such as roasting or sautéing. These cuts have some connective tissue, which can make them a bit tougher than tender cuts. Roasting in the oven at moderate temperatures helps to evenly cook the meat while preserving moisture. Sautéing in a pan at medium heat also works well, allowing for caramelization on the surface. A culinary guide published by the Culinary Institute of America recommends a sear followed by oven roasting for optimal results in medium cuts, enhancing both texture and flavor. -
Tough Cuts:
Tough cuts, including brisket and chuck roast, require moist cooking methods like stewing or slow cooking to break down the collagen in the meat. This process tenderizes the meat and infuses flavor. Slow cooking in a Dutch oven can result in a satisfying meal, with the low and slow heat allowing the meat to become tender over several hours. According to a 2018 study by the Journal of Food Science, using moist heat can reduce the chewiness of tough cuts significantly. The process of braising, which involves cooking meat slowly in a covered pot with liquid, is particularly effective for these cuts, leading to a rich and flavorful dish.
What Tips Can Enhance the Flavor of Meat Cooked in a Cast Iron Dutch Oven?
To enhance the flavor of meat cooked in a cast iron Dutch oven, consider these tips.
- Use marinating to infuse flavor.
- Sear the meat before cooking it.
- Add aromatics such as onions, garlic, and herbs.
- Incorporate acidic ingredients like tomatoes or vinegar.
- Adjust cooking temperature and time for tenderness.
- Use broth or stock instead of water for added richness.
- Let the meat rest before serving.
These strategies not only improve flavor but also contribute to the overall texture and presentation of the dish. Different chefs may emphasize certain techniques over others, leading to various interpretations of meat preparation in a Dutch oven.
-
Marinating the Meat:
Marinating the meat enhances its flavor through a combination of acids, oils, and seasonings. A marinade typically contains an acidic component, such as vinegar or citrus juice, which helps break down the meat fibers and tenderizes the protein. This process allows for deeper flavor penetration. According to the USDA, marinating meat for at least 30 minutes can significantly improve flavor profiles. -
Searing the Meat:
Searing the meat before cooking creates a Maillard reaction, which develops complex flavors and a beautiful crust. The high heat of the Dutch oven allows for effective browning. This step can enhance flavor significantly before the slow cooking process begins. Chef Thomas Keller, in his cookbooks, emphasizes the importance of this technique, stating it adds a rich caramelized taste. -
Adding Aromatics:
Aromatics, such as onions, garlic, and herbs, build layers of flavor during the cooking process. When sautéed, these ingredients release their essential oils, adding depth to the dish. Research shows that including various aromatics can elevate the sensory experience of the meal. For example, finely chopped fresh herbs add brightness, while sautéed onions contribute sweetness. -
Incorporating Acidic Ingredients:
Adding acidic ingredients like tomatoes or vinegar can illuminate the flavors during cooking. Acids counterbalance rich flavors, creating a more balanced dish. Studies in culinary science suggest that the presence of acid enhances taste perception. For instance, using a tomato-based sauce can enrich the overall profile of hearty stews or braised meats. -
Adjusting Cooking Temperature and Time:
Slow cooking at lower temperatures allows flavors to develop over time, and adjusting these will make the meat tender. Different cuts of meat require different cooking times for optimal texture. The USDA recommends cooking tougher cuts like chuck or brisket slowly over low heat for best results. For example, a beef stew benefits from a long simmer to breakdown collagen. -
Using Broth or Stock:
Utilizing broth or stock rather than water adds a layer of richness and depth to the flavor. These liquids carry additional elements such as herbs and spices. According to culinary experts, the type of broth can significantly influence the final dish. For instance, beef stock can amplify the savory profile in a beef stew. -
Letting the Meat Rest:
Allowing the meat to rest before serving retains moisture and improves texture. Resting lets juices redistribute throughout the meat, resulting in a more succulent final product. The American Meat Science Association emphasizes that resting meat is crucial for quality, as it can enhance flavor through improved moisture retention. For example, a roast will be juicier and more flavorful after a 10-15 minute resting period.
Are There Unique Techniques for Searing Meat Before Stewing?
Yes, there are unique techniques for searing meat before stewing. Searing involves cooking the meat at a high temperature to develop a brown crust. This step enhances the flavor and creates a richer, more complex dish.
Searing can be done using two main techniques: dry searing in a hot pan and wet searing in a marinade or broth. Dry searing utilizes oil in a heated skillet, allowing the Maillard reaction to occur. This reaction produces a savory flavor and attractive color. Wet searing, on the other hand, incorporates moisture, which can add additional flavor but may result in a less crispy exterior. Each method has its merits, but dry searing typically achieves a more intense flavor profile.
The benefits of searing before stewing are notable. Research indicates that searing enhances the overall flavor of the meat, leading to a more satisfying dish. According to the Culinary Institute of America, meat that is properly seared can retain more juices, resulting in tender, flavorful bites. Additionally, the caramelization produced during searing contributes to a deeper flavor, enriching the final meal.
However, there are drawbacks to consider. Searing can sometimes result in uneven cooking if the meat is not prepared correctly. If the heat is not adequately controlled, parts of the meat may burn while other sections remain undercooked. Experts like chef Thomas Keller warn that overcooking or burning the exterior can introduce undesirable flavors. It is essential to monitor cooking times closely and adjust heat as needed.
For optimal results, consider the following recommendations: Use a heavy-bottomed pan to maintain even heat distribution. Preheat the pan before adding meat to achieve a good sear. Pat the meat dry to remove excess moisture, which can prevent browning. Additionally, choose cuts of meat with a good ratio of fat, such as chuck or brisket, as they will enhance flavor during the stewing process.
Related Post: