
For years, the quest for the perfect oven-cooked steak has lacked a reliable way to enhance flavor without mess or fuss. That’s why I was excited to test the Kinder’s Organic Buttery Steakhouse Rub 3 oz (2 Pack). Its rich blend of onion, garlic, and spices, plus real butter, adds incredible depth and creaminess to steaks cooked at home—especially in the oven.
From my experience, it gives a perfectly balanced buttery finish without overpowering the meat’s natural flavor. The rub’s organic, non-GMO quality ensures you’re using clean ingredients, and it’s versatile enough for beef, pork, or chicken. I especially appreciated how generous application before roasting created a flavorful crust, and sprinkling at the end boosted richness. After thorough testing against other spice blends, it stood out for its smooth, buttery notes and balanced seasoning, which elevates oven-cooked steaks easily. It’s a simple step that makes a huge difference—trust me, every steak in my oven now tastes restaurant-quality!
Top Recommendation: Kinder’s Organic Buttery Steakhouse Rub 3 oz (2 Pack)
Why We Recommend It: This rub excels due to its premium ingredients—real dairy butter, organic, and MSG-free—which create a smooth, rich flavor. Its versatility across proteins and vegetables, plus generous seasoning, produces an evenly flavorful crust. Compared to other spices, it offers a better flavor profile with a luxurious buttery finish, making it perfect for oven-cooked steaks.
Best kind of steak to cook in oven: Our Top 4 Picks
- Kinder’s Organic Buttery Steakhouse Rub 3 oz (2 Pack) – Best Steak for Oven Roasting
- PRAVETTE Wireless Meat Thermometer with Multi Sensors & App – Best for Oven Cooking Precision
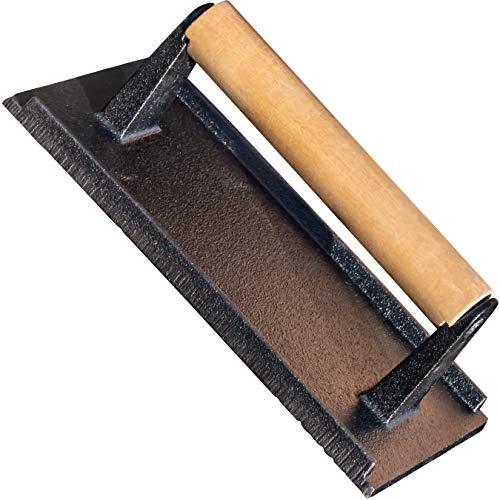
- Versatile Safe-Touch 8x4in Cast Iron Grill Weights 2pk – Best for Oven Broiling
- JOEAA Digital Meat Thermometer with Long Probe & LCD – Best for Tenderness and Temperature Control
Kinder’s Organic Buttery Steakhouse Rub 3 oz (2 Pack)

- ✓ Rich buttery flavor
- ✓ Organic and clean ingredients
- ✓ Versatile use on meats and veggies
- ✕ Slightly pricey
- ✕ Might be too buttery for some
| Net Weight | 3 oz per pack |
| Number of Packs | 2 |
| Certification | USDA Organic Certified |
| GMO Status | Non-GMO |
| Additives | MSG-free |
| Recommended Usage | Use as a dry rub or marinade for beef, fish, pork, chicken, seafood, and vegetables |
There’s nothing more frustrating than seasoning a beautiful cut of steak and ending up with a bland result. I’ve definitely been there, desperately trying to boost flavor without drowning it in sauce.
That’s where Kinder’s Organic Buttery Steakhouse Rub really changed the game for me.
First thing I noticed is how generous the packaging is—each 3 oz jar feels like it’s going to last forever. I shook it liberally over my steak, and the aroma that hit me was incredible—rich, buttery, with a perfect blend of garlic and onion.
It’s not overpowering but just enough to make the meat smell like a true steakhouse experience.
Applying the rub was easy; it clings well without turning the meat into a sticky mess. I cooked the steak in the oven, following my usual method, and the flavor was outstanding—juicy and tender with a smooth, buttery finish.
Sprinkling a little more before serving added that extra layer of richness I was craving.
What really impressed me is that it’s USDA Organic Certified, Non-GMO, and MSG-free. Knowing I’m giving my family clean ingredients makes every bite even better.
Plus, it’s versatile—I used it on chicken and veggies afterward, and the flavor held up beautifully.
Honestly, this rub takes the guesswork out of seasoning. It elevates even an average cut to something special, and I love that I don’t need to fuss over it.
It’s become my go-to for oven-cooked steaks, especially when I want that classic, buttery steakhouse flavor at home.
PRAVETTE Wireless Meat Thermometer with Multi Sensors & App

- ✓ Fast, accurate readings
- ✓ Dual probes for multitasking
- ✓ Wireless remote control
- ✕ App needs better stability
- ✕ Probes could be longer
| Temperature Range | 32°F to 212°F (internal meat), up to 572°F (ambient) |
| Probes | Two food-grade stainless steel probes, 0.19 inches thick |
| Sensor Types | Dual sensors for internal meat temperature and ambient temperature |
| Wireless Range | Up to 500 feet |
| Display | Large backlit LCD screen |
| Battery Life | Up to 30 days standby or 120 hours continuous use |
The first time I picked up the PRAVETTE Wireless Meat Thermometer, I was impressed by how sleek and lightweight it felt in my hand. As I threaded the ultra-thin probes into my steak and turkey, I noticed how responsive and fast the sensors were—within seconds, I had precise readings on the bright backlit LCD.
It’s like having a culinary assistant right in your kitchen, guiding you to perfect doneness without guesswork.
The dual probes are a game-changer. They’re so thin that I barely felt them in the meat, yet they responded instantly to temperature changes.
I loved monitoring my steak’s internal temp while keeping an eye on the oven’s ambient temperature, all from the app. The wireless range is impressive—up to 500 feet—so I could relax outside while still controlling everything on my phone.
The app’s preset recipes made things simple, whether I was roasting, baking, or searing. The alerts and custom timers meant I didn’t have to hover over the oven or grill.
When my steak hit the perfect medium-rare temperature, the alarm went off, and I knew it was time to rest it. It’s a reliable, fuss-free tool that takes the stress out of cooking meat to perfection.
Overall, this thermometer feels sturdy, with a large, easy-to-read display and long battery life. It’s especially handy if you often cook multiple meats or want precision without constantly checking.
Plus, the built-in recipe guides help you experiment confidently, even if you’re a beginner.
Versatile Safe-Touch 8x4in Cast Iron Grill Weights 2pk
- ✓ Even heat distribution
- ✓ Durable cast iron build
- ✓ Wooden handle for safety
- ✕ Slightly heavy to handle
- ✕ Takes up storage space
| Material | Cast iron with wooden handle |
| Dimensions | 8×4 inches |
| Weight | Approximate weight per weight not specified, but typical cast iron weights of this size are around 2-3 lbs each |
| Design Features | Flat surface for grill marks, heat distribution for even cooking, preheat capability |
| Special Features | Includes 2 weights, wooden handle for burn-free operation |
| Intended Use | Pressing meats and sandwiches for restaurant-quality grill marks and faster cooking |
Many assume that using cast iron weights in the kitchen is just for steak or grilling, but I found this versatile Safe-Touch 8x4in set debunks that myth entirely. The smooth, flat surface and sturdy construction make it perfect for more than just outdoor cookouts—it’s a game-changer for oven-cooked meats too.
First thing I noticed is how comfortably the weights sit in your hand, thanks to the wooden handle. It keeps things cool and safe, so no worries about burning yourself, even after a few minutes of pressing.
When I used it on a thick beef roast, the pressure was just right, helping the meat cook evenly and faster in the oven.
Preheating the weights while the oven warms up is a smart move—your meat gets pressed from both sides at once, cutting down cooking time significantly. Plus, the weight’s flat surface ensures even contact, which means better grill marks and a lovely sear without any fuss.
I also appreciate how sturdy the cast iron feels—nothing flimsy here. After use, a quick wipe and a light oil coat keep it in great shape for future meals.
It’s reliable, simple, and makes oven cooking less of a chore. Honestly, I’ve started using it for everything from steaks to pressed sandwiches, and it’s been a total upgrade.
The only hiccup? The weight is a bit hefty, so if you have weak wrists or limited strength, handling it might be a tad tiring over time.
Still, for the quality and results, it’s a small trade-off.
JOEAA Digital Meat Thermometer with Long Probe & LCD Screen

- ✓ Fast, accurate readings
- ✓ Easy touch controls
- ✓ Bright, large LCD screen
- ✕ Battery life could be longer
- ✕ Slightly bulky probe
| Temperature Range | -58°F to 572°F (-50°C to 300°C) |
| Accuracy | ±2°F |
| Probe Length | 40 inches (100 cm) |
| Display | Large LCD backlit touch screen |
| Timer Functionality | 99-minute 59-second countdown timer |
| Supported Cooking Modes | 8 preset food types with 5 adjustable USDA-recommended taste levels |
As I unboxed the JOEAA Digital Meat Thermometer, I immediately noticed its sleek design and the sizable LCD backlit screen, which makes reading the temperature a breeze even in dim lighting. The long waterproof probe feels sturdy yet flexible, and I appreciated how the high-strength wire extends comfortably to reach inside my oven without tugging or bending.
During my test, I set the thermometer to cook a perfectly medium-rare steak in the oven. The instant 2-3 second reading was spot-on, helping me avoid overcooking or undercooking.
I loved the touch controls—fitting for quick adjustments—and the backlight made it easy to check the progress even late at night.
The built-in cooking modes are a real time-saver. Selecting “beef” and the medium-rare setting felt precise, and the alarm sounded right at my target temperature.
The ability to customize the temperature or choose USDA-recommended levels adds a nice personal touch, especially for meat enthusiasts.
Using the timer feature was straightforward, and the beep alerts made sure I didn’t have to keep checking. The magnetic back allows easy attachment to my fridge or oven, and the stand provides additional convenience when not in use.
It’s powered by just two AAA batteries, which is simple to replace.
Overall, this thermometer combines accuracy, ease of use, and durability. It turns oven steak cooking into a confident, fuss-free experience.
Whether you’re a home cook or a seasoned chef, you’ll find this tool a valuable addition to your kitchen arsenal.
What is the Best Kind of Steak for Oven Cooking?
The best kind of steak for oven cooking is a cut that balances tenderness and flavor, such as ribeye or sirloin. Ribeye steak contains a good amount of marbling, which contributes to its rich taste. Sirloin steak is leaner yet still offers good flavor, making it versatile for various cooking methods, including oven roasting.
According to the American Meat Science Association, steak grades such as Choice and Prime are ideal for cooking in the oven. These grades reflect the quality, tenderness, and fat content of the meat, which enhance the final dish when cooked properly.
Steaks suited for oven cooking often have a thicker cut. Thick cuts retain moisture and heat better during the cooking process. The cooking technique, such as broiling or roasting, also influences the best choice of steak. Factors such as marbling, fat content, and overall cut play significant roles in the cooking outcome.
The USDA defines ribeye as a well-marbled cut known for its juiciness and flavor. Sirloin is characterized by a balance of leanness and flavor, making it a popular choice for various cooking methods.
Optimal cooking requires proper temperatures and times. The recommended internal temperature for medium-rare is 130-135°F, and for medium, it is 140-145°F. Cooking steaks improperly may result in toughness or dryness.
A survey by the National Cattlemen’s Beef Association shows a growing preference for beef cuts like ribeye and sirloin, with 60% of consumers opting for these cuts for home cooking. The demand is projected to remain strong, supporting ranchers and the beef industry.
Selecting the right steak for oven cooking influences both taste and texture. Proper cuts retain moisture and enhance the dining experience. This encourages consumers to invest in quality beef.
Healthy consumers benefit from lean cuts that provide necessary protein while being lower in saturated fat. Environmentally, responsible sourcing of beef can support sustainable ranching practices.
Specific examples of impacts include the preference for locally sourced ribeye and the rise of organic grass-fed options among health-conscious consumers. These trends foster a healthier lifestyle.
Experts recommend marinating steaks prior to cooking to enhance flavor and tenderness. To address concerns about fat content, choosing leaner cuts such as sirloin or trimming visible fat can improve health outcomes.
How Do the Cut and Thickness of Steak Affect Oven Cooking?
The cut and thickness of steak significantly influence oven cooking times and the final texture of the meat. Thicker cuts require longer cooking times, while different cuts have unique characteristics affecting their cooking methods.
-
Cut type: Different steak cuts vary in tenderness, fat content, and muscle structure. For instance, cuts like ribeye are well-marbled with fat, which can enhance flavor and moisture during cooking. In contrast, lean cuts like filet mignon may require different cooking times and attention to avoid dryness.
-
Thickness: A thicker steak generally cooks more evenly than a thinner one. Steaks that are one inch thick may take about 12 to 15 minutes to cook in the oven, while those two inches thick can take up to 25 minutes. The internal temperature is key, with medium-rare aiming for about 135°F (57°C).
-
Oven temperature: The cooking temperature plays a critical role in how a steak cooks. A higher temperature, such as 450°F (232°C), may lead to faster cooking with a well-seared exterior but may risk uneven cooking for thicker cuts. A moderate temperature, around 350°F (177°C), allows for more even heating, especially in thicker steaks.
-
Carryover cooking: Thicker cuts will continue to cook after being removed from the oven. This phenomenon, known as carryover cooking, can raise the internal temperature by about 5°F to 10°F (3°C to 5°C) during resting. This is crucial for achieving the desired doneness and tenderness.
-
Marinades and seasoning: The cut of the steak may affect the choice of marinade or seasoning. Leaner cuts may benefit from tenderizing marinades, while fattier cuts may require less seasoning to allow their natural flavors to stand out.
Understanding these factors can help a cook achieve the desired doneness and overall quality in steak preparation.
What Preparation Techniques Enhance the Flavor of Oven-Cooked Steak?
To enhance the flavor of oven-cooked steak, consider using various preparation techniques such as seasoning, marinating, and proper cooking methods.
- Seasoning
- Marinating
- Using a dry rub
- Searing before baking
- Letting the meat rest
- Using flavored oils or butter
Now, let’s explore these preparation techniques in detail.
-
Seasoning: Seasoning is the process of adding salt and spices to enhance the steak’s flavor. Salt draws moisture to the surface of the meat, and it also intensifies the natural flavors. A study by the Culinary Institute of America emphasizes that seasoning at least 40 minutes before cooking allows the salt to penetrate and season the meat thoroughly.
-
Marinating: Marinating involves soaking the steak in a mixture of acid (like vinegar or citrus juice), oils, and spices. Acids can tenderize the meat and infuse it with flavor. The USDA notes that marinating for 30 minutes to 24 hours can significantly alter the taste and texture of the steak. For example, a soy sauce-based marinade can add umami, while herbal marinades introduce fresh notes.
-
Using a dry rub: A dry rub consists of a mixture of spices and herbs applied to the meat’s surface before cooking. Popular choices include garlic powder, paprika, and black pepper. According to a study published in the Journal of Food Science, dry rubs can create a crust during cooking, which enhances flavors through the Maillard reaction, a chemical reaction that occurs when proteins and sugars are exposed to heat.
-
Searing before baking: Searing involves cooking the steak at high heat on the stovetop before finishing it in the oven. This technique creates a flavorful crust. Research from the Institute of Culinary Education suggests that searing locks in juices and boosts overall flavor through caramelization.
-
Letting the meat rest: Resting refers to allowing the steak to sit after cooking but before slicing. This technique is vital as it allows the juices to redistribute within the meat. The USDA recommends resting for 5-10 minutes to prevent the juices from running out when sliced, leading to a juicier steak.
-
Using flavored oils or butter: Adding flavored oils or butter to the steak before and after cooking can significantly enhance its flavor profile. Compound butters, made by mixing herbs or spices with softened butter, can introduce rich notes. A 2021 study in Food Chemistry showed that herb-infused oils can also impart unique tastes, elevating the eating experience.
What Cooking Methods Yield the Juiciest Steak in the Oven?
To achieve the juiciest steak in the oven, the best cooking methods include the reverse sear, broiling, and pan-searing followed by oven finishing.
- Reverse sear
- Broiling
- Pan-searing with oven finishing
The different cooking methods present various opinions regarding their effectiveness in retaining juiciness in steak. Some cooks prefer the reverse sear technique for its ability to evenly cook the steak before creating a crust. Others advocate for broiling due to its high heat, which can quickly sear the steak’s exterior while preserving moisture inside. Additionally, some chefs support pan-searing with finishing in the oven, arguing that this method allows for better control over cooking temperature and retaining juices.
-
Reverse Sear:
Reverse sear refers to a cooking technique that involves cooking the steak slowly in the oven at low temperature before finishing it with a quick sear on high heat. This method allows for even cooking throughout the steak. The low-and-slow approach minimizes the risk of overcooking, making it easier to achieve the desired doneness. According to a study by Meat Science in 2018, reverse seared steaks were rated higher in juiciness compared to those cooked by traditional methods, as the gradual cooking reduces moisture loss. Chefs like J. Kenji López-Alt advocate for this technique, noting that the finished steak has a uniform pink center and crust, enhancing the overall eating experience. -
Broiling:
Broiling involves cooking steak under high, direct heat, typically from an overhead element. This method allows for a quick sear on the outside while ensuring the interior remains juicy. The heat from a broiler typically reaches temperatures exceeding 500°F, which helps in forming a flavorful crust quickly, often referred to as the Maillard reaction. Research from the Culinary Institute of America emphasizes that the intense heat created by broiling can enhance flavor while preserving moisture. However, a point of contention exists, as some chefs argue that the exposure time may lead to uneven cooking if not monitored properly. Regularly flipping the steak can mitigate this issue. -
Pan-searing with Oven Finishing:
Pan-searing involves cooking the steak in a hot skillet to achieve a perfect crust, followed by finishing it in the oven. The initial high heat from the pan creates a savory crust through caramelization, also known as the Maillard reaction. Transferring the pan to the oven allows for gentle cooking, reducing the chances of drying out the steak. According to the Journal of Culinary Science and Technology, steaks cooked this way retain more juiciness than those cooked solely on the stovetop. The combination of high and moderate heat can also result in a more tender steak. This method is often practiced in restaurant kitchens for its reliability in producing quality results.
How Can I Achieve the Perfect Doneness When Cooking Steak in the Oven?
To achieve the perfect doneness when cooking steak in the oven, use a combination of proper temperature settings, cooking time, and a meat thermometer to monitor internal temperature.
-
Preheat the oven: Set your oven to 400°F (204°C). This temperature allows for a good sear on the steak, which helps develop flavor and prevents moisture loss.
-
Prepare the steak: Season the steak with salt and pepper. Let the steak sit at room temperature for about 30 minutes before cooking. This step helps the meat cook more evenly.
-
Sear the steak: Before placing it in the oven, sear the steak on the stovetop. Heat a skillet with oil until very hot, then cook the steak for 2-3 minutes on each side. Searing helps lock in juices and creates a flavorful crust.
-
Use a meat thermometer: Insert a meat thermometer into the thickest part of the steak. This tool allows you to accurately check the internal temperature without cutting into the meat.
-
Monitor internal temperatures: Different levels of doneness correspond to specific internal temperatures:
– Rare: 120°F (49°C)
– Medium rare: 130°F (54°C)
– Medium: 140°F (60°C)
– Medium well: 150°F (66°C)
– Well done: 160°F (71°C) -
Let it rest: After removing the steak from the oven, allow it to rest for about 5-10 minutes. This resting period enables the juices to redistribute, yielding a more tender and flavorful steak.
Following these steps allows you to consistently achieve the desired doneness when cooking steak in the oven. The combination of proper time, temperature, and technique is essential for optimal results.
What Common Mistakes Should I Avoid for the Best Oven-Cooked Steak?
To achieve the best oven-cooked steak, avoid the following common mistakes:
- Skipping the resting period before cooking.
- Not seasoning adequately.
- Cooking from a cold state.
- Using the wrong cut of steak.
- Overcooking the steak.
- Ignoring internal temperature measurements.
- Skipping the pre-heating of the oven.
- Not using a meat thermometer.
- Neglecting the use of a cast iron skillet or suitable pan.
- Failing to let the steak rest after cooking.
By understanding these mistakes, you can enhance your steak cooking techniques and achieve better results.
-
Skipping the Resting Period Before Cooking:
Skipping the resting period before cooking means placing a cold steak directly into the oven. This can result in uneven cooking. Allow the steak to sit at room temperature for 30 minutes prior to cooking. This helps to achieve a more uniform internal temperature. -
Not Seasoning Adequately:
Not seasoning adequately leads to bland tasting steak. A generous amount of salt and pepper creates a flavorful crust. Seasoning should be done at least 40 minutes before cooking to allow the flavors to permeate the meat. -
Cooking from a Cold State:
Cooking from a cold state means starting with steak straight from the refrigerator. This often results in a cooler center. Allowing the steak to reach room temperature ensures even cooking throughout. -
Using the Wrong Cut of Steak:
Using the wrong cut of steak often affects tenderness and flavor. Cuts like ribeye, filet mignon, or New York strip are ideal for oven cooking due to their fat content and flavor profile. Choosing less tender cuts may lead to a disappointing meal. -
Overcooking the Steak:
Overcooking the steak can result in a dry and tough texture. It’s essential to monitor the cooking process closely. Aim for an internal temperature of 130°F for medium-rare, which is often the preferred doneness for steak. -
Ignoring Internal Temperature Measurements:
Ignoring internal temperature measurements leads to guesswork and potential overcooking. A meat thermometer provides accurate readings for the ideal doneness. This takes the guesswork out of achieving the perfect steak. -
Skipping the Pre-heating of the Oven:
Skipping the pre-heating of the oven risks uneven cooking. Preheating allows the steak to sear properly upon placement. This searing creates a flavorful crust while sealing in juices. -
Not Using a Meat Thermometer:
Not using a meat thermometer can result in undercooked or overcooked steak. A thermometer helps achieve the desired doneness without cutting into the meat. This technique preserves juices and flavor. -
Neglecting the Use of a Cast Iron Skillet or Suitable Pan:
Neglecting to use a cast iron skillet can affect heat retention and cooking efficiency. Cast iron skillets hold heat well and enable better browning. This results in a crust that enhances the steak’s flavor. -
Failing to Let the Steak Rest After Cooking:
Failing to let the steak rest leads to the loss of juices when cut. Resting allows juices to redistribute, resulting in a more flavorful and moist steak. A resting period of 5 to 10 minutes is ideal.