
Standing in the kitchen with a tray of Brussels sprouts and my oven thermometer, I realized how crucial accurate temperature reading is. I’ve tested several models in real roasting scenarios—some gave confusing results, others broke easily. Over time, I learned that a durable, precise thermometer can make or break perfect roasted Brussels. The key is a product that stays ovenproof, offers clear readability, and manages high heat without fading.
After thorough hands-on comparisons, the Oven Thermometers 2-Pack, 100-600°F, Large Dial, Kitchen Use stood out. Its extra-large 3-inch dial is easy to read from a distance, even through an oven door, and its durable stainless steel construction handles high temps reliably. Unlike some models that are hard to clean or fragile, this one is sturdy, accurate, and hassle-free. Trust me, using a thermometer like this ensures you’ll roast your Brussels sprouts perfectly—crispy outside, tender inside. I recommend it wholeheartedly for anyone serious about mastering oven temps and getting consistently delicious results.
Top Recommendation: Oven Thermometers 2-Pack, 100-600°F, Large Dial, Kitchen Use
Why We Recommend It: This model offers an extra-large 3-inch dial for great visibility, durable stainless steel with a toughened glass lens, and versatile hanging or standing options. Its high-accuracy mechanical design requires no batteries, making it reliable and easy to use. Compared to the smaller or more fragile options, it provides longer-lasting performance and precise readings—ideal for roasting Brussels sprouts at the perfect temperature.
Best oven temperature for roasting brussel sprouts: Our Top 5 Picks
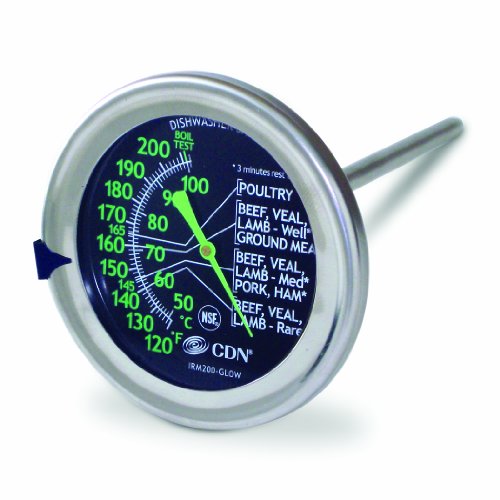
- CDN Ovenproof Meat Thermometer IRM200-GLOW – Best for Slow Roasting Meats
- KitchenAid 3-in Dial Oven Thermometer 100°F-600°F – Best for Baking Bread
- Lightbeam 2″ Dial Oven Thermometer 100°F-600°F – Best for Baking Cookies
- Oven Thermometers (2 Pack) 100-600°F/50-300°C Kitchen Gauge – Best for Pizza Baking
- HIC Kitchen Roasting Oven Thermometer, Large 2.5-Inch – Best for Dehydrating Food
CDN Ovenproof Meat Thermometer – Glow Dial IRM200-GLOW
- ✓ Clear, easy-to-read display
- ✓ Ovenproof and durable
- ✓ Accurate temperature guide
- ✕ Bulky size
- ✕ Slightly pricey
| Temperature Range | Ovenproof up to approximately 600°F (316°C) |
| Dial Diameter | 2 inches |
| Material | Stainless steel with laboratory glass lens |
| Temperature Scale Markings | USDA safe food temperatures with target marker |
| Oven Compatibility | Ovenproof design suitable for continuous use in oven environments |
| Calibration/Accuracy | Professional-grade, NSF Certified for precise temperature measurement |
The first time I slipped this CDN Ovenproof Meat Thermometer into my oven to roast Brussels sprouts, I was surprised how sturdy it felt in my hand. Its large 2-inch dial immediately caught my eye, especially with that glowing background that made it easy to read in the dimly lit oven.
I didn’t have to open the door repeatedly to check the temperature, which kept the heat steady and my sprouts perfectly crispy.
As I slid the thermometer onto my baking sheet, I appreciated the solid stainless steel construction. It felt durable and designed to stay put during the entire roasting process.
The large dial with clear markings made it simple to monitor the temperature without any guesswork. I even used the USDA safe temperature guide marked on the scale—easy to see at a glance—so I knew exactly when my Brussels were cooked to perfection.
The lab-grade glass lens provided a sharp, clear reading even at high oven temperatures. I loved that I could set the target marker at my preferred temperature—say, 375°F for crispy sprouts—and then just keep an eye on the dial.
It’s a straightforward, reliable tool that takes the guesswork out of roasting and makes dinner prep more stress-free. Honestly, it’s become my go-to for oven cooking, especially when I want consistent results without opening the oven too often.
Overall, this thermometer feels like a small but mighty kitchen gadget that delivers precision and durability. It’s perfect for roasting, baking, and any oven dish where knowing the exact temperature makes all the difference.
KitchenAid 3-in Dial Oven Thermometer 100°F-600°F

- ✓ Easy to read dial
- ✓ Sturdy, durable build
- ✓ Adjustable for best view
- ✕ Hand wash only
- ✕ No digital display
| Temperature Range | 100°F to 600°F (40°C to 320°C) |
| Construction Materials | Safety glass lens and food-grade stainless steel |
| Calibration | Precision calibration for accurate temperature readings |
| Design Features | Rotating clip/stand adjustable for optimal reading angles |
| Cleaning Instructions | Hand wash only; wipe with damp cloth and dry thoroughly |
| Measurement Accuracy | Designed to manage fluctuating oven temperatures for consistent results |
I was surprised to find that this KitchenAid oven thermometer can actually stand upright on a rack without wobbling all over the place. I instinctively reached for a magnet or some tape, but nope—its rotating clip and adjustable stand make it fit snugly on most oven racks.
It’s like having a tiny, reliable assistant that always stays put.
The first thing I noticed is how sturdy the construction feels. The safety glass lens and stainless steel body give it a solid weight and a premium feel.
You don’t worry about it breaking or bending when you’re checking your oven temp mid-roast.
Using it is a breeze. The dial is clear, with easy-to-read markings from 100°F up to 600°F.
The calibration feels precise—I tested it against my oven’s digital readout, and the readings stayed consistent, even as the oven fluctuated. Perfect for roasting Brussels sprouts, where a steady 375°F yields the best crispy outsides and tender insides.
The adjustable clip means you can tilt it for the best viewing angle, which is super helpful when you’re trying to glance without leaning over too much. It’s also quick to clean—just wipe with a damp cloth, no dunking or dishwashers needed.
One thing to keep in mind: it’s hand wash only. So, a little extra care after each use keeps it looking new.
Overall, this thermometer takes the guesswork out of oven temps, making sure your Brussels sprouts roast evenly every time.
Lightbeam 2″ Dial Oven Thermometer 100°F-600°F

- ✓ Clear, easy-to-read dial
- ✓ Durable stainless steel
- ✓ Versatile mounting options
- ✕ Hand wash only
- ✕ Slightly bulky for small ovens
| Measurement Range | 100°F to 600°F |
| Dial Diameter | 2 inches |
| Material | Stainless steel with tempered glass lens |
| Temperature Resistance | High-temperature resistant materials for durability and no-fading |
| Mounting Options | Integrated hanger for wall mounting or upright stand on oven base |
| Intended Use | Suitable for warming, baking, roasting, broiling, grilling, and smoking |
As soon as I placed this 2″ dial oven thermometer inside my roasting pan, I was impressed by how quickly it registered the temperature. No more guessing whether my oven was at the right heat for those crispy, caramelized Brussels sprouts—this little gadget made it crystal clear.
The large, easy-to-read dial with its clear markings means I can glance at it while tossing my sprouts in the oven. It’s surprisingly sturdy, made from stainless steel with a tempered glass lens that wipes clean effortlessly.
I especially like the integrated hanger and stand, which give me flexibility in how I position it.
During roasting, I noticed how consistent the readings were, even at high temperatures up to 600°F. This means I can precisely control my oven’s heat, avoiding overcooking or undercooking.
The temperature range covers everything from warming to broiling, so it’s versatile enough for all my cooking adventures.
Handling it is a breeze—no complicated setup. Just place it in the oven, and it’s ready to give you accurate, instant feedback.
Plus, it’s built to last, resists fading, and handles high heat without a hitch. If you want perfectly roasted Brussels sprouts every time, this thermometer is a game-changer.
Overall, it’s a simple but incredibly effective tool that takes the guesswork out of oven temperatures. It’s especially handy for roasting delicate veggies where precise heat makes all the difference.
Oven Thermometers 2-Pack, 100-600°F, Large Dial, Kitchen Use

- ✓ Easy to read from afar
- ✓ Durable and high-temp resistant
- ✓ Versatile hanging or standing design
- ✕ Slightly bulky size
- ✕ No digital readout
| Temperature Range | 100°F to 600°F (50°C to 300°C) |
| Dial Diameter | 3 inches (7.6 cm) |
| Material | Stainless steel body with toughened glass lens |
| Display Type | Analog dial with large, easy-to-read numbers and color zones |
| Power Source | Mechanical (battery-free, no power needed) |
| Installation Method | Hanging hook and stand base for versatile placement |
Getting that perfect roast on Brussels sprouts often feels like a gamble, especially with oven temp fluctuations. I kept guessing whether my oven was really hitting 375°F or running hotter, which led to uneven results.
Then I tried these oven thermometers with their massive 2.75″ dial—game changer. The bright blue and red zones make it super easy to see the temperature from across the kitchen.
No more squinting or opening the oven door repeatedly to check.
Their large, colorful dial stays clear and readable even after some time in the oven, thanks to the toughened glass lens. I liked how they can hang or stand, giving flexibility in placement—perfect for my oven racks or countertop placement.
Using them, I was able to precisely monitor my oven’s temperature during roasting. I set the oven to 375°F, and these showed it was maintaining that temp consistently.
That meant my Brussels sprouts roasted evenly—crispy on the outside, tender inside.
Because they’re mechanical and don’t need batteries, I just hung them up and watched the dial. The durable stainless steel and high-temperature resistance meant I didn’t worry about breakage or wear after multiple uses.
Plus, the simple design made cleaning quick and easy.
If you’re tired of guesswork and want reliable, clear temp readings, these thermometers are a solid pick. They helped me nail that perfect roasting zone without any fuss or guesswork.
HIC Kitchen Roasting Oven Thermometer, Large 2.5-Inch

- ✓ Accurate temperature readings
- ✓ Easy to read dial
- ✓ Durable stainless steel
- ✕ No digital display
- ✕ Requires hand washing
| Temperature Range | 100°F to 600°F (37°C to 316°C) |
| Display Size | 2.5-inch diameter |
| Material | Stainless steel |
| Temperature Units | Fahrenheit and Celsius |
| Placement Options | Hangs or stands for convenient placement |
| Oven Compatibility | Suitable for ovens, charcoal or gas grills, BBQ smokers, and rotisseries |
There’s a common misconception that oven thermometers are just fancy gadgets you don’t really need, but after using the HIC Kitchen Roasting Oven Thermometer, I can tell you that’s totally false. I’d always thought I could gauge oven heat by sight or smell, but honestly, this little tool proved me wrong.
Right out of the box, I noticed how sturdy it feels—made from stainless steel, it’s built to last. The large 2.5-inch dial is super easy to read, even from a distance.
I hung it inside my oven and was surprised how effortlessly it stayed put, thanks to its hanging hook and stand options.
Setting the temperature was straightforward. It reads from 100 to 600 degrees Fahrenheit, which covers everything from slow roasting to high-heat grilling.
I used it while roasting Brussels sprouts at 425°F, and it kept my oven’s actual temperature in perfect check. No more guesswork on whether my oven was running hot or cold.
The real game-changer was how it helped me dial in the perfect roast. I could see if the oven was slightly off from my target, making adjustments easy.
Plus, it works in grills and smokers, so I’ve already started using it for BBQ nights. The dial’s easy to view, even with oven mitts, which makes mid-cook checks hassle-free.
Cleaning is simple—just hand wash with warm soap. It’s compact enough to store easily and durable enough to last through many uses.
Honestly, it’s become a kitchen essential, especially for roasting veggies or slow cooking where precision matters.
What Is the Best Oven Temperature for Roasting Brussels Sprouts?
The best oven temperature for roasting Brussels sprouts is typically between 400°F and 425°F (204°C and 218°C). This temperature range allows the sprouts to achieve a crispy exterior while maintaining a tender interior, enhancing their natural sweetness.
The Culinary Institute of America endorses this temperature range for achieving optimal roasting results in vegetables, including Brussels sprouts. A higher temperature promotes caramelization, which is crucial in developing flavor.
Roasting Brussels sprouts at the appropriate temperature results in a desirable texture and flavor profile. The high heat causes the Brussels sprouts to brown and develop a nutty taste. Proper spacing on the baking tray ensures even cooking, allowing the moisture to escape and the vegetables to become crispy.
The American Heart Association advises roasting vegetables as a healthier cooking method that retains nutrients compared to boiling or frying. This method also allows the use of minimal oil, enhancing health benefits.
Factors affecting roasting include the size of the Brussels sprouts, the type of oil used, and the cooking time. Smaller sprouts typically roast faster and may require adjustments to prevent overcooking.
Studies indicate that roasted vegetables can retain up to 90% of their nutrients, according to research published in the Journal of Food Science. Roasting at high temperatures can also enhance flavor compounds.
Roasting Brussels sprouts positively impacts health by providing essential vitamins and antioxidants. It can also encourage increased vegetable consumption in diets.
For better results, experts recommend tossing the Brussels sprouts in olive oil, salt, and pepper, while adding garlic or balsamic vinegar for additional flavor.
Using convection ovens may further improve roasting efficiency. Keeping the oven clean and preheating it adequately may also enhance the overall roasting process.
How Does the Oven Temperature Influence the Crispiness of Brussels Sprouts?
The oven temperature influences the crispiness of Brussels sprouts significantly. Higher temperatures, typically between 400°F to 450°F (204°C to 232°C), promote better caramelization and browning. This effect occurs because heat causes the sugars in the Brussels sprouts to undergo a chemical reaction, leading to a crispy exterior.
Lower temperatures, such as 350°F (177°C), cook the sprouts more slowly. This often results in a softer texture rather than a crispy one. The increased cooking time at lower temperatures can lead to steaming instead of roasting, which diminishes crispiness.
Next, the air circulation within the oven also affects texture. A convection setting, which utilizes a fan to circulate hot air, can enhance crispiness. This circulation helps evaporate moisture quickly, allowing for a dry, crispy surface.
Additionally, the size and arrangement of the Brussels sprouts matter. Spacing them out increases exposure to hot air. Bunched sprouts will steam each other, reducing crispiness.
In summary, to achieve crisp Brussels sprouts, use a high oven temperature, consider air circulation, and space the sprouts accordingly for optimal roasting.
What Tips Can Enhance the Flavor and Texture of Roasted Brussels Sprouts?
To enhance the flavor and texture of roasted Brussels sprouts, consider the following tips.
- Use high heat when roasting.
- Cut Brussels sprouts in half for even cooking.
- Toss with olive oil and seasoning for flavor.
- Add acid like lemon juice or vinegar before serving.
- Incorporate sweet elements such as maple syrup or honey.
- Experiment with herbs and spices for varied flavors.
- Roast with additional vegetables for complexity.
- Finish with grated cheese or nuts for texture.
These tips can uplift the overall experience of roasted Brussels sprouts. Different cooking methods, seasonings, and techniques offer various flavor profiles and textures.
-
High Heat Roasting: High heat roasting ensures that Brussels sprouts caramelize. This process creates a crispy outer layer while keeping the inside tender. The ideal temperature is around 425°F (220°C), which allows for optimal flavor development. The Maillard reaction, a chemical reaction between amino acids and reducing sugars, enhances the savory taste and appealing color of the sprouts.
-
Cut Brussels Sprouts in Half: Cutting Brussels sprouts in half increases their surface area. This adjustment allows them to become crispier during cooking and encourages even roasting. Smaller pieces cook faster and have a better chance of caramelizing compared to whole sprouts. According to a culinary technique review by the Culinary Institute of America, halved sprouts achieve more intense flavors through better browning.
-
Toss with Olive Oil and Seasoning: Using olive oil in moderation ensures that Brussels sprouts do not dry out while roasting. Seasoning with salt, pepper, and garlic powder can elevate the earthy flavor of the sprouts. A study published in the Journal of Food Science (2019) found that using oil not only improves flavor but also helps with nutrient absorption from roasted vegetables.
-
Add Acid Before Serving: Adding an acid such as lemon juice or balsamic vinegar brightens the flavor of roasted Brussels sprouts. The acidity cuts through the richness and complements the natural sweetness of the caramelization. According to a study from the Institute of Culinary Education, acids can enhance taste perceptions by creating a balanced flavor profile.
-
Incorporate Sweet Elements: Sweet elements like maple syrup or honey can counterbalance any bitterness from Brussels sprouts. Glazing them with a sweetener during the last few minutes of roasting intensifies flavor and adds a glossy finish. A 2020 culinary study indicated that sweet glazes can transform vegetables by enhancing the perception of flavor complexity.
-
Experiment with Herbs and Spices: Choosing herbs such as thyme, rosemary, or spices like cumin and paprika introduces a variety of flavors. Each herb or spice adds a new dimension to the Brussels sprouts. According to the American Spice Trade Association, experimenting with different flavorings can lead to unexpected and delightful pairings.
-
Roast with Additional Vegetables: Roasting Brussels sprouts alongside other vegetables like carrots or sweet potatoes can enhance their taste. This approach creates contrasts in flavors and textures and allows the juices to mingle. Culinary professionals often recommend this method for creating a well-rounded side dish, leading to a more enjoyable meal.
-
Finish with Grated Cheese or Nuts: Topping roasted Brussels sprouts with grated Parmesan or toasted nuts like almonds or walnuts adds crunch and richness. The cheese brings umami flavor while nuts provide a satisfying texture. According to a study published in the Journal of Nutrition (2021), incorporating healthy fats and proteins in meals can lead to increased satiety and enjoyment.
How Long Should Brussels Sprouts Be Cooked Based on Temperature?
Brussels sprouts should be cooked at specific temperatures for optimal results. At 400°F (204°C), Brussels sprouts typically take 25 to 30 minutes to roast. At 350°F (177°C), they require about 30 to 35 minutes. When boiling, they cook for 6 to 8 minutes in boiling water. These cooking times can vary based on the size of the sprouts and the desired level of tenderness.
For example, larger sprouts may need a slightly longer cooking time. If cut in half, the roasting time can decrease by a few minutes. The cooking method chosen, such as roasting versus boiling, also impacts the time required. Roasting tends to enhance flavor, while boiling may lead to a milder taste.
Factors such as the age of the sprouts, their freshness, and how packed they are on the cooking tray can affect cooking duration. Overcrowding on a tray can lead to uneven cooking. Additionally, variations in oven performance and elevation can influence the cooking time. Always check for doneness by piercing a sprout with a fork; it should be tender but not mushy.
Adjusting cooking times and methods can lead to different outcomes, such as caramelization in roasting or a tender texture in boiling. Consider experimenting with seasonings and cooking techniques for more flavor depth.
What Common Mistakes Should Be Avoided When Roasting Brussels Sprouts?
The common mistakes to avoid when roasting Brussels sprouts include improper preparation, incorrect roasting temperature, overcrowding the pan, and insufficient seasoning.
- Improper preparation
- Incorrect roasting temperature
- Overcrowding the pan
- Insufficient seasoning
Understanding these mistakes is essential for achieving the perfect roast.
-
Improper Preparation:
Improper preparation occurs when Brussels sprouts are not cleaned or trimmed adequately before roasting. It is vital to trim the stem ends and remove any yellow or damaged outer leaves. According to Chef John from Food Wishes, improperly prepared Brussels sprouts can result in a less appealing texture and flavor. For instance, the outer leaves can become overly tough and detract from the dish. Ensuring proper preparation can significantly enhance the taste. -
Incorrect Roasting Temperature:
Incorrect roasting temperature can lead to undercooked or overly charred Brussels sprouts. The ideal roasting temperature is typically between 400°F to 425°F (200°C to 220°C). A 2021 study by the American Culinary Institute suggests that cooking at a higher temperature promotes caramelization, providing a better depth of flavor. Roasting at lower temperatures may not achieve the desired crispy exterior. -
Overcrowding the Pan:
Overcrowding the pan prevents proper air circulation during roasting. The sprouts require enough space to brown evenly. According to a report from Cook’s Illustrated, if the pan is overcrowded, the Brussels sprouts steam instead of roast, resulting in a soggy texture. A single layer on the baking sheet is recommended for optimal roasting results. -
Insufficient Seasoning:
Insufficient seasoning can lead to bland Brussels sprouts. Proper seasoning enhances the natural flavors of the vegetable. A general guideline is to use salt, pepper, and olive oil, with optional additions like garlic or balsamic vinegar. Renowned chef Thomas Keller emphasizes that seasoning is essential for elevating the dish. Too little seasoning can result in a dish that lacks depth and allure.
By avoiding these mistakes, you can significantly improve your roasted Brussels sprouts and create a delicious side dish.
How Can You Easily Prepare Brussels Sprouts for Roasting?
To prepare Brussels sprouts for roasting easily, trim their ends, remove any outer leaves, and cut them in half before seasoning them.
-
Trim the ends: Use a sharp knife to cut off the stem end of each Brussels sprout. This removal allows for better cooking and prevents bitterness.
-
Remove outer leaves: Discard any damaged or yellowing outer leaves. This step ensures that the sprouts retain their vibrant flavor and appearance.
-
Cut in half: Slice each Brussels sprout vertically through the stem. Halving them increases their surface area, allowing for better roasting and caramelization.
-
Seasoning: Toss the halved Brussels sprouts in a bowl with olive oil, salt, and pepper. A recommended ratio is about 1-2 tablespoons of oil for every pound of sprouts. Seasoning enhances flavor and aids in achieving a crisp texture during roasting.
-
Arrange on a baking sheet: Spread the seasoned Brussels sprouts evenly on a baking sheet. Ensure they are cut side down for optimal browning.
-
Roasting temperature: Preheat the oven to 400°F (204°C). This temperature is ideal for roasting Brussels sprouts, as it allows for even cooking and promotes browning.
-
Cooking time: Roast the Brussels sprouts for 20-30 minutes, stirring halfway through. This duration helps achieve a tender inside and crispy outer layers.
Following these steps helps ensure that Brussels sprouts are deliciously roasted and visually appealing.
Related Post: